×
- Hello
- Login or Register
- Quick Links
- Live Chat
- Track Order
- Parts Availability
- RMA
- Help Center
- Contact Us
- Shop for
- Volkswagen Parts
My Garage
My Account
Cart
Genuine Volkswagen Cabrio Car Bulbs
- Select Vehicle by Model
- Select Vehicle by VIN
Select Vehicle by Model
orMake
Model
Year
Select Vehicle by VIN
For the most accurate results, select vehicle by your VIN (Vehicle Identification Number).
14 Car Bulbs found

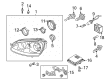
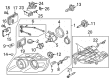
Volkswagen Cabrio Headlamps Part Number: N-101-301-01
$12.81 MSRP: $21.00You Save: $8.19 (39%)Ships in 1-2 Business Days
Volkswagen Cabrio Bulb Part Number: N-100-666-02
$15.49 MSRP: $25.40You Save: $9.91 (40%)
Volkswagen Cabrio Bulb Part Number: N-017-723-4
$2.12 MSRP: $2.67You Save: $0.55 (21%)Ships in 1-2 Business Days
Volkswagen Cabrio Bulb Part Number: N-903-605-01
$2.49 MSRP: $3.13You Save: $0.64 (21%)Ships in 1-2 Business Days
Volkswagen Cabrio Bulb Part Number: N-017-726-2
$2.64 MSRP: $3.32You Save: $0.68 (21%)Ships in 1-2 Business Days
Volkswagen Cabrio Bulb Part Number: N-017-718-6
$2.76 MSRP: $3.47You Save: $0.71 (21%)Ships in 1-2 Business Days
Volkswagen Cabrio Bulb Part Number: N-017-725-2
$2.76 MSRP: $3.47You Save: $0.71 (21%)Ships in 1-2 Business Days
Volkswagen Cabrio Bulb Part Number: N-017-732-2
$3.25 MSRP: $4.10You Save: $0.85 (21%)Ships in 1-2 Business Days
Volkswagen Cabrio Turn Signal Bulb Part Number: N-104-759-01
$3.31 MSRP: $4.17You Save: $0.86 (21%)Ships in 1-2 Business Days
Volkswagen Cabrio Bulb Part Number: N-017-738-6
$3.75 MSRP: $4.72You Save: $0.97 (21%)Ships in 1-2 Business Days
Volkswagen Cabrio Bulb Part Number: N-017-753-5
$4.68 MSRP: $5.91You Save: $1.23 (21%)Ships in 1-2 Business Days
Volkswagen Cabrio Bulb Part Number: N-017-762-2
$7.78 MSRP: $9.82You Save: $2.04 (21%)Ships in 1-2 Business Days
Volkswagen Cabrio Headlamps Part Number: N-101-300-01
$18.04 MSRP: $22.75You Save: $4.71 (21%)Ships in 1-2 Business Days
Volkswagen Cabrio Headlamp Bulb Part Number: N-103-201-02
$19.26 MSRP: $24.29You Save: $5.03 (21%)Ships in 1-2 Business Days
Volkswagen Cabrio Car Bulbs
Choose OEM Car Bulbs for superior quality and long-lasting durability. They match the Volkswagen's factory specifications exactly and pass strict quality control. If you plan to replace Car Bulbs on your Cabrio, put OEM at the top of your list. You'll get the right fit, reliable performance, and peace of mind. We stock an extensive inventory of genuine Volkswagen Cabrio parts. It is easy to find what you need. You will love our competitive prices that help you save. No more hassle with returns or guesswork. Every part includes a warranty straight from the manufacturer. Get trusted quality, strong durability, and real value today.
Volkswagen Cabrio Car Bulbs Parts and Q&A
- Q: How to safely and correctly renew exterior Car Bulbs on Volkswagen Cabrio?A:When changing the bulb, the negative cable of the battery should be removed before one commences working but it is important to have the correct activation code of any anti-theft stereo system. You should be careful because the bulb can be very hot especially after use. Inspect the bulb contacts and holder of the bulb and cleansing off corrosion or dirt and then install a new bulb. In the case of a bayonet like bulb, make sure that the terminal contacts are firmly in contact with the bulb contact. Always fit in the appropriate rating of the new bulb and always keep it clean particularly in head-light and foglight bulbs. Engine compartment - access cover Removing the access cover to the rear of the headlight unit, disconnection of the wiring connector to the bulb and rotation of the bulb holder to release it. Use a tissue or clean cloth to touch the new bulb and in case touched, use rubbing alcohol to clean. Fit the new bulb in place, re-fix the wiring and refit the access cover. On the front sidelight, lift the access cover, pull out the bulbholder and then unscrew the bulb by pressing and twisting counterclockwise and then reverse and retighten. In the case of the front direction indicator, simply pry out the reflector and then release the retaining clip and twist the bulbholder to take it out and then install it back in. When replacing the front direction indicator repeater on the light side, remove the light out of the fender using the tool, remove the unit and extract the capless bulb by pulling it out. In the case of the front foglight, pry out the reflector, then remove the screws that hold the reflector on and disconnect the wiring on the bullet before unconnection of the spring clip in order to remove the bulb. Install the new bulb, carefully, affix with the spring clip, rearrange the wiring, and re-fit the beam in the bumper, and a beam aim check may be required. In the case of the rear light cluster, the cover has to be unlocked in the luggage compartment and the bulbholder assembly is to be released after which the relevant bulb should be replaced making sure that it is correctly fixed. In the case of license plate light, screws that hold the lens can be removed to remove the lens and verify the seal is not damaged and to replace the capless bulb by pushing it back in place and then replacing the seal and the lens without over tightening the screws.
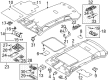
- Q: How to replace different types of interior car bulbs on Volkswagen Cabrio?A:To change the courtesy light, a small and flat-bladed screwdriver is used to carefully lift the light lens and to free the bulb in the light unit contacts and then install the new bulb in place and then re-connect the light lens. To install the front seat reading light, gently poke the courtesy light assembly out of the overhead console, unconnect the wiring connections and use the bulbholder to unscrew the bulb then slip the new bulb in, reattach the holder, reconnect the wiring, and re-poke the unit back in place. For the rear seat reading lamp, the process is the same: push out the light unit, break a connection of the lighting, take away the bulb, fit the new bulb, reconnect the wiring, and re-clip the unit. To perform maintenance on instrument panel illumination and warning lights, loosen the instrument panel, counterclockwise twist the bulbholder to extract it, make sure that the new bulbs fit the appropriate rating and replace the bulbholder and instrument panel. In the case of the glovebox illumination light, open the glovebox, extract the light assembly, unscrew the bulb, fit the new bulb and reconnect the unit. In the case of the cassette storage box illumination bulb, simply slide the storage box out, unhook the wiring, disconnect the holding clips, take out the bulb and then reconnect in the opposite order. In the case of the cigarette lighter/ashtray illumination bulb, you will have to carefully pry the surround, remove screws to unlock the control unit, open the back of the cigarette lighter, unclip the bulbholder and replace the bulb then put the parts back together in the order in which they were removed. In case of heater control panel illumination bulb, remove the panel, disconnect the wiring, unclip the bulbholder, remove the bulb and re-attach in the same order. Finally, switch illumination lamps are attached to the switch assembly and the entire assembly must be replaced to change bulbs.


