×
- Hello
- Login or Register
- Quick Links
- Live Chat
- Track Order
- Parts Availability
- RMA
- Help Center
- Contact Us
- Shop for
- Volkswagen Parts
My Garage
My Account
Cart
Genuine Volkswagen Golf Engine Oil Cooler
Oil Cooler- Select Vehicle by Model
- Select Vehicle by VIN
Select Vehicle by Model
orMake
Model
Year
Select Vehicle by VIN
For the most accurate results, select vehicle by your VIN (Vehicle Identification Number).
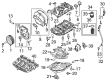
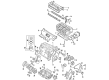
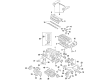
8 Engine Oil Coolers found


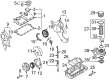
Volkswagen Golf Cooler Part Number: 068-117-021-B
$317.19 MSRP: $433.32You Save: $116.13 (27%)Ships in 1-2 Business Days


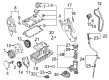
Volkswagen Golf Oil Cooler Part Number: 028-117-021-L
$329.39 MSRP: $449.99You Save: $120.60 (27%)Ships in 1-2 Business Days


Volkswagen Golf Oil Cooler Part Number: 07K-117-021-C
$365.99 MSRP: $499.98You Save: $133.99 (27%)Ships in 1-2 Business Days
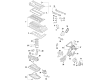
Volkswagen Golf Oil Cooler Part Number: 04E-117-021-K
$232.04 MSRP: $324.98You Save: $92.94 (29%)Ships in 1-2 Business Days

Volkswagen Golf Oil Cooler Part Number: 06L-117-021-G
$274.49 MSRP: $374.98You Save: $100.49 (27%)Ships in 1-2 Business Days
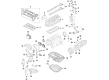
Volkswagen Golf Oil Cooler Part Number: 06K-117-021-K
$308.04 MSRP: $420.82You Save: $112.78 (27%)Ships in 1-2 Business Days
Volkswagen Golf Oil Cooler Part Number: 068-117-021-BX
$317.19 MSRP: $433.32You Save: $116.13 (27%)Ships in 1-2 Business Days
Volkswagen Golf Oil Cooler Part Number: 038-117-021-E
$457.49 MSRP: $624.99You Save: $167.50 (27%)Ships in 1-2 Business Days
Volkswagen Golf Engine Oil Cooler
Choose OEM Engine Oil Cooler for superior quality and long-lasting durability. They match the Volkswagen's factory specifications exactly and pass strict quality control. If you plan to replace Engine Oil Cooler on your Golf, put OEM at the top of your list. You'll get the right fit, reliable performance, and peace of mind. We stock an extensive inventory of genuine Volkswagen Golf parts. It is easy to find what you need. You will love our competitive prices that help you save. No more hassle with returns or guesswork. Every part includes a warranty straight from the manufacturer. Get trusted quality, strong durability, and real value today.
Volkswagen Golf Engine Oil Cooler Parts and Q&A
- Q: How to replace the Engine Oil Cooler on Volkswagen Golf?A:Lift the front part of the car and place it on jackstands. Working below the vehicle drain the engine coolant and remove the lower splash shield that is beneath the engine. In the case of 1.4L engines, the intake manifold must be removed and the mounting bolts of the oil cooler must be removed followed by the removal of the cooler on the side of the engine. De-assemble the four O-rings of the engine block and fit new ones. Install new O-rings to the engine block, and then fix the oil cooler and tighten the mounting bolts to the required torque. The other steps are the opposite of the removal. Recharge engine oil, coolant, and start the engine and look at leaks. With 1.8L and 2.0L engines, take out the oil filter and unscrew the electrical connectors immediately below the filter. Unscrew the mounting bolt of the oil dipstick tube, disconnect the tube on the timing chain cover and push it forward. Eliminate the fan shroud, air inlet duct and charge air cooler inlet pipe. Unconnect the electrical connector to the air conditioning compressor, and take out the compressor mounting bolts, and fix the compressor out of the mounting bracket of the sub-assembly. Take out the intake manifold support and the alternator of the sub-assembly mounting bracket. Unclip the harness of the sub-assembly bracket, disconnect the electrical connectors of the oil pressure regulator valve and the electrical connectors to the oil pressure switch and take the harness out of the way. Insert the sub-assembly mounting bracket bolts in reverse sequence of installation and slide the sub-assembly forward until the oil cooler-to-coolant pump housing connector is loosened, and then remove the sub-assembly bracket. Take out the oil cooler mounting bolts and remove the cooler out of the sub-assembly bracket. When very much of metal shavings or other debris is detected in the engine oil, wipe the areas of oil channels clean and change the engine oil cooler to avoid further damage. Disassemble and install a new seal to the oil cooler and install the new seal in the grooves of the sub-assembly bracket making sure that it is correctly positioned in the mounting bracket and the mounting bolts are properly installed to the required torque. Mount the sub-assembly bracket to the engine and screw the mounting bolts in turn to the recommended torque. The other steps are the opposite of the removal. Recharge engine oil, coolant, and start the engine and look at leaks.

Related Volkswagen Golf Parts
 Volkswagen Golf Air Injection Pump
 Volkswagen Golf Alternator Bearings
 Volkswagen Golf Brake Shoe Set
 Volkswagen Golf Crankshaft
 Volkswagen Golf Exhaust Clamp
 Volkswagen Golf Fuel Cap
 Volkswagen Golf Fuel Filler Housing
 Volkswagen Golf Fuel Level Sensor
 Volkswagen Golf Intake Valve
 Volkswagen Golf Oil Drain Plug Gasket
 Volkswagen Golf Power Steering Hose
 Volkswagen Golf Transmission Control Module
Browse by Year
2021 Engine Oil Cooler 2020 Engine Oil Cooler 2019 Engine Oil Cooler 2018 Engine Oil Cooler 2017 Engine Oil Cooler 2016 Engine Oil Cooler 2015 Engine Oil Cooler 2014 Engine Oil Cooler 2013 Engine Oil Cooler 2012 Engine Oil Cooler 2011 Engine Oil Cooler 2010 Engine Oil Cooler 2006 Engine Oil Cooler 2005 Engine Oil Cooler 2004 Engine Oil Cooler 2003 Engine Oil Cooler 2002 Engine Oil Cooler 2001 Engine Oil Cooler 2000 Engine Oil Cooler 1999 Engine Oil Cooler 1998 Engine Oil Cooler 1997 Engine Oil Cooler 1996 Engine Oil Cooler 1995 Engine Oil Cooler 1994 Engine Oil Cooler 1993 Engine Oil Cooler