×
- Hello
- Login or Register
- Quick Links
- Live Chat
- Track Order
- Parts Availability
- RMA
- Help Center
- Contact Us
- Shop for
- Volkswagen Parts
My Garage
My Account
Cart
Genuine Volkswagen Golf SportWagen Automatic Transmission Seal
- Select Vehicle by Model
- Select Vehicle by VIN
Select Vehicle by Model
orMake
Model
Year
Select Vehicle by VIN
For the most accurate results, select vehicle by your VIN (Vehicle Identification Number).
2 Automatic Transmission Seals found

Volkswagen Golf SportWagen Seal Part Number: 0CQ-525-596-A
$39.83 MSRP: $55.32You Save: $15.49 (28%)Ships in 1-2 Business Days
Volkswagen Golf SportWagen Oil Seal Part Number: 0CN-409-464
$6.28 MSRP: $10.30You Save: $4.02 (40%)Ships in 1-2 Business Days
Volkswagen Golf SportWagen Automatic Transmission Seal
Choose OEM Automatic Transmission Seal for superior quality and long-lasting durability. They match the Volkswagen's factory specifications exactly and pass strict quality control. If you plan to replace Automatic Transmission Seal on your Golf SportWagen, put OEM at the top of your list. You'll get the right fit, reliable performance, and peace of mind. We stock an extensive inventory of genuine Volkswagen Golf SportWagen parts. It is easy to find what you need. You will love our competitive prices that help you save. No more hassle with returns or guesswork. Every part includes a warranty straight from the manufacturer. Get trusted quality, strong durability, and real value today.
Volkswagen Golf SportWagen Automatic Transmission Seal Parts and Q&A
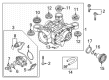
- Q: How to remove the Automatic Transmission Seal and Transfer Case, also known as the Bevel Box on Volkswagen Golf SportWagen?A:This is only applicable to Golf AWD models and is what is referred to as the Bevel Box. The first step is to lift the car and to firmly balance it on jackstands and empty the transaxle and transfer case fluid. Unscrew the Driveshaft off the transfer case flange and hold it out of the way, including the driveshaft heat shield in the process. The next step will be to take off the driveaxle heat shield and driveaxle of the passenger, then the front exhaust bracket of the sub-frame. In models containing DSG transaxles, it is required to disconnect the exhaust at the connection after the bracket and attach it beneath the vehicle. In other models, all except the transaxle, with DSG transaxles, have the lower transaxle mount bolts removed and the mount and transaxle are removed as well, and the engine is turned forward, mounted with a piece of wood. Take out the bolt that connects the passenger driveaxle flange to the transfer case and remove any electrical connection or harnesses that might not allow the transfer case to be removed. Take off the transaxle support bracket and the transmission of the engine, and in the later models with DSG transaxle, the front subframe. Unscrew the bolts using which the transfer case is fitted to the transaxle, positioning a drain pan under the transaxle to receive any fluid in case during the following procedures, and take the transfer case off the transaxle very carefully. The opposite of removal is installation and it is important to ensure that the fasteners are tightened to the required torque and transaxle and transfer case-fluid is properly refilled and it is easy. The same process is used when replacing the input shaft seals as the Front Axle Differential Lock input seals, with the difference being the emphasis being on the small input shaft seal of the outside of the output shaft after the removal of the output shaft and flange. The process associated with changing the driveaxle output shaft seal resembles that of the Front Axle Differential Lock output seal and it can be done with the transfer case in the vehicle. The driveshaft output shaft seal is changed with the transfer case removed; the first step is to take the output shaft flange nut off and with a puller to take the flange off the transfer case followed by a press to take the bearing off the flange and pry the seal off the transfer case housing. To install, insert the bearing in the race in the transfer case, wipe the new contact surfaces of the seals with grease, and press the new seal into the transfer case with the open end pressed against the housing. Installation Reverse of removal Press the flange onto the shaft with a puller and tighten the flange nut to the recommended torque.

Related Volkswagen Golf SportWagen Parts
 Volkswagen Golf SportWagen Belt Tensioner Bolt
 Volkswagen Golf SportWagen Coolant Pipe
 Volkswagen Golf SportWagen Driveshaft
 Volkswagen Golf SportWagen Exhaust Heat Shield
 Volkswagen Golf SportWagen Intercooler Hose
 Volkswagen Golf SportWagen Lift Support
 Volkswagen Golf SportWagen Oil Dipstick
 Volkswagen Golf SportWagen Parking Brake Cable
 Volkswagen Golf SportWagen Timing Cover
 Volkswagen Golf SportWagen Valve Spring Retainer