×
- Hello
- Login or Register
- Quick Links
- Live Chat
- Track Order
- Parts Availability
- RMA
- Help Center
- Contact Us
- Shop for
- Volkswagen Parts
My Garage
My Account
Cart
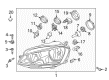
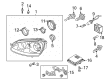
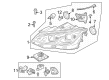
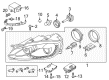
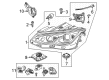
Genuine Volkswagen GTI Headlight
Headlamp- Select Vehicle by Model
- Select Vehicle by VIN
Select Vehicle by Model
orMake
Model
Year
Select Vehicle by VIN
For the most accurate results, select vehicle by your VIN (Vehicle Identification Number).
24 Headlights found


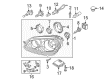
Volkswagen GTI Headlamp Assembly Part Number: 1K6-941-005-S
$215.89 MSRP: $302.37You Save: $86.48 (29%)Ships in 1-2 Business Days


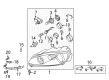
Volkswagen GTI Headlamp Assembly Part Number: 5K0-941-005-C
$229.60 MSRP: $321.56You Save: $91.96 (29%)Ships in 1-2 Business Days


Volkswagen GTI Headlamp Assembly Part Number: 5GM-941-006-C
$267.89 MSRP: $365.98You Save: $98.09 (27%)Ships in 1-2 Business Days

Volkswagen GTI Headlamp Assembly Part Number: 5GM-941-005-E
$279.65 MSRP: $382.02You Save: $102.37 (27%)Ships in 1-2 Business Days

Volkswagen GTI Headlamp Assembly Part Number: 5GM-941-006-E
$324.76 MSRP: $443.67You Save: $118.91 (27%)Ships in 1-2 Business Days

Volkswagen GTI Headlamp Assembly Part Number: 1K6-941-006-S
$462.59 MSRP: $631.95You Save: $169.36 (27%)Ships in 1-2 Business Days


Volkswagen GTI Headlamp Assembly Part Number: 5GM-941-005-C
$459.53 MSRP: $627.76You Save: $168.23 (27%)Ships in 1-2 Business Days


Volkswagen GTI Headlamp Assembly Part Number: 1K6-941-039-B
$410.65 MSRP: $561.00You Save: $150.35 (27%)Ships in 1-2 Business Days

Volkswagen GTI Headlamp Assembly Part Number: 1K6-941-040-B
$410.65 MSRP: $561.00You Save: $150.35 (27%)Ships in 1-2 Business Days


Volkswagen GTI Headlamp Assembly Part Number: 5K0-941-753-B
$728.93 MSRP: $995.82You Save: $266.89 (27%)Ships in 1-2 Business Days


Volkswagen GTI Headlamp Assembly Part Number: 5H0-941-030-D
$934.69 MSRP: $1276.91You Save: $342.22 (27%)Ships in 1-2 Business DaysVolkswagen GTI Headlamp Assembly Part Number: 5K0-941-006-C
$281.82 MSRP: $385.00You Save: $103.18 (27%)Ships in 1-2 Business Days
Volkswagen GTI Headlamp Assembly Part Number: 5K0-941-754-C
$728.82 MSRP: $995.75You Save: $266.93 (27%)Ships in 1-2 Business DaysVolkswagen GTI Headlamp Assembly Part Number: 5K0-941-753-C
$791.16 MSRP: $1080.79You Save: $289.63 (27%)Ships in 1-2 Business DaysVolkswagen GTI Headlamp Assembly Part Number: 5K0-941-754-B
$796.59 MSRP: $1088.25You Save: $291.66 (27%)Ships in 1-2 Business Days
Volkswagen GTI Headlamp Assembly Part Number: 5H0-941-113-D
$921.32 MSRP: $1258.63You Save: $337.31 (27%)Ships in 1-2 Business DaysVolkswagen GTI Headlamp Assembly Part Number: 5H0-941-114-D
$921.32 MSRP: $1258.63You Save: $337.31 (27%)Ships in 1-2 Business Days
Volkswagen GTI Headlamp Assembly Part Number: 5H0-941-114-E
$885.88 MSRP: $1210.24You Save: $324.36 (27%)Ships in 1-2 Business DaysVolkswagen GTI Headlamp Assembly Part Number: 5H0-941-113-E
$925.63 MSRP: $1264.52You Save: $338.89 (27%)Ships in 1-2 Business DaysVolkswagen GTI Headlamp Assembly Part Number: 5H0-941-029-D
$958.77 MSRP: $1309.79You Save: $351.02 (27%)Ships in 1-2 Business Days
| Page 1 of 2 |Next >
1-20 of 24 Results
Volkswagen GTI Headlight
Choose OEM Headlight for superior quality and long-lasting durability. They match the Volkswagen's factory specifications exactly and pass strict quality control. If you plan to replace Headlight on your GTI, put OEM at the top of your list. You'll get the right fit, reliable performance, and peace of mind. We stock an extensive inventory of genuine Volkswagen GTI parts. It is easy to find what you need. You will love our competitive prices that help you save. No more hassle with returns or guesswork. Every part includes a warranty straight from the manufacturer. Get trusted quality, strong durability, and real value today.
Volkswagen GTI Headlight Parts and Q&A
- Q: What specific steps are required for the removal and installation of headlight housing on Volkswagen GTI?A:Headlight housing have to be removed and installed in a particular way in models with halogen bulbs. The first thing is to unplug the electrical harness connector on the headlight housing. The next step is to take off the front bumper cover. Then remove the headlight housing fasteners, and proceed to coax the headlight housing out towards the horizontal. Installation: Re-installation should follow the sequence of removal i.e. the two main upper screws first, then the inner forward screw, and lastly the rear screw. Moreover, the procedures of re-adjusting the headlight are to be adhered to.
- Q: How should headlights be adjusted on Volkswagen GTI?A:Some models are equipped with a headlight leveling system, and this adjustment procedure will not apply to those models; have the headlights adjusted by a dealer service department or other qualified repair shop. There are several methods of adjusting the headlights, with the simplest requiring an open area with a blank wall and a level floor. Begin by positioning masking tape vertically on the wall in line with the vehicle centerline and the centerlines of both headlights, followed by a horizontal tape line in line with the centerline of all the headlights; it may be easier to position the tape with the vehicle parked only a few inches away. Adjustments should be made with the vehicle parked 25 feet from the wall, sitting level, with the gas tank half-full and no unusually heavy load, using low beam settings. The high intensity zone should be positioned two inches below the horizontal line and two inches to the side of the vertical headlight line, away from oncoming traffic, by turning the adjustment screws until the desired position is achieved; for up-and-down adjustments, remove the plug with a thin screwdriver, then turn the screw with a Phillips screwdriver, and reinstall the plug after adjustment, while side-to-side adjustments are made by turning the screw at the rear of the headlight housing. With the high beams on, the high intensity zone should be vertically centered with the exact center just below the horizontal line.


Related Volkswagen GTI Parts
 Volkswagen GTI Battery Hold Downs
 Volkswagen GTI Brake Hose
 Volkswagen GTI Door Hinge
 Volkswagen GTI Door Lock Switch
 Volkswagen GTI Door Moldings
 Volkswagen GTI Hood Release Cable
 Volkswagen GTI Ignition Lock Cylinder
 Volkswagen GTI Interior Lights
 Volkswagen GTI License Plate Lights
 Volkswagen GTI Liftgates
 Volkswagen GTI Power Seat Switch