×
- Hello
- Login or Register
- Quick Links
- Live Chat
- Track Order
- Parts Availability
- RMA
- Help Center
- Contact Us
- Shop for
- Volkswagen Parts
My Garage
My Account
Cart
Genuine Volkswagen Rabbit Liftgates
- Select Vehicle by Model
- Select Vehicle by VIN
Select Vehicle by Model
orMake
Model
Year
Select Vehicle by VIN
For the most accurate results, select vehicle by your VIN (Vehicle Identification Number).
2 Liftgates found

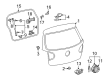
Volkswagen Rabbit Lift Gate Part Number: 1K6-827-025-H
$367.16 MSRP: $501.57You Save: $134.41 (27%)Ships in 1-2 Business Days
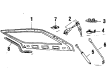
Volkswagen Rabbit Gate Part Number: 175-827-025-B
$43.20 MSRP: $60.00You Save: $16.80 (28%)
Volkswagen Rabbit Liftgates
Choose OEM Liftgates for superior quality and long-lasting durability. They match the Volkswagen's factory specifications exactly and pass strict quality control. If you plan to replace Liftgates on your Rabbit, put OEM at the top of your list. You'll get the right fit, reliable performance, and peace of mind. We stock an extensive inventory of genuine Volkswagen Rabbit parts. It is easy to find what you need. You will love our competitive prices that help you save. No more hassle with returns or guesswork. Every part includes a warranty straight from the manufacturer. Get trusted quality, strong durability, and real value today.
Volkswagen Rabbit Liftgates Parts and Q&A
- Q: How can the heavy and somewhat awkward liftgates be removed and installed on Volkswagen Rabbit?A:The/if/gate is large and to some extent cumbersome to take out and fix hence at least two individuals must carry out this task. It is important to start by unscrewing the liftgate and the fasteners of the trim panel/ grab handle at the mid point of the lower edge. Then remove the fasteners on the left and right ends, and then carefully lift the lower part of the trim panel of the liftgate, using just enough force to loosen the spring clips, and unclip the top part of the trim panel to the rear window frame. Unhook the wiring to the liftgate parts, and record the routing and connection points of the wires. Draw a line with a marker connecting the liftgate and the hinges. Using a small screwdriver to help in the liftgate, ensure you lift the retaining springs on both ends of the support strut, and then pry or pull out the strut off the ballstud to disconnect it. Cautiously peel away the hinge covers, then lift them off, and then remove the liftgate-to-hinge fasteners and push up the liftgate out of the car. Removal is the opposite of installation making sure that the liftgate is properly in position, fully tightening the hinge bolts. The latch assembly is adjustable up-and-down once the nuts are loosened and the closed position of the liftgate is adjustable by changing the position of the rubber liftgate stops on top of the opening. Unscrew the plastic cover on the liftgate stop and move the center adjusting screw in or out accordingly.

Related Volkswagen Rabbit Parts
 Volkswagen Rabbit Coil Springs
 Volkswagen Rabbit Door Lock
 Volkswagen Rabbit Door Lock Switch
 Volkswagen Rabbit Headlight Motor
 Volkswagen Rabbit Hood Release Cable
 Volkswagen Rabbit Pillar Panels
 Volkswagen Rabbit Power Steering Hose
 Volkswagen Rabbit Turn Signal Lights
 Volkswagen Rabbit Window Channel