×
- Hello
- Login or Register
- Quick Links
- Live Chat
- Track Order
- Parts Availability
- RMA
- Help Center
- Contact Us
- Shop for
- Volkswagen Parts
My Garage
My Account
Cart
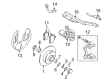
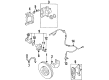
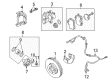
Genuine 2001 Volkswagen Cabrio Brake Pad Set
Disc Brake Pad Set- Select Vehicle by Model
- Select Vehicle by VIN
Select Vehicle by Model
orMake
Model
Year
Select Vehicle by VIN
For the most accurate results, select vehicle by your VIN (Vehicle Identification Number).
3 Brake Pad Sets found

2001 Volkswagen Cabrio Brake Pads Part Number: 1E0-698-451-G
$57.76 MSRP: $74.05You Save: $16.29 (22%)Ships in 1-2 Business DaysProduct Specifications- Other Name: Brake Lining; Brake Pad
- Replaces: 1E0-698-451, 1E0-698-451-D
- Item Weight: 4.60 Pounds
- Condition: New
- Fitment Type: Direct Replacement
- SKU: 1E0-698-451-G
- Warranty: This genuine part is guaranteed by Volkswagen's factory warranty.

2001 Volkswagen Cabrio Brake Pads Part Number: 1HM-698-151-A
$79.72 MSRP: $103.06You Save: $23.34 (23%)Ships in 1-2 Business DaysProduct Specifications- Other Name: Brake Lining; Brake Pad
- Replaces: 1HM-698-151, 357-698-151-A
- Item Weight: 4.30 Pounds
- Condition: New
- Fitment Type: Direct Replacement
- SKU: 1HM-698-151-A
- Warranty: This genuine part is guaranteed by Volkswagen's factory warranty.
2001 Volkswagen Cabrio Brake Pads Part Number: 6N0-698-151-A
$92.02 MSRP: $118.96You Save: $26.94 (23%)Ships in 1-2 Business DaysProduct Specifications- Other Name: Brake Lining; Brake Pad, Front Pad
- Item Weight: 4.40 Pounds
- Condition: New
- Fitment Type: Direct Replacement
- SKU: 6N0-698-151-A
- Warranty: This genuine part is guaranteed by Volkswagen's factory warranty.
2001 Volkswagen Cabrio Brake Pad Set Parts and Q&A
- Q: How can a front Brake Pad Set be installed and bedded-in for optimal braking efficiency on 2001 Volkswagen Cabrio?A: New pads will not offer the full braking efficiency until bedded-in so it should be avoided to be hard-braked in the first hundred miles of replacement. Start by loosening the lug bolts of the wheels, engaging the parking brake, lifting the front of the car and then firmly supporting it on jackstands to remove the front wheels. clean the brake system Clean the caliper and the area around it with the help of a drip pan and brake system cleaner. Unless it has a brake pad wear sensor connection, unconnect the wiring of this sensor, taking note of its routing and disengaging it of any retaining clips. To access better, pull the air deflector shield off the caliper, then loosen and take out the two caliper mounting bolts to pull the caliper off and make sure that it is fastened to the suspension strut so that it does not just hang off the brake hose. Disassemble the two brake pads and take out the anti-rattle springs, remembering where they are supposed to be installed, as they are not the same and can not be used in a different place. Check the thickness of individual brake pads and in case one of the pads is worn to the stipulated minimum length or even less, one should change all four pads. Oily or greasy pads are also to be replaced because there is no satisfactory method of making contaminated friction material degrees. Where any of the pads are unequally worn or contaminated, find and remedy the source and re-assemble. Ensure the spacers are easy to slide in caliper body bushings and clean the pad mounting area and the caliper. Check and examine the dust seal on the piston in case of damage caused and verify fluid leakage or corrosion. With a C-clamp, insert the caliper piston into the cylinder noticing that the level of the brake fluid does not spill. Install the new anti-rattle springs and pads and be sure that the friction material is toward the brake disc and then align the caliper over the pads and make sure that the pad warning sensor wiring is passed through the caliper aperture. Insert the caliper and place the mounting bolts and tighten them to the required torque without overstraining. Install air deflector shield (where fitted) and reconnect electrical connectors of wear sensor. Press the brake pedal a few times until the pads have brought the brake disc to a firm pressure that normal pedal pressure is regained. Repeat the process with the rest of the front brake caliper, attach the wheels, bring the vehicle down and screw the wheel bolts. Lastly, fill in the brake fluid level in the reservoir and add fluid where needed. In the case of Girling calipers, loosen the bottom caliper guide pin bolt, lift the caliper upwards, and take off the shim of the caliper piston then inspect the pads and caliper. Fit the pads so that the friction material is into contact with brake disc, place the piston at the bottom of the caliper bore and pop the shim. Slide the caliper down, then thread the pad warning sensor wiring inside the aperture of the caliper and then install the new guide pin bolt, tightening it, but holding on to the guide pin. Some brake pad wear sensors have wiring that is connected back into the brake pedal, depress the brake pedal until the pads reach the brake disc and repeat with the other caliper. Lastly, fit the wheels, lower the car, tighten bolts on the wheels and test the amount of brake fluid.
Related 2001 Volkswagen Cabrio Parts
 2001 Volkswagen Cabrio Axle Support Bushings
 2001 Volkswagen Cabrio Brake Dust Shield
 2001 Volkswagen Cabrio Car Bulbs
 2001 Volkswagen Cabrio Cup Holder
 2001 Volkswagen Cabrio Fuel Tank Strap
 2001 Volkswagen Cabrio Shock Absorber
 2001 Volkswagen Cabrio Spark Plug Wire
 2001 Volkswagen Cabrio Starter
 2001 Volkswagen Cabrio Steering Column Cover