×
- Hello
- Login or Register
- Quick Links
- Live Chat
- Track Order
- Parts Availability
- RMA
- Help Center
- Contact Us
- Shop for
- Volkswagen Parts
My Garage
My Account
Cart
Genuine 2005 Volkswagen Passat Crankshaft Seal
- Select Vehicle by Model
- Select Vehicle by VIN
Select Vehicle by Model
orMake
Model
Year
Select Vehicle by VIN
For the most accurate results, select vehicle by your VIN (Vehicle Identification Number).
1 Crankshaft Seal found

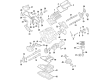
2005 Volkswagen Passat Crank Seal Part Number: 068-103-085-E
$20.12 MSRP: $32.98You Save: $12.86 (39%)Ships in 1-2 Business DaysProduct Specifications- Other Name: Seal; Front Seal
- Replaces: 068-103-085-A, 026-103-085-E, 026-103-085-F
- Item Weight: 0.10 Pounds
- Condition: New
- Fitment Type: Direct Replacement
- SKU: 068-103-085-E
- Warranty: This genuine part is guaranteed by Volkswagen's factory warranty.
2005 Volkswagen Passat Crankshaft Seal Parts and Q&A
- Q: What steps are involved in removing and replacing the rear crankshaft seal, transaxle, flywheel/driveplate, and rear oil seal housing on 2005 Volkswagen Passat?A: The transaxle and the flywheel/driveplate must be removed from the vehicle for this procedure. The rear oil seal and housing are an integral part that must be removed and replaced together as a unit, although they can be replaced without removing the oil pan. If the oil pan gasket is damaged during the removal of the housing on vehicles with a solid oil pan gasket, the oil pan must be removed and a new gasket fitted. After installing the housing, ensure the oil pan is reinstalled. Some models use RTV sealant for the oil pan-to-cylinder block mating surface, while others use a solid gasket material; always reseal with the same type of sealing material originally equipped. Remove the rear oil seal housing mounting bolts and take off the housing from the engine. Before installing a new rear seal and housing, ensure the mating surfaces of the cover, cylinder block, and oil pan rail are perfectly clean, using a hard plastic or wood scraper to remove all traces of gasket material, taking care not to damage the aluminum alloy of the rear housing. Install a new gasket on the cylinder block. If the vehicle originally had a solid oil pan gasket and it was undamaged during removal, apply a 3/16-inch (5 mm) bead of RTV sealant to the corners where the oil pan gasket meets the engine block. If RTV sealant was originally used, apply a 3/16-inch (5 mm) bead of sealant to the oil pan sealing surface on the rear oil seal housing flange, avoiding application on the oil pan itself to prevent sealant from being pushed inward. Install the rear oil seal housing over the dowels onto the engine, lubricating the oil seal lip beforehand to aid installation and prevent dry starts that may damage the seal and lead to future oil leaks. Some oil seals come with an installation tool to prevent damage during installation; locate the tool on the end of the crankshaft and slide the oil seal and housing into place. Tighten the rear oil seal housing bolts evenly in several steps to the specified torque, following the sealant manufacturer's recommendations on curing times and allowing the sealant to properly cure before adding oil. The remaining steps are the reverse of removal.
Related 2005 Volkswagen Passat Parts
 2005 Volkswagen Passat A/C Switch
 2005 Volkswagen Passat Brake Disc
 2005 Volkswagen Passat Cooling Fan Temperature Switch
 2005 Volkswagen Passat CV Joint Boot
 2005 Volkswagen Passat Drive Belt
 2005 Volkswagen Passat Exhaust Clamp
 2005 Volkswagen Passat Fuel Tank
 2005 Volkswagen Passat Lift Support
 2005 Volkswagen Passat Rack and Pinions