×
- Hello
- Login or Register
- Quick Links
- Live Chat
- Track Order
- Parts Availability
- RMA
- Help Center
- Contact Us
- Shop for
- Volkswagen Parts
My Garage
My Account
Cart
Genuine Volkswagen Golf R Axle Shaft
Car Axle Shaft- Select Vehicle by Model
- Select Vehicle by VIN
Select Vehicle by Model
orMake
Model
Year
Select Vehicle by VIN
For the most accurate results, select vehicle by your VIN (Vehicle Identification Number).
12 Axle Shafts found


Volkswagen Golf R Axle Shafts Part Number: 0CQ-525-351-A
$430.04 MSRP: $587.49You Save: $157.45 (27%)Ships in 1-2 Business DaysVolkswagen Golf R Axle Shafts Part Number: 0CQ-525-354-A
$430.04 MSRP: $587.49You Save: $157.45 (27%)Ships in 1-2 Business Days
Volkswagen Golf R Axle Assembly Part Number: 5QM-501-053-F
$1128.49 MSRP: $1423.07You Save: $294.58 (21%)Ships in 1-2 Business Days
Volkswagen Golf R Axle Assembly Part Number: 1K0-501-204-FX
$288.70 MSRP: $338.06You Save: $49.36 (15%)Ships in 1-2 Business Days
Volkswagen Golf R Axle Assembly Part Number: 5WA-501-204-A
$220.73 MSRP: $264.99You Save: $44.26 (17%)Ships in 1-2 Business Days
Volkswagen Golf R Axle Assembly Part Number: 5WA-501-203-A
$456.61 MSRP: $534.67You Save: $78.06 (15%)Ships in 1-2 Business Days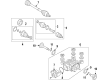
Volkswagen Golf R Axle Assembly Part Number: 5Q0-501-203-A
$477.70 MSRP: $559.37You Save: $81.67 (15%)Ships in 1-2 Business Days
Volkswagen Golf R Axle Assembly Part Number: 5Q0-407-271-CQ
$531.60 MSRP: $622.48You Save: $90.88 (15%)Ships in 1-2 Business DaysVolkswagen Golf R Axle Assembly Part Number: 5Q0-501-204-A
$640.49 MSRP: $749.98You Save: $109.49 (15%)Ships in 1-2 Business Days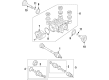
Volkswagen Golf R Axle Assembly Part Number: 1K0-501-203-F
$662.90 MSRP: $776.23You Save: $113.33 (15%)Ships in 1-2 Business DaysVolkswagen Golf R Axle Assembly Part Number: 1K0-501-204-F
$662.90 MSRP: $776.23You Save: $113.33 (15%)Ships in 1-2 Business Days
Volkswagen Golf R Axle Assembly Part Number: 5Q0-501-204-AX
$332.54 MSRP: $385.71You Save: $53.17 (14%)Ships in 1-2 Business Days
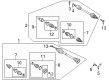
Volkswagen Golf R Axle Shaft
Choose OEM Axle Shaft for superior quality and long-lasting durability. They match the Volkswagen's factory specifications exactly and pass strict quality control. If you plan to replace Axle Shaft on your Golf R, put OEM at the top of your list. You'll get the right fit, reliable performance, and peace of mind. We stock an extensive inventory of genuine Volkswagen Golf R parts. It is easy to find what you need. You will love our competitive prices that help you save. No more hassle with returns or guesswork. Every part includes a warranty straight from the manufacturer. Get trusted quality, strong durability, and real value today.
Volkswagen Golf R Axle Shaft Parts and Q&A
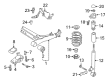
- Q: How to remove and install the rear axle shaft on Volkswagen Golf R?A:The given procedure is applicable only to AWO Golf models. Start by removing the wheel trim or hub cap, and loosen the driveaxle/hub bolt by one-quarter turn with the vehicle on the wheels, and loosen the wheel bolts. It is recommended to be careful so as not to overturn the driveaxle/hub bolt more than a quarter turn with the wheel on the ground, thus damaging the wheel bearing. The second step is to lift the back of the car and hold it carefully on jackstands, and make sure that the front wheels do not roll. Nevertheless, remove the wheel and detach the level control sensor of the control arm in case it has level control. When the shock absorber is connected to the electrical connector of a model with Adaptive Chassis DCC, disconnect the shock absorber. Drill out the rivets and take out the stone shield (when there is one) in the control arm, then take off the stabilizer bar link on the stabilizer bar and also take out the stabilizer bar bracket bolts, and then the stabilizer bar will pivot down. Undo the shock absorber, lower control arm and tie rod to the knuckle then remove the coil spring. Unscrew the bolts attaching the inner CV joint to the differential drive flange and loosen the retaining plates under the bolts and should not drop the driveaxle unsupported, using a strap. Unscrew the driveaxle/hub bolt and in cases where the splines of the outer joint are frozen in the hub, tap the joint out with a dead-blow hammer or brass drift: otherwise a puller might be required. Slowly bend the knuckle out of the hub, then remove the driveaxle outer constant velocity joint and then manipulate the driveaxle out through the vehicle bottom and one gets rid of the gasket on the inner constant velocity joint when it is present and makes sure to use another when installing it. Do not leave the vehicle on its wheels when one or both driveaxles are removed to avoid damaging the wheel bearings it is necessary to prop the inner end(s) to avoid hanging and temporarily fit the outer end of the driveaxle(s) in the one or more hub(s) and clamp the driveaxle/hub bolt(s) into place. To install, make sure the joint surfaces of the differential drive and inner are clean, dry, and that the outer joint and hub splines and threads are clean, coating the splines with a light coating of multi-purpose grease. Position the driveaxle and engage the outer joint with the hub, and then install a new bolt and screw it to draw the joint fully into place, but not completely tightened. Install the coil spring, connect the lower control arm, tie-rod, and shock absorber to the control arm tightening the fasteners to the required torque. Make sure the driveaxle inner joint aligns with the retaining bolts and plates and fitting them to the required torque. Make sure that the outer joint is completely pulled, and then make the installation of the wheel and put the vehicle down to the earth. Installation Out of the driveaxle / hub bolt: Tighten the driveaxle / hub bolt to the recommended torque and angle of rotation and then tighten the wheel bolts and fit the wheel trim or hub cap.
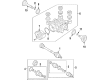
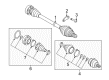
- Q: What role does the Axle Shaft play in transmitting power from the transaxle to the front wheels, and what are the key components and maintenance considerations involved on Volkswagen Golf R?A:To the front wheels, the transaxle delivers power using two driveaxles, the inner end of which is connected to either a drive flange of the Differential or splined to the differential on the transaxle; the outer end is connected to a stub shaft which splines to the hub and bearing assembly, and is held by a large bolt. The inner ends of the driveaxles are provided with sliding constant velocity (CV) joints, which allow angular as well as axial motion made up of either a triple rotor-type bearing or a ball-and-cage type bearing housed within a casing that allows the driveaxle to slide with the wheel. The outer extremes are equipped with ball-and-cage type CV joints, permitting angular but not axial movement and consisting of six ball bearings between an inner race and an outer cage. The boots should be regularly checked and inspected on any damage and leaking lubricant, torn CV joint boots should be immediately replaced to prevent joint destruction, and in case one of the boots is damaged, the CV joint can be reassembled and wiped clean, however, damaged components may require replacement of the entire driveaxle assembly. Worn or damaged CV joints are also characterized by leaking lubricants, clicking sounds during turns, clunking when the driveaxle accelerates after coasting, and vibration at highway speeds, to confirm wear, take one axle, then the other and rotate the axle in each direction when hitting the CV joint housings feeling whether there is any play (indicating worn splines or loose CV joints) and also examine the driveaxle shafts to cracks, dents, and distortion.

Related Volkswagen Golf R Parts
 Volkswagen Golf R Air Intake Hose
 Volkswagen Golf R Axle Support Bushings
 Volkswagen Golf R Belt Tensioner Bolt
 Volkswagen Golf R Brake Hose
 Volkswagen Golf R EGR Cooler
 Volkswagen Golf R Throttle Position Sensor
 Volkswagen Golf R Transmission Filter
 Volkswagen Golf R Washer Pump
 Volkswagen Golf R Wheel Bearing