×
- Hello
- Login or Register
- Quick Links
- Live Chat
- Track Order
- Parts Availability
- RMA
- Help Center
- Contact Us
- Shop for
- Volkswagen Parts
My Garage
My Account
Cart
Genuine Volkswagen Golf R Differential
Front Differential- Select Vehicle by Model
- Select Vehicle by VIN
Select Vehicle by Model
orMake
Model
Year
Select Vehicle by VIN
For the most accurate results, select vehicle by your VIN (Vehicle Identification Number).
7 Differentials found

Volkswagen Golf R Differential Part Number: 08E-525-010-F
$2051.94 MSRP: $2402.74You Save: $350.80 (15%)Ships in 1-2 Business DaysVolkswagen Golf R Differential Part Number: 08E-525-010-J
$2051.94 MSRP: $2402.74You Save: $350.80 (15%)Ships in 1-2 Business Days

Volkswagen Golf R Carrier Part Number: 0CQ-525-010-S
$3739.29 MSRP: $4378.55You Save: $639.26 (15%)Ships in 1-2 Business Days
Volkswagen Golf R Carrier Assembly Part Number: 0BR-525-010-G
$5209.39 MSRP: $6099.98You Save: $890.59 (15%)Ships in 1-2 Business Days
Volkswagen Golf R Differential Part Number: 0CN-409-053-AN
$1233.16 MSRP: $1443.99You Save: $210.83 (15%)Ships in 1-2 Business DaysVolkswagen Golf R Differential Part Number: 0FN-409-053-B
$1126.47 MSRP: $1420.52You Save: $294.05 (21%)Ships in 1-2 Business Days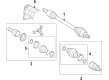
Volkswagen Golf R Differential Part Number: 0CN-409-053-AR
$1807.58 MSRP: $2116.60You Save: $309.02 (15%)Ships in 1-2 Business Days
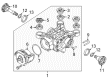
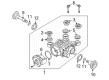
Volkswagen Golf R Differential
Choose OEM Differential for superior quality and long-lasting durability. They match the Volkswagen's factory specifications exactly and pass strict quality control. If you plan to replace Differential on your Golf R, put OEM at the top of your list. You'll get the right fit, reliable performance, and peace of mind. We stock an extensive inventory of genuine Volkswagen Golf R parts. It is easy to find what you need. You will love our competitive prices that help you save. No more hassle with returns or guesswork. Every part includes a warranty straight from the manufacturer. Get trusted quality, strong durability, and real value today.
Volkswagen Golf R Differential Parts and Q&A
- Q: How to properly check and replace the fluid in a vehicle's transfer case, AWD coupler, and rear differential on Volkswagen Golf R?A:Lift both the front and the back of the car so that it is even and firmly held on jackstands. When it is warm, (between 68 to 104 degrees F 20 to 40 degrees C) remove the check/fill plug out of the transfer case (bevel box) and ensure that the level of the fluid is at the bottom of the plug hole; otherwise, add the required amount of specified clutch fluid until you have reached the correct level then put the plug back in and tighten. Put a drain pan at the transfer case drain plug, cover the subframe to prevent the spillage of oil and take out the drain plug to drain the fluid fully then install the drain plug and tighten. Clean the space around the check/fill plug, take away it, fill up the transfer case with the relevant clutch oil into it using a hand pump until it drips at the hole and replace it and tighten the plug. In the case of the AWD coupler (Haldex), put a drain pan under it, take out the check/fill plug, and make the fluid level even at the bottom of the hole if not it is filled with the fluid it specifies. Once the vehicle is brought down and the fluid has warmed, repeat the test and drain as much of the fluid as possible prior to replacing the plug. To replace the fluid, unscrew the check/fill plug, put a drain pan under the drain plug and then have the fluid to drain before replacing the drain plug and filling the coupler with the fluid of the right amount until it flows out of the check/fill plug end. In the case of the rear differential, wear a drain pan underneath, take out the oil filler/check plug and make sure that the fluid is at the same level with the bottom of the hole otherwise fill it up with the required fluid. Having wiped the drain plug, remove the drain plug and drain the lubricant after which new lubricant is added up to the required level and the oil filler/check plug is reinstalled and tightened.
- Q: What procedures for removing and installing the differential on Volkswagen Golf R?A:The following procedures apply to Golf AWD models only. To remove the Transfer Case, first disconnect the cable from the negative terminal of the battery. Raise the vehicle and support it securely on jackstands. For Golf Wagon models, remove the spare tire and drill two 1-inch holes at the marked locations on the rear compartment floor to access the differential bolts, then remove these bolts. Remove the exhaust system at the rear of the vehicle, supporting the front while the rear section is detached. Next, remove the rear stabilizer bar and rear coil springs. Remove the rear driveaxles, jacking up the rear suspension as necessary for clearance. Mark the Driveshaft rear rubber disc relationship to the differential flange and remove the bolts. For Golf R models, remove the driveshaft center support bolts, detach the rear rubber disc, and support the driveshaft. Support the differential using a floor jack, preferably one with a transmission jack head adapter. Loosen the rear axle assembly mounting bolts just behind the upper coil spring mounts. For all models except Golf Wagon, lower the rear axle assembly about 2 inches to gain access for removing the differential rear attaching bolt. With the differential supported, remove the remaining attaching bolt at the front of the differential, move the differential rearward, and disconnect the driveshaft while supporting it to prevent damage. Slowly lower the differential while tilting to different angles to access and remove the vent lines and disconnect the electrical connectors, then slowly lower and move forward to remove it from the vehicle. For installation, reverse the removal process, using new bolts for attaching the differential to the rear axle, aligning the marks on the rubber disc and the differential flange when installing the driveshaft, tightening all fasteners to the specified torque, and refilling or topping off the differential fluid as necessary. To replace the driveaxle seals, remove the rear driveaxles, use a slide hammer to remove the flange and shaft assembly, pry the driveaxle seal from the differential housing, coat the new seal contact surfaces with grease, and drive the new seal into the differential with the open side facing the housing. Pry the old spring clip from the inner end of the flange and shaft assembly and install a new one, then install the flange and shaft squarely into the differential housing and use a dead-blow hammer to secure the locking ring inside the differential. The remainder of the installation is the reverse of removal, and top off the differential fluid as necessary. For the pinion seal, disconnect the driveshaft from the differential flange and position it to the side, remove the pinion flange nut, and use a puller to remove the flange. Pry the pinion seal from the differential housing, coat the new seal contact surfaces with grease, and drive the new seal into the differential with the open side facing the housing. Tighten the pinion flange nut to the specification, and the remainder of the installation is the reverse of removal, topping off the differential fluid as necessary.

Related Volkswagen Golf R Parts
 Volkswagen Golf R Automatic Transmission Shift Levers
 Volkswagen Golf R Brake Caliper
 Volkswagen Golf R Camshaft
 Volkswagen Golf R Clutch Disc
 Volkswagen Golf R Control Arm Nut
 Volkswagen Golf R Cooling Fan Assembly
 Volkswagen Golf R Radiator Hose
 Volkswagen Golf R Thermostat Housing
 Volkswagen Golf R Valve Spring Retainer Keeper
 Volkswagen Golf R Wheel Seal