×
- Hello
- Login or Register
- Quick Links
- Live Chat
- Track Order
- Parts Availability
- RMA
- Help Center
- Contact Us
- Shop for
- Volkswagen Parts
My Garage
My Account
Cart
Genuine Volkswagen Golf R Coil Springs
Strut Spring- Select Vehicle by Model
- Select Vehicle by VIN
Select Vehicle by Model
orMake
Model
Year
Select Vehicle by VIN
For the most accurate results, select vehicle by your VIN (Vehicle Identification Number).
12 Coil Springs found

Volkswagen Golf R Spring Part Number: 5QM-511-121-E
$43.67 MSRP: $60.65You Save: $16.98 (28%)Ships in 1-2 Business Days
Volkswagen Golf R Spring Part Number: 5Q0-511-115-EP
$90.52 MSRP: $126.77You Save: $36.25 (29%)Ships in 1-2 Business Days
Volkswagen Golf R Spring Part Number: 1K0-411-105-JP
$92.45 MSRP: $129.49You Save: $37.04 (29%)Ships in 1-2 Business Days
Volkswagen Golf R Spring Part Number: 5WA-511-115-D
$99.70 MSRP: $139.64You Save: $39.94 (29%)Ships in 1-2 Business Days
Volkswagen Golf R Spring Part Number: 5WA-411-105
$101.02 MSRP: $141.47You Save: $40.45 (29%)Ships in 1-2 Business Days
Volkswagen Golf R Spring Part Number: 5WA-411-105-A
$101.02 MSRP: $141.47You Save: $40.45 (29%)Ships in 1-2 Business Days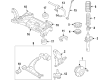
Volkswagen Golf R Spring Part Number: 5Q0-411-105-JG
$103.64 MSRP: $145.15You Save: $41.51 (29%)Ships in 1-2 Business Days
Volkswagen Golf R Spring Part Number: 5Q0-411-105-JF
$108.89 MSRP: $152.50You Save: $43.61 (29%)Ships in 1-2 Business Days
Volkswagen Golf R Spring Part Number: 1K0-511-115-HS
$116.19 MSRP: $162.74You Save: $46.55 (29%)Ships in 1-2 Business Days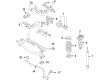
Volkswagen Golf R Spring Part Number: 1K0-511-115-JQ
$124.63 MSRP: $174.55You Save: $49.92 (29%)Ships in 1-2 Business Days
Volkswagen Golf R Spring Part Number: 1K0-411-105-JG
$124.94 MSRP: $174.99You Save: $50.05 (29%)Ships in 1-2 Business DaysVolkswagen Golf R Spring Part Number: 1K0-411-105-JC
$139.06 MSRP: $194.76You Save: $55.70 (29%)Ships in 1-2 Business Days
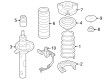
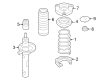
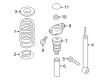
Volkswagen Golf R Coil Springs
Choose OEM Coil Springs for superior quality and long-lasting durability. They match the Volkswagen's factory specifications exactly and pass strict quality control. If you plan to replace Coil Springs on your Golf R, put OEM at the top of your list. You'll get the right fit, reliable performance, and peace of mind. We stock an extensive inventory of genuine Volkswagen Golf R parts. It is easy to find what you need. You will love our competitive prices that help you save. No more hassle with returns or guesswork. Every part includes a warranty straight from the manufacturer. Get trusted quality, strong durability, and real value today.
Volkswagen Golf R Coil Springs Parts and Q&A
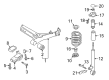
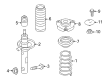
- Q: What actions are necessary if the coil springs and shock absorber in the front suspension strut show signs of wear on Volkswagen Golf R?A:When the front suspension strut or coil springs have any signs of wear, i.e. leaking fluid, loss of damping ability, sagging or cracked coil springs etc., then they should be disassembled and overhauled accordingly, with the struts being replaced when defective and springs and associated parts being replaced separately so as to ensure an equal amount of characteristics on each side of the vehicle. Once the assembly is out of the vehicle, wipe off all the dirt on the outside and place it in a vise. Attach the tools of coil spring compressor and compress the spring until the upper mount releases all its tension. Use an Allen key to remove the strut piston rod and a box-end wrench to remove the nut securing the thrust bearing and then remove the top mount, upper spring seat, spring, boot, bearing and bump stop. When a new spring is required, be careful when removing the old spring out of the compressor; when re-using, it is not necessary to remove it out of the compressor. All the strut components should be checked to determine whether it is worn out and damaged and all the strut components should be repaired or replaced with some parts as needed with the strut assembly fully disassembled. Check the strut leakage, examine the pitting on the piston rod, and examine the damage or non-damage of the strut body. Test the operation of the strut by swinging the piston in long and short strokes, making sure of smooth and continuous resistance; a sudden or irregular resistance or wear visible on the strut is enough evidence of wear to get a replacement. The process of reassembly is the opposite of disassembly, where the coil springs should be fitted with the paint mark at the bottom, and the ends of the coil springs fit into the upper and lower seats correctly before the compressor is released and the piston rod nut tightened to the recommended torque.
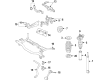
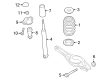
- Q: How to properly remove and install coil springs on Volkswagen Golf R?A:Relax the wheel bolts and chock the front wheels lest the vehicle roll over, and lift up the rear with the jackstands under the rocker panel flanges and place the wheels on jackstands before removing them. In multi-link rear suspensed models, the ride height sensor may be disconnected. Installing a spring compressor to the spring and compressing it with the instructions of the tool manufacturer is enough to take the load off the other suspension parts, which can be checked by wiggling the spring. In case of working on the model of the multi-link rear suspension, support the lower Control Arm with the help of the floor jack, take off the Shock Absorber lower mounting bolt, disconnect the stabilizer bar link to the lower control arm, and disconnect the lower control arm to the rear knuckle and then lower the jack to allow the removal of the springs. Eliminate the spring together with the upper spring seat and lower spring seat, inspecting the springs of any cracks and chips, and change the springs as a unit in case of any defects. In addition, inspect the upper and lower seats and see whether they are damaged and deteriorated and replace them where needed. Should the lower spring seat be removed, make sure that the location pin is inserted again in the lower control arm or Axle Beam to place the seat in the center. The opposite of removing is installation, whereby the lower spring seat should be installed with the pin in place in the hole in the control arm or axle beam, and with the coil springs in place with the end of the spring against the spring seat stop. In multi-link suspension models, the lower control arm should be raised using the floor jack to simulate normal ride height and then the suspension fasteners must be tightened. Lastly, loosen the vehicle and screw the wheel bolts to the desired level of torque.


Related Volkswagen Golf R Parts
 Volkswagen Golf R Body Control Module
 Volkswagen Golf R Center Console
 Volkswagen Golf R Coil Spring Insulator
 Volkswagen Golf R Coolant Pipe Seal
 Volkswagen Golf R Exhaust Heat Shield
 Volkswagen Golf R Fuel Vapor Leak Detection Pump
 Volkswagen Golf R Fuse Box
 Volkswagen Golf R Harmonic Balancer
 Volkswagen Golf R Stub Axle
 Volkswagen Golf R Valve Stem Oil Seal
 Volkswagen Golf R Water Pump Gasket
 Volkswagen Golf R Wheel Hub