×
- Hello
- Login or Register
- Quick Links
- Live Chat
- Track Order
- Parts Availability
- RMA
- Help Center
- Contact Us
- Shop for
- Volkswagen Parts
My Garage
My Account
Cart
Genuine Volkswagen Golf R Hood
Engine Hood- Select Vehicle by Model
- Select Vehicle by VIN
Select Vehicle by Model
orMake
Model
Year
Select Vehicle by VIN
For the most accurate results, select vehicle by your VIN (Vehicle Identification Number).
2 Hoods found

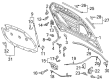
Volkswagen Golf R Hood Part Number: 5G0-823-031-J
$298.74 MSRP: $408.12You Save: $109.38 (27%)Ships in 1-2 Business Days
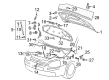
Volkswagen Golf R Hood Part Number: 5K0-823-031-G
$293.67 MSRP: $401.19You Save: $107.52 (27%)Ships in 1-2 Business Days
Volkswagen Golf R Hood
Choose OEM Hood for superior quality and long-lasting durability. They match the Volkswagen's factory specifications exactly and pass strict quality control. If you plan to replace Hood on your Golf R, put OEM at the top of your list. You'll get the right fit, reliable performance, and peace of mind. We stock an extensive inventory of genuine Volkswagen Golf R parts. It is easy to find what you need. You will love our competitive prices that help you save. No more hassle with returns or guesswork. Every part includes a warranty straight from the manufacturer. Get trusted quality, strong durability, and real value today.
Volkswagen Golf R Hood Parts and Q&A
- Q: How should the hood be removed and installed properly on Volkswagen Golf R?A:Removing and installing the hood is a tedious task and thus, there are no less than two individuals who should undertake the task. Start with blankets or pads over the cowl of the body and the Fenders. To remove the harness/hoses, pry out and unconnect the harness/hoses on the bottom of the hood, pry the grommet out, and then pull the harness/hoses out of the hood. Using a permanent marker, make alignment marks around the hinge plates so that the installation is the same. Get an assistant to assist in the support of the hood and then remove the upper end of hood support strut where applicable. Take off the hinge to hood nuts and the hood can be removed and it is the same to put it back on. To adjust, the fore-and-aft and the side-to-side placement is performed by sliding the hood up and down in relation to the hinge plates by means of loosening the nuts. Unscrew the nuts and just move the hood into position little by little. Screw the hinge nuts and lower the hood slowly checking the alignment. To provide a flat hood that aligns with the fenders when closed, turn the hood bumpers inwards or outwards and to raise or lower the hood height, screw the bumpers inwards or outwards. The loosening of the nuts also allows the adjustment of the Hood Latch assembly or the safety lever up-and-down and side-to-side.

Related Volkswagen Golf R Parts
 Volkswagen Golf R Car Bulbs
 Volkswagen Golf R Cup Holder
 Volkswagen Golf R Hood Hinge
 Volkswagen Golf R Ignition Lock Cylinder
 Volkswagen Golf R Mirror Switch
 Volkswagen Golf R Transmission Control Module
 Volkswagen Golf R Turn Signal Lights
 Volkswagen Golf R Wheel Bearing
 Volkswagen Golf R Wheel Seal
 Volkswagen Golf R Window Switch