×
- Hello
- Login or Register
- Quick Links
- Live Chat
- Track Order
- Parts Availability
- RMA
- Help Center
- Contact Us
- Shop for
- Volkswagen Parts
My Garage
My Account
Cart
Genuine Volkswagen Golf SportWagen Oil Pan
Oil Drain Pan- Select Vehicle by Model
- Select Vehicle by VIN
Select Vehicle by Model
orMake
Model
Year
Select Vehicle by VIN
For the most accurate results, select vehicle by your VIN (Vehicle Identification Number).
10 Oil Pans found

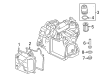
Volkswagen Golf SportWagen Transmission Pan Part Number: 02E-325-201-D
$109.47 MSRP: $153.31You Save: $43.84 (29%)Ships in 1-2 Business Days
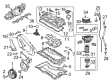
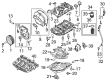
Volkswagen Golf SportWagen Oil Pan Part Number: 04L-103-602-A
$205.98 MSRP: $288.47You Save: $82.49 (29%)Ships in 1-2 Business Days

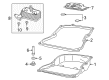
Volkswagen Golf SportWagen Oil Pan Part Number: 06K-103-600-AE
$236.14 MSRP: $330.74You Save: $94.60 (29%)Ships in 1-2 Business Days
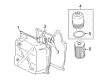
Volkswagen Golf SportWagen Oil Pan Part Number: 09G-321-361-F
$247.04 MSRP: $337.48You Save: $90.44 (27%)Ships in 1-2 Business Days
Volkswagen Golf SportWagen Oil Pan Part Number: 09S-321-361
$253.14 MSRP: $345.82You Save: $92.68 (27%)Ships in 1-2 Business Days
Volkswagen Golf SportWagen Oil Pan Part Number: 04E-103-601-AC
$329.53 MSRP: $450.17You Save: $120.64 (27%)Ships in 1-2 Business Days
Volkswagen Golf SportWagen Oil Pan Part Number: 04L-103-603-H
$349.70 MSRP: $477.74You Save: $128.04 (27%)Ships in 1-2 Business Days
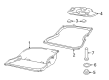
Volkswagen Golf SportWagen Transmission Pan Part Number: 09G-321-361-B
$326.34 MSRP: $445.81You Save: $119.47 (27%)Ships in 1-2 Business Days
Volkswagen Golf SportWagen Oil Pan Part Number: 04E-103-602-B
$375.82 MSRP: $513.42You Save: $137.60 (27%)Ships in 1-2 Business Days
Volkswagen Golf SportWagen Oil Pan Part Number: 06K-103-603-BC
$671.56 MSRP: $846.85You Save: $175.29 (21%)Ships in 1-2 Business Days
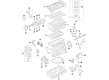
Volkswagen Golf SportWagen Oil Pan
Choose OEM Oil Pan for superior quality and long-lasting durability. They match the Volkswagen's factory specifications exactly and pass strict quality control. If you plan to replace Oil Pan on your Golf SportWagen, put OEM at the top of your list. You'll get the right fit, reliable performance, and peace of mind. We stock an extensive inventory of genuine Volkswagen Golf SportWagen parts. It is easy to find what you need. You will love our competitive prices that help you save. No more hassle with returns or guesswork. Every part includes a warranty straight from the manufacturer. Get trusted quality, strong durability, and real value today.
Volkswagen Golf SportWagen Oil Pan Parts and Q&A
- Q: How to remove and install the lower and upper oil pans for 5-cylinder engines on Volkswagen Golf SportWagen?A:The engine has a two-part oil pan, where only the upper part of the oil pan needs to be removed when the engine is out of the vehicle, therefore, the instructions below are only all about the removal and installation of the lower oil pan when it is still in the vehicle. Removal of bottom oil pan requires firstly, parking brake and blocking rear wheels followed by lifting the front part of the vehicle and holding it firmly on jackstands. Then, take off the under vehicle splash shield, drain the engine oil, and take off the lower oil pan that has the fasteners in a diagonal order. In case, the oil pan is stuck, tap it with a mallet to loosen. To install, remove all traces of old sealant using a scraper on the top and bottom of the oil pan, clean the mating surfaces with brake system cleaner, and apply a bead of RTV sealant 1/8-inch in height to the oil pan flange and make certain that the oil pan is in place within 5 minutes of sealant application. The lower oil pan goes on the top pan and the bolts are installed and hand-tightened then all bolts should be tightened in a diagonal pattern to the recommended torque, the sealant should be allowed to dry and then oil should be added. Removal is the opposite of installation and then the engine should be started to examine the presence of oil pressure and leaks. As per the upper oil pan, firstly the low-lying oil pan is removed, and then the transaxle, crankshaft front oil seal flange, camshaft sprockets are loosened, control housing, oil pump chain tensioner and guide are removed, the pick-up tube retaining fasteners and the pick-up tube-to-oil pump seal are removed. Once the upper oil pan mounting fastensers have been removed, the oil pan can then be removed, however, by prying it off, but being very careful to pry at the number 6 and number 1 crankshaft bearing caps. To install, repeat above scraper used to clean the old sealant and clean the mating surfaces, apply RTV silicone sealant on the mating surface between the oil pan and the cylinder block. Clean up the threaded bolt holes and test the oil pan flange to be distortion free, meaning eliminate any nicks or burrs. Place the upper oil pan onto the block of the cylinder, fix and tighten two mounting connectors in front and back, and align the ends of the upper pan and the cylinder block. Installation of the oil pan should be done with a special tool till the edges are aligned and then install the rest of the bolts and tighten them in a diagonal pattern. Lastly, fit the oil pick-up tube and new seal, run the mounting fasteners and fit the oil pump timing chain and tensioner and leave the sealant to dry before putting the oil in and reassemble the assembly in reverse sequence of dismantling.

Related Volkswagen Golf SportWagen Parts
 Volkswagen Golf SportWagen Alternator
 Volkswagen Golf SportWagen Alternator Bracket
 Volkswagen Golf SportWagen Ball Joint
 Volkswagen Golf SportWagen Belt Tensioner
 Volkswagen Golf SportWagen Belt Tensioner Bolt
 Volkswagen Golf SportWagen Differential Seal
 Volkswagen Golf SportWagen Exhaust Manifold Gasket
 Volkswagen Golf SportWagen Exhaust Nut
 Volkswagen Golf SportWagen Fuel Pressure Regulator
 Volkswagen Golf SportWagen Pressure Plate
 Volkswagen Golf SportWagen Radiator Cap