×
- Hello
- Login or Register
- Quick Links
- Live Chat
- Track Order
- Parts Availability
- RMA
- Help Center
- Contact Us
- Shop for
- Volkswagen Parts
My Garage
My Account
Cart
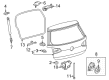
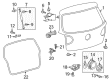
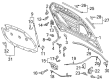
Genuine Volkswagen GTI Trunk Lid Latch
Luggage Compartment Door Lock Assembly- Select Vehicle by Model
- Select Vehicle by VIN
Select Vehicle by Model
orMake
Model
Year
Select Vehicle by VIN
For the most accurate results, select vehicle by your VIN (Vehicle Identification Number).
4 Trunk Lid Latches found

Volkswagen GTI Lock Part Number: 2G6-827-505-B-9B9
$53.03 MSRP: $73.65You Save: $20.62 (28%)Ships in 1-2 Business Days

Volkswagen GTI Lock Part Number: 1K6-827-505-F-9B9
$120.18 MSRP: $168.32You Save: $48.14 (29%)Ships in 1-2 Business Days
Volkswagen GTI Lock Part Number: 5K0-827-505-C-9B9
$134.46 MSRP: $188.32You Save: $53.86 (29%)
Volkswagen GTI Lock Part Number: 5G6-827-505-B-9B9
$420.89 MSRP: $574.99You Save: $154.10 (27%)Ships in 1-2 Business Days
Volkswagen GTI Trunk Lid Latch
Choose OEM Trunk Lid Latch for superior quality and long-lasting durability. They match the Volkswagen's factory specifications exactly and pass strict quality control. If you plan to replace Trunk Lid Latch on your GTI, put OEM at the top of your list. You'll get the right fit, reliable performance, and peace of mind. We stock an extensive inventory of genuine Volkswagen GTI parts. It is easy to find what you need. You will love our competitive prices that help you save. No more hassle with returns or guesswork. Every part includes a warranty straight from the manufacturer. Get trusted quality, strong durability, and real value today.
Volkswagen GTI Trunk Lid Latch Parts and Q&A
- Q: How to replace the lift support and trunk lid latch for sedan on Volkswagen GTI?A:In models which have a trunk lock cylinder built into the trunk latch/actuator, the integrated part cannot be changed independently and must be changed as a whole. In order to unlock the latch, pull the trunk open and unplug the cable at the negative battery terminal, and the inner trim panel should be taken away in the trunk lid. There are models where the latch has a plastic trim cover, which must be pressed by depressing the retaining tab then slide off. The second stage is to undress the electrical connector of the latch, sketch the installed location of the latch bracket using a marker, pull out the mounting nuts, and extract the latch assembly. The reverse order is followed during reinstallation, so as not to be out of the marks that were drawn during removal. In the case of the support struts, open the trunk, the upper carpet has a pin that holds the carpet in place, peel back the carpet to reveal the inner lift support strut retaining clip. As you hold the trunk, disengage the support strut ends and take them off. The process of re-installation is also in reverse order. In order to deal with the release switch and backup camera assembly, unscrew the cable in the negative battery terminal, and then snap out the trunk lid trim panel. Unscrew the electrical connectors and pull out the switch holding nuts before detaching the switch assembly on the outside of the trunk lid, and re-connect the switch assembly in reverse order.

Related Volkswagen GTI Parts
 Volkswagen GTI Axle Beam
 Volkswagen GTI Brake Tubing Clips
 Volkswagen GTI Coil Spring Insulator
 Volkswagen GTI Exhaust Hanger
 Volkswagen GTI Fuel Tank Skid Plate
 Volkswagen GTI Spindle Nut
 Volkswagen GTI Window Channel
 Volkswagen GTI Windshield
Browse by Year
2024 Trunk Lid Latch 2023 Trunk Lid Latch 2022 Trunk Lid Latch 2021 Trunk Lid Latch 2020 Trunk Lid Latch 2019 Trunk Lid Latch 2018 Trunk Lid Latch 2017 Trunk Lid Latch 2016 Trunk Lid Latch 2015 Trunk Lid Latch 2014 Trunk Lid Latch 2013 Trunk Lid Latch 2012 Trunk Lid Latch 2011 Trunk Lid Latch 2010 Trunk Lid Latch 2009 Trunk Lid Latch 2008 Trunk Lid Latch 2007 Trunk Lid Latch 2006 Trunk Lid Latch