×
- Hello
- Login or Register
- Quick Links
- Live Chat
- Track Order
- Parts Availability
- RMA
- Help Center
- Contact Us
- Shop for
- Volkswagen Parts
My Garage
My Account
Cart
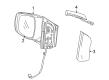
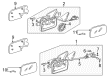
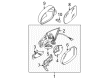
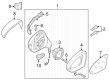
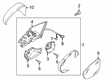
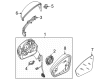
Genuine Volkswagen Side View Mirrors
Outside Rear View Mirror- Select Vehicle by Model
- Select Vehicle by VIN
Select Vehicle by Model
orMake
Model
Year
Select Vehicle by VIN
For the most accurate results, select vehicle by your VIN (Vehicle Identification Number).
197 Side View Mirrors found

Volkswagen Mirror Assembly Part Number: 7B0-857-502-AP-XV0
$113.84 MSRP: $159.43You Save: $45.59 (29%)Ships in 1-2 Business DaysProduct Specifications- Other Name: Mirror
- Replaces: 7B0-857-502-H-XV0, 7B0-857-502-AL-XV0, 7B0-857-502-L-XV0, 7B0-857-502-Q-XV0, 7B0-857-502-AH-XV0, 7B0-857-502-AC-XV0
Volkswagen Mirror Assembly Part Number: 7B0-857-502-AP-XS0
$115.80 MSRP: $162.18You Save: $46.38 (29%)Ships in 1-2 Business DaysProduct Specifications- Other Name: Mirror
- Position: Passenger Side
- Replaces: 7B0-857-502-D-XS0, 7B0-857-502-AC-XS0, 7B0-857-502-XS0, 7B0-857-502-AL-XS0, 7B0-857-502-L-XS0, 7B0-857-502-H-XS0, 7B0-857-502-AH-XS0, 7B0-857-502-Q-XS0

Volkswagen Mirror Assembly Part Number: 1EM-857-507-01C
$116.58 MSRP: $163.28You Save: $46.70 (29%)Ships in 1-2 Business DaysProduct Specifications- Other Name: Housing
- Position: Driver Side
Volkswagen Mirror Assembly Part Number: 7B0-857-502-AP-XQ0
$121.48 MSRP: $170.13You Save: $48.65 (29%)Ships in 1-2 Business DaysProduct Specifications- Other Name: Mirror
- Position: Passenger Side
- Replaces: 7B0-857-502-AL-XQ0, 7B0-857-502-D-XQ0, 7B0-857-502-H-XQ0, 7B0-857-502-L-XQ0, 7B0-857-502-XQ0, 7B0-857-502-Q-XQ0, 7B0-857-502-AH-XQ0, 7B0-857-502-AC-XQ0

Volkswagen Mirror Assembly Part Number: 3C1-857-507-DP-9B9
$127.56 MSRP: $178.67You Save: $51.11 (29%)Ships in 1-2 Business DaysProduct Specifications- Other Name: Housing
- Position: Driver Side
- Replaces: 3C1-857-507-CJ-9B9
Volkswagen Mirror Assembly Part Number: 3C1-857-508-DM-9B9
$274.55 MSRP: $375.07You Save: $100.52 (27%)Ships in 1-2 Business DaysProduct Specifications- Other Name: Housing
- Position: Passenger Side
- Replaces: 3C1-857-508-CJ-9B9
Volkswagen Mirror Assembly Part Number: 7B0-857-502-BQ-XP0
$131.05 MSRP: $183.55You Save: $52.50 (29%)Ships in 1-2 Business DaysProduct Specifications- Other Name: Mirror
- Position: Passenger Side
- Replaces: 7B0-857-502-D-XP0, 7B0-857-502-H-XP0, 7B0-857-502-XP0


Volkswagen Repair Kit Part Number: 3B1-857-507-L-01C
$131.59 MSRP: $184.30You Save: $52.71 (29%)Ships in 1-2 Business DaysProduct Specifications- Other Name: Housing; Mirror Assembly
- Position: Driver Side
- Replaces: 3B1-857-507-E-01C
Volkswagen Repair Kit Part Number: 3B1-857-507-M-01C
$135.05 MSRP: $189.15You Save: $54.10 (29%)Ships in 1-2 Business DaysProduct Specifications- Other Name: Housing; Mirror Assembly
- Position: Driver Side
- Replaces: 3B1-857-507-D-01C
Volkswagen Mirror Assembly Part Number: 7B0-857-502-BM-XU0
$140.92 MSRP: $197.37You Save: $56.45 (29%)Ships in 1-2 Business DaysProduct Specifications- Other Name: Mirror
- Position: Passenger Side
- Replaces: 7B0-857-502-L-XU0, 7B0-857-502-AH-XU0, 7B0-857-502-AC-XU0, 7B0-857-502-BK-XU0, 7B0-857-502-H-XU0, 7B0-857-502-Q-XU0, 7B0-857-502-AP-XU0, 7B0-857-502-AL-XU0

Volkswagen Mirror Assembly Part Number: 5H1-857-507-AG-9B9
$166.59 MSRP: $233.32You Save: $66.73 (29%)Ships in 1-2 Business DaysProduct Specifications- Other Name: Housing; Mirror
- Position: Driver Side

Volkswagen Mirror Assembly Part Number: 561-857-508-BH-9B9
$154.69 MSRP: $216.65You Save: $61.96 (29%)Ships in 1-2 Business DaysProduct Specifications- Other Name: Housing
- Position: Passenger Side
Volkswagen Repair Kit Part Number: 3B1-857-508-AD-01C
$148.75 MSRP: $208.33You Save: $59.58 (29%)Ships in 1-2 Business DaysProduct Specifications- Other Name: Housing; Mirror Assembly
- Position: Passenger Side
- Replaces: 3B1-857-508-L-01C
Volkswagen Repair Kit Part Number: 3B1-857-508-AF-01C
$151.21 MSRP: $211.78You Save: $60.57 (29%)Ships in 1-2 Business DaysProduct Specifications- Other Name: Housing; Mirror Assembly
- Position: Passenger Side
- Replaces: 3B1-857-508-K-01C
Volkswagen Mirror Assembly Part Number: 7B0-857-502-CC-XF0
$155.54 MSRP: $218.57You Save: $63.03 (29%)Ships in 1-2 Business DaysProduct Specifications- Other Name: Mirror
- Position: Passenger Side
- Replaces: 7B0-857-502-AP-XF0, 7B0-857-502-D-XF0, 7B0-857-502-H-XF0, 7B0-857-502-L-XF0, 7B0-857-502-AL-XF0, 7B0-857-502-BG-XF0, 7B0-857-502-XF0, 7B0-857-502-AC-XF0, 7B0-857-502-Q-XF0, 7B0-857-502-AH-XF0

Volkswagen Mirror Assembly Part Number: 1E1-857-507-E-01C
$159.16 MSRP: $222.91You Save: $63.75 (29%)Ships in 1-2 Business DaysProduct Specifications- Other Name: Housing
- Position: Driver Side
Volkswagen Mirror Assembly Part Number: 7B0-857-502-BP-GRU
$168.31 MSRP: $235.73You Save: $67.42 (29%)Ships in 1-2 Business DaysProduct Specifications- Other Name: Mirror
- Position: Passenger Side
- Replaces: 7B0-857-502-Q-XR0, 7B0-857-502-AC-XR0, 7B0-857-502-BP-XV0, 7B0-857-502-H-XR0, 7B0-857-502-AP-XR0, 7B0-857-502-XR0, 7B0-857-502-AH-XR0, 7B0-857-502-L-XR0, 7B0-857-502-AL-XR0, 7B0-857-502-D-XR0
Volkswagen Mirror Assembly Part Number: 1EM-857-508-B-01C
$178.50 MSRP: $250.00You Save: $71.50 (29%)Product Specifications- Other Name: Housing
- Position: Passenger Side

Volkswagen Mirror Part Number: 11B-857-507-AB-9B9
$211.81 MSRP: $296.65You Save: $84.84 (29%)Ships in 1-2 Business DaysProduct Specifications- Other Name: Housing
- Replaced by: 11B-857-507-AJ-9B9
Volkswagen Mirror Part Number: 11B-857-507-AJ-9B9
$211.81 MSRP: $296.65You Save: $84.84 (29%)Ships in 1-2 Business DaysProduct Specifications- Other Name: Housing; Mirror Assembly
- Position: Driver Side
- Replaces: 11B-857-507-AB-9B9
| Page 1 of 10 |Next >
1-20 of 197 Results
Volkswagen Side View Mirrors
Volkswagen Side View Mirrors extend a driver's vision beyond the natural limits of peripheral vision, increasing confidence while changing lanes and performing tight parking maneuvers. Founded in 1937 with the aim of creating a reliable people car, the brand evolved from the iconic Beetle and Type 2 van to a diverse range that now includes turbocharged TSI engines, digital cockpits, park assist, and an advancing family of ID electric vehicles. The brand is based on the flexible MQB platform to optimize production, and intuitive MIB infotainment and clear head-up displays make every trip an engaging one. VW combines clean design and solid engineering to gain trust around the globe and make each car, SUV, or future EV seem familiar while looking forward. As important as powertrains and touchscreens, Side View Mirrors on every VW are crucial safety tools. These mirrors are positioned on the doors, close to the A pillars, providing planar glass on the driver side to provide true-to-life reflections and convex or aspheric glass on the passenger side to increase the field of view and reduce blind spots. Many versions include heating to remove frost, power folding to prevent damage to the curb, and electrochromic dimming which reduces glare, all features that contribute to everyday comfort across the entire range. Whether navigating city alleys or cruising highways, Side View Mirrors work with driver-assist tech to build a clear, confident picture of the world around any VW.
Buying OEM parts is a smart move to keep your long-term repair costs low. These components are built to last because VW uses such strict factory standards. At VWPartsGiant.com, it is easy to find genuine Volkswagen Side View Mirrors at prices that actually beat the competition. You get a real manufacturer's warranty with every single part, so you know your purchase is safe. Plus, forget about return headaches since our policy is easy and worry-free. We ship your order fast, too. If you have questions, our team of parts experts is ready to help. Why wait? Start shopping now!
Volkswagen Side View Mirrors Parts and Q&A
- Q: How to replace Side View Mirrors, including the mirror glass and motor on Volkswagen Golf?A:Ensure the ignition switch is in the OFF position before beginning. For the interior mirror, if replacing just the mirror body, pull it sharply off the base ball stud. To replace the mirror base, rotate it 90-degrees counterclockwise until the retaining spring disengages, then remove it from the retaining plate. For installation, align and engage the mirror base with the retaining plate, then rotate it clockwise until it locks in place, followed by pressing the mirror body firmly into the ball stud. If equipped with a rain sensor and auto dimmer, pry off the trim cap halves from each side of the mirror base, disconnect the wiring harness connector, disengage the clips from each side of the mirror base, and slide the mirror off the base plate, with installation being the reverse of removal. For base plate replacement, apply heat with a heat gun and gently pry it off the windshield, using a special type of rear view mirror adhesive for installation, and consider having this procedure performed by a qualified automotive repair shop due to the risk of cracking the windshield. For the exterior mirror, remove the door panel, carefully pry the sail panel trim cover from the door, disconnect the mirror electrical connector, pry the wiring harness clip free, remove the mirror mounting fastener, and detach the mirror from the door, working the mirror harness through the hole. Installation is the reverse of removal. To remove the mirror glass, use a plastic trim tool to pry it from the bottom while pressing on the upper-left corner to disengage the glass retaining clips, taking care to avoid cracking the glass. Swivel the glass away from the mirror housing and disconnect the electrical connectors. To remove the mirror motor, take out the motor retaining bolt in the center, carefully pry out the motor without bending the inside connector, pull the motor out, and disconnect the electrical connector, with installation being the reverse of removal.
- Q: How to remove and install Side View Mirrors on Volkswagen Passat?A:To take out the interior mirror, unscrew it at the angle so that it can dissolve out of the retaining plate, and in case it has an automatic mirror, remove the cover and disconnect the wiring harness and mirror connector. To install, position the mirror to the car vertically, and adjust it 90 degrees until it clips in place, after which the wiring harness and the mirror connector can be reconnected. To do the exterior, first take out the door-trim panel, and loosen the electrical connector of the mirror in the door, being careful not to snag it when pulling it out by the harness connector spoil. At the same time using the door open, use the screws to remove the trim cover and the mirror trim cover and then use the screw to remove the mirror to the door as one removes the harness of the mirror through the hole. Installation goes in the opposite sequence of removal.


Related Volkswagen Parts
 Volkswagen License Plate
 Volkswagen Daytime Running Lights
 Volkswagen Antenna
 Volkswagen Door Lock
 Volkswagen Door Lock Cylinder
 Volkswagen Window Switch
 Volkswagen Back Up Light
 Volkswagen Body Control Module
 Volkswagen Door Screws
 Volkswagen Hood Hinge
 Volkswagen Turn Signal Lights
 Volkswagen Window Crank Handles
Browse by Model
Atlas Cross Sport Side View Mirrors Atlas Side View Mirrors Beetle Side View Mirrors Cabrio Side View Mirrors Cabriolet Side View Mirrors CC Side View Mirrors Corrado Side View Mirrors e-Golf Side View Mirrors EuroVan Side View Mirrors Golf Alltrack Side View Mirrors Golf R Side View Mirrors Golf Side View Mirrors Golf SportWagen Side View Mirrors GTI Side View Mirrors ID.4 Side View Mirrors Jetta Side View Mirrors Passat Side View Mirrors Quantum Side View Mirrors Routan Side View Mirrors Scirocco Side View Mirrors Touareg Side View Mirrors Vanagon Side View Mirrors