×
- Hello
- Login or Register
- Quick Links
- Live Chat
- Track Order
- Parts Availability
- RMA
- Help Center
- Contact Us
- Shop for
- Volkswagen Parts
My Garage
My Account
Cart
Genuine Volkswagen Transporter Cylinder Head
Head- Select Vehicle by Model
- Select Vehicle by VIN
Select Vehicle by Model
orMake
Model
Year
Select Vehicle by VIN
For the most accurate results, select vehicle by your VIN (Vehicle Identification Number).
1 Cylinder Head found

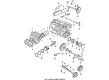
Volkswagen Transporter Cylinder Head Part Number: 025-101-065-CX
$596.95 MSRP: $811.20You Save: $214.25 (27%)
Volkswagen Transporter Cylinder Head
Choose OEM Cylinder Head for superior quality and long-lasting durability. They match the Volkswagen's factory specifications exactly and pass strict quality control. If you plan to replace Cylinder Head on your Transporter, put OEM at the top of your list. You'll get the right fit, reliable performance, and peace of mind. We stock an extensive inventory of genuine Volkswagen Transporter parts. It is easy to find what you need. You will love our competitive prices that help you save. No more hassle with returns or guesswork. Every part includes a warranty straight from the manufacturer. Get trusted quality, strong durability, and real value today.
Volkswagen Transporter Cylinder Head Parts and Q&A
- Q: How to remove rocker arms from the shaft while ensuring proper valve maintenance on Cylinder Head on Volkswagen Transporter?A:To remove the Rocker Arms in the shaft, the end clips in the springs must be removed together with the thrust washers and wave washers and the end rockers can be taken off. When the pedestals of rocker shaft support are tight, then they might have to be tapped off to reach the two inner rocker arms, clips and washers. It is also recommendable to package the parts sequentially in the order of dismantling in a stable place. To remove the valves, an appropriate tool is needed to compress the valve springs which are close to the side of the head casting. In case no G clamp with long ends is available, a short section of tube with a hole cut in the side may be used with a standard spring compressor to reach the split collets on the valve stem. Once the spring is compressed, the split conical collars of the valve stem can be pulled out with a small screwdriver without risking to drop the spring clamp. When the spring retainer collar and spring have been removed, any little sealing rings at the stems of the valves must be removed, and the valve must be pushed through the guide. In case of sticking of the valve this can be as a result of carbon or sludge that should be removed and burrs on the valve stem of the like must be stoned very carefully so that they do not score the guide. Valves are also supposed to be in order so that when they are replaced; they are done in the same port, with a piece of cardboard numbered and the same one is used to replace it. Once the cylinder head and the valves have been taken out of the engine, it is recommended to clean the cylinder head of any carbon deposits and check it as well to see whether or not it has any cracks, especially in the area of the valve seats or the holes of the spark plugs. In case there are cracks seen, it is time to scrap the head, and the question of whether to buy a new one or to get a used one in a better condition must be taken into consideration. In case the head had been blown off between the head and cylinder, then it could be caused by a wrongly tightened head studs and nuts. When no evidence of severe burning appears, the cylinder may be light grounded with carborundum paste making the depth of each cylinder equal to each other to avoid leaks. Valve seats are to be examined as to burning, pitting, or ridging, slight pitting may be corrected by grinding in the valve with carborundum paste, and a serious pitting could necessitate re-cutting the seat. It is necessary to disassemble the rocker gear and clean it of the sludge, so the rocker arms are free to slide on the shaft without any play because too much play can also influence engine performance. The screws that adjust clearance of the valves also should be inspected in relation to wear. Cleaning of the valves should be done of carbon, and the head of the valves should be smooth of cracks, a verge, and should not be ridged or pitted, or the seating edge should be unverged. In replacing valve into its guide, any lateral movement is a sign of wear, but a sideways rock of 0.8 mm is the maximum acceptable. the issue of replacing a valve guide may be difficult, and one should not do it by themselves, except with the guidance of a dealer. And, lastly, the part of the valve stem where the rocker arm is mounted must be flat, as it may be made concave or ridged, and special caps may be repaired by grinding with a fine oil stone, as it is a hard task to set the valve clearance when the valve stem is damaged.

