×
- Hello
- Login or Register
- Quick Links
- Live Chat
- Track Order
- Parts Availability
- RMA
- Help Center
- Contact Us
- Shop for
- Volkswagen Parts
My Garage
My Account
Cart
Genuine 2014 Volkswagen Jetta Crankshaft Seal
- Select Vehicle by Model
- Select Vehicle by VIN
Select Vehicle by Model
orMake
Model
Year
Select Vehicle by VIN
For the most accurate results, select vehicle by your VIN (Vehicle Identification Number).
1 Crankshaft Seal found

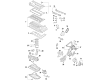
2014 Volkswagen Jetta Front Crank Seal Part Number: 070-103-051-A
$68.45 MSRP: $95.87You Save: $27.42 (29%)Ships in 1-2 Business DaysProduct Specifications- Other Name: Seal; Timing Case Seal, Timing Cover Seal
- Position: Front
- Replaces: 078-103-051-A
- Item Weight: 0.70 Pounds
- Condition: New
- Fitment Type: Direct Replacement
- SKU: 070-103-051-A
- Warranty: This genuine part is guaranteed by Volkswagen's factory warranty.
2014 Volkswagen Jetta Crankshaft Seal Parts and Q&A
- Q: How to replace the crankshaft seal and house for 4-cylinder engines on 2014 Volkswagen Jetta?A: The housing includes the seal as an inseparable part and has to be changed as a piece. Start by taking out the flywheel/driveplate. In timing belt engines, the manufacturer suggests removing the oil pan, but it is possible to omit the procedure in timing chain engines, as the rear seal and housing could be changed. Two rear main seal versions exist; either one may be in place by removing the adapter plate. Version 1 has a long sealing lip on the transmission side and Version 2 has long sealing lip on the engine side and short dust lip on the transmission side. Make sure that on Version 2 the long sealing lips faces to the engine side to stop leakage of oil. In the 2.0L models, grab the rear housing of oil seal retaining bolts and pull the adapter plate off the locating dowels and out. Wipe the mating surfaces with a clean cloth then install a new rear seal and housing with a 1/8-inch bead of RTV sealant applied to flange sealing surfaces. In 2.0L models that have Version 1, place the housing and seal around the crankshaft and carefully force it into place. In engines with Version 2, when removing the seal, special tools are necessary to make sure that it is properly installed and aligned. Install bolts to the rear oil seal housing uniformly in order to the required torque, and then the sealant is allowed to dry, and oil is added. Line the plate in place of the adapter to the top of the oil seal housing and place it on the dowels located in the rear of the cylinder head and in the same order in which it was fitted. The special tool required with 1.4L engines will be tool T10134, which is necessary to make sure that the rear seal housing and sensor wheel assembly have been correctly installed in certain steps that will help to secure and measure the assembly correctly and then finalize the installation.
Related 2014 Volkswagen Jetta Parts
 2014 Volkswagen Jetta Fuel Tank
 2014 Volkswagen Jetta A/C Switch
 2014 Volkswagen Jetta Brake Disc
 2014 Volkswagen Jetta CV Joint Boot
 2014 Volkswagen Jetta Drive Belt
 2014 Volkswagen Jetta Exhaust Clamp
 2014 Volkswagen Jetta Lift Support
 2014 Volkswagen Jetta Rack and Pinions