×
- Hello
- Login or Register
- Quick Links
- Live Chat
- Track Order
- Parts Availability
- RMA
- Help Center
- Contact Us
- Shop for
- Volkswagen Parts
My Garage
My Account
Cart
Genuine Volkswagen Jetta Valve Cover
Cylinder Head Cover- Select Vehicle by Model
- Select Vehicle by VIN
Select Vehicle by Model
orMake
Model
Year
Select Vehicle by VIN
For the most accurate results, select vehicle by your VIN (Vehicle Identification Number).
23 Valve Covers found

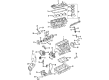
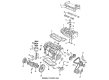
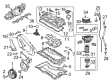
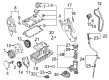
Volkswagen Jetta Valve Cover Part Number: 06A-103-475-C
$73.77 MSRP: $103.32You Save: $29.55 (29%)Ships in 1-2 Business Days
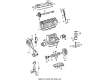
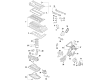
Volkswagen Jetta Valve Cover Part Number: 037-103-469-N
$96.39 MSRP: $135.00You Save: $38.61 (29%)
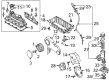
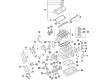
Volkswagen Jetta Valve Cover Part Number: 03L-103-469-K
$164.22 MSRP: $230.00You Save: $65.78 (29%)Ships in 1-2 Business Days
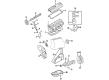
Volkswagen Jetta Valve Cover Part Number: 028-103-469-E
$167.08 MSRP: $234.00You Save: $66.92 (29%)Ships in 1-2 Business Days
Volkswagen Jetta Valve Cover Part Number: 021-103-469-G
$188.02 MSRP: $263.33You Save: $75.31 (29%)Ships in 1-2 Business Days
Volkswagen Jetta Valve Cover Part Number: 021-103-475-M
$197.06 MSRP: $276.00You Save: $78.94 (29%)
Volkswagen Jetta Valve Cover Part Number: 05E-103-469-D
$255.88 MSRP: $349.56You Save: $93.68 (27%)Ships in 1-2 Business Days
Volkswagen Jetta Valve Cover Part Number: 06A-103-469-AS
$271.44 MSRP: $370.81You Save: $99.37 (27%)Ships in 1-2 Business Days
Volkswagen Jetta Valve Cover Part Number: 03L-103-469-AD
$277.54 MSRP: $379.15You Save: $101.61 (27%)Ships in 1-2 Business Days
Volkswagen Jetta Valve Cover Part Number: 038-103-469-E
$286.69 MSRP: $391.64You Save: $104.95 (27%)Ships in 1-2 Business Days
Volkswagen Jetta Valve Cover Part Number: 06G-103-429-B
$301.94 MSRP: $412.48You Save: $110.54 (27%)Ships in 1-2 Business Days
Volkswagen Jetta Valve Cover Part Number: 022-103-429-S
$357.46 MSRP: $488.33You Save: $130.87 (27%)Ships in 1-2 Business Days
Volkswagen Jetta Valve Cover Part Number: 03G-103-469-G
$359.89 MSRP: $491.65You Save: $131.76 (27%)Ships in 1-2 Business Days

Volkswagen Jetta Valve Cover Part Number: 03L-103-469
$362.94 MSRP: $495.81You Save: $132.87 (27%)Ships in 1-2 Business Days
Volkswagen Jetta Valve Cover Part Number: 07K-103-469-L
$372.09 MSRP: $508.32You Save: $136.23 (27%)Ships in 1-2 Business Days

Volkswagen Jetta Valve Cover Part Number: 06F-103-469-K
$396.49 MSRP: $541.65You Save: $145.16 (27%)Ships in 1-2 Business Days
Volkswagen Jetta Valve Cover Part Number: 038-103-469-AF
$442.24 MSRP: $604.16You Save: $161.92 (27%)Ships in 1-2 Business Days
Volkswagen Jetta Valve Cover Part Number: 04E-103-469-EA
$750.46 MSRP: $946.35You Save: $195.89 (21%)Ships in 1-2 Business Days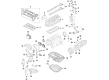
Volkswagen Jetta Valve Cover Part Number: 04E-103-469-EJ
$618.42 MSRP: $779.85You Save: $161.43 (21%)Ships in 1-2 Business Days
Volkswagen Jetta Valve Cover Part Number: 04E-103-469-P
$370.78 MSRP: $506.53You Save: $135.75 (27%)Ships in 1-2 Business Days
| Page 1 of 2 |Next >
1-20 of 23 Results
Volkswagen Jetta Valve Cover
Choose OEM Valve Cover for superior quality and long-lasting durability. They match the Volkswagen's factory specifications exactly and pass strict quality control. If you plan to replace Valve Cover on your Jetta, put OEM at the top of your list. You'll get the right fit, reliable performance, and peace of mind. We stock an extensive inventory of genuine Volkswagen Jetta parts. It is easy to find what you need. You will love our competitive prices that help you save. No more hassle with returns or guesswork. Every part includes a warranty straight from the manufacturer. Get trusted quality, strong durability, and real value today.
Volkswagen Jetta Valve Cover Parts and Q&A
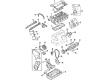
- Q: How to remove and reinstall the valve cover for 4-cylinder engines on Volkswagen Jetta?A:This is a process that is applicable to the 2.0L timing belt (CBPA) alone. You can start by taking off the engine cover, which is then succeeded by the timing belt upper cover containing fasteners. The second step is to remove the ignition coils, PCV valve fasteners and then remove the PCV housing of the cover. Unscrew crankcase hose heat shield that holds fasteners on the turbocharger and remove the shield. Unplug the electrical connectors and harness attached to the cover of the valve. Unscrew the fasteners a couple of turns at a time, beginning at the center and circling in a circular fashion all the way to the ends, until all the bolts are loosened then take out the retaining fasteners and loosen the valve cover of the cylinder head. In the case when the cover is stuck, hammer and block of wood will help to loosen the cover, or a flexible putty knife can be used to open the seal without damaging the sealing surfaces so that it would not leak oil once the cover is replaced. Be sure that the mating surfaces of the cylinder head and cover are clean prior to installation by stripping all of sealant and old gasket material, such as the spark plug tube seal gaskets, and cleaning with brake system cleaner. Check the rubber end plug at the back of the cylinder head and replace it in case of any cracks and damages. In the case of a rubber gasket, it may be reused in the case it is undamaged. Fit the valve cover, and any brackets removed, and screw the fasteners in a circular order to the required torque. Lastly, remove the remaining parts, and restart the engine and verify that there is no leakage of oil.
- Q: How to remove and install a valve cover for 5-cylinder engines on Volkswagen Jetta?A:In order to take off the valve cover, disconnect the cable with the negative battery terminal. Then, up in the engine compartment, leave the engine cover. Then remove the Housing ignition coil assemblies off the spark plugs and take out the secondary air injection pipe and uncouple the crankcase housing ventilation pipe on the corner of the cover. Gradually loosen the valve cover with fasteners in the opposite order in which they were tightened and note the captive spacer sleeve and rubber seal and then remove the cover. Note: Wipe off the cover gasket which should be changed in case of leakage or damage. Installation To install, wipe the cover and cylinder head gasket faces cleanly, then place a new gasket on to the valve cover making sure that it is in the correct position as guided by the rubber seals and spacer sleeves. Join the cover to the cylinder head and ensure that positioning the gasket is done as the cover is clamped. First, close the cover bolts using only your hands and when all the bolts are hand-tight, go round and progressively tighten the bolts to the required torque. The rest of the installation procedure is the same as of the removal procedure but in other way, and lastly, start the engine to confirm that there is no leakage of oil.


Related Volkswagen Jetta Parts
 Volkswagen Jetta Ignition Coil
 Volkswagen Jetta Radiator Cap
 Volkswagen Jetta Air Intake Hose
 Volkswagen Jetta Alternator Bearings
 Volkswagen Jetta Brake Master Cylinder
 Volkswagen Jetta CV Joint Boot
 Volkswagen Jetta Headlight Screws
 Volkswagen Jetta Lift Support
 Volkswagen Jetta Oil Filler Cap
 Volkswagen Jetta Oil Pan Gasket
 Volkswagen Jetta Vapor Canister Purge Solenoid
 Volkswagen Jetta Water Pump Pulley
Browse by Year
2024 Valve Cover 2023 Valve Cover 2022 Valve Cover 2021 Valve Cover 2020 Valve Cover 2019 Valve Cover 2018 Valve Cover 2017 Valve Cover 2016 Valve Cover 2015 Valve Cover 2014 Valve Cover 2013 Valve Cover 2012 Valve Cover 2011 Valve Cover 2010 Valve Cover 2009 Valve Cover 2008 Valve Cover 2007 Valve Cover 2006 Valve Cover 2005 Valve Cover 2004 Valve Cover 2003 Valve Cover 2002 Valve Cover 2001 Valve Cover 2000 Valve Cover 1999 Valve Cover 1998 Valve Cover 1997 Valve Cover 1996 Valve Cover 1995 Valve Cover 1994 Valve Cover 1993 Valve Cover 1992 Valve Cover 1991 Valve Cover 1989 Valve Cover 1987 Valve Cover 1986 Valve Cover 1985 Valve Cover 1984 Valve Cover