×
- Hello
- Login or Register
- Quick Links
- Live Chat
- Track Order
- Parts Availability
- RMA
- Help Center
- Contact Us
- Shop for
- Volkswagen Parts
My Garage
My Account
Cart
Genuine Volkswagen Passat Shock Absorber
Suspension Shock Absorber- Select Vehicle by Model
- Select Vehicle by VIN
Select Vehicle by Model
orMake
Model
Year
Select Vehicle by VIN
For the most accurate results, select vehicle by your VIN (Vehicle Identification Number).
24 Shock Absorbers found

Volkswagen Passat Strut Part Number: 357-513-031-S
$92.82 MSRP: $130.00You Save: $37.18 (29%)Ships in 1-2 Business Days
Volkswagen Passat Shock Absorber Part Number: 561-513-049-C
$96.39 MSRP: $135.00You Save: $38.61 (29%)Ships in 1-2 Business DaysVolkswagen Passat Strut Part Number: 357-513-033-C
$101.39 MSRP: $142.00You Save: $40.61 (29%)
Volkswagen Passat Shock Part Number: 3C0-513-049-AR
$111.86 MSRP: $156.67You Save: $44.81 (29%)Ships in 1-2 Business Days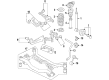
Volkswagen Passat Shock Absorber Part Number: 3C0-513-049-CN
$118.69 MSRP: $166.24You Save: $47.55 (29%)Ships in 1-2 Business Days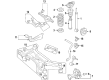
Volkswagen Passat Shock Absorber Part Number: 3C0-513-049-BR
$115.22 MSRP: $161.37You Save: $46.15 (29%)Ships in 1-2 Business Days
Volkswagen Passat Shock Part Number: 3C0-513-049-BD
$121.19 MSRP: $169.74You Save: $48.55 (29%)Ships in 1-2 Business DaysVolkswagen Passat Shock Part Number: 3C0-513-049-BF
$121.19 MSRP: $169.74You Save: $48.55 (29%)Ships in 1-2 Business DaysVolkswagen Passat Shock Part Number: 3C0-513-049-BH
$121.19 MSRP: $169.74You Save: $48.55 (29%)Ships in 1-2 Business DaysVolkswagen Passat Shock Part Number: 561-513-049-D
$127.26 MSRP: $178.22You Save: $50.96 (29%)Ships in 1-2 Business DaysVolkswagen Passat Shock Absorber Part Number: 3C0-513-049-BS
$159.45 MSRP: $223.32You Save: $63.87 (29%)Ships in 1-2 Business Days
Volkswagen Passat Shock Part Number: JZW-513-025-N
$159.45 MSRP: $223.32You Save: $63.87 (29%)Ships in 1-2 Business Days

Volkswagen Passat Strut Part Number: 357-413-031-S
$118.52 MSRP: $166.00You Save: $47.48 (29%)Volkswagen Passat Shock Part Number: 3C0-513-049-BJ
$124.94 MSRP: $174.99You Save: $50.05 (29%)Ships in 1-2 Business DaysVolkswagen Passat Shock Part Number: 3C0-513-049-CE
$124.94 MSRP: $174.99You Save: $50.05 (29%)Ships in 1-2 Business DaysVolkswagen Passat Shock Part Number: 3C0-513-049-BQ
$132.51 MSRP: $185.57You Save: $53.06 (29%)Ships in 1-2 Business DaysVolkswagen Passat Shock Part Number: 3C0-513-049-CP
$132.51 MSRP: $185.57You Save: $53.06 (29%)Ships in 1-2 Business Days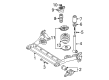
Volkswagen Passat Shock Part Number: 3B5-513-031-E
$127.47 MSRP: $178.53You Save: $51.06 (29%)Ships in 1-2 Business DaysVolkswagen Passat Shock Part Number: 3B9-513-031-N
$130.90 MSRP: $183.33You Save: $52.43 (29%)Ships in 1-2 Business DaysVolkswagen Passat Shock Part Number: 3B9-513-031-G
$134.47 MSRP: $188.33You Save: $53.86 (29%)Ships in 1-2 Business Days
| Page 1 of 2 |Next >
1-20 of 24 Results
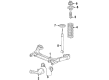
Volkswagen Passat Shock Absorber
The Volkswagen Passat Shock Absorber allows the sedan to pass over potholes by transforming the up and down impact of the tires into harmless heat, quickly spreading out to keep the tires on the ground and steer clear. It uses coil springs, with a hydraulic piston in the Passat Shock Absorber forcing oil through a series of microchannels to damp down additional movement to ensure the cabin is not bouncing like a trampoline. Over the rich history of Volkswagen sedans, engineers substituted the initial leaf springs with hydraulic dampers, which were further improved into two major designs. The early instance of this Shock Absorber technology is the popular twin-tube design, which incorporates an inner working cylinder within an outer reservoir that is usually filled with gas to prevent foaming and improve lifespan. Drivers who desire more sharpness can have some Passats adopt a monotube design where all the components are placed in one large cylinder, providing better heat dissipation and allowing the component to be placed in any position. Additional innovations in Volkswagen development added position-sensitive and acceleration-sensitive valving, which tenses or relaxes the ride automatically, and adaptive units that hold special fluids can change almost immediately to provide better grip or even comfort. All the Shock Absorbers, however designed, are designed to curb body roll, reduce braking distances, and ensure that the car maintains a stable feel that owners are applied to in a Volkswagen car without making the car lose its fun that people expect it to have as well as being predictable to drive.
Choose OEM Shock Absorber for superior quality and long-lasting durability. They match the Volkswagen's factory specifications exactly and pass strict quality control. If you plan to replace Shock Absorber on your Passat, put OEM at the top of your list. You'll get the right fit, reliable performance, and peace of mind. We stock an extensive inventory of genuine Volkswagen Passat parts. It is easy to find what you need. You will love our competitive prices that help you save. No more hassle with returns or guesswork. Every part includes a warranty straight from the manufacturer. Get trusted quality, strong durability, and real value today.
Volkswagen Passat Shock Absorber Parts and Q&A
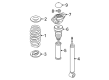
- Q: How to replace the rear shock absorbers on Volkswagen Passat?A:Unscrew the rear wheel bolts and put chocks on the front wheels to ensure the vehicle does not roll, and then make the rear elevated and put on jackstands to hold it safely and then remove the rear wheel. Place the floor jack under the rear of the trailing arm and then remove lower mounting bolt/nut of the shock absorber. The second step is to remove shock absorber upper mounting bolts and shock absorber itself. Unscrew the damper rod nut and grab the damper rod with a second wrench to ensure that it does not turn. Take off the top mount, bump stop, boot, and cap of the damper rod and then add the cap, boot, bump stop, and upper mount to the new shock absorber. Fit a new nut on the damper shaft and screw it on to the required torque. Install the shock absorber and install the upper mounting bolts and a new lower mounting bolt and nut, however do not tighten the lower mounting bolt/nut. Install the upper mounting bolts to the correct level of tightening and then raise the rear axle to mimic normal ride height and tighten the lower mounting bolt/nut to the correct level of tightening. Repeat on the other rear shock absorber after which then install the wheels and lower the vehicle making sure that the wheel bolts are tightened to the required torque.
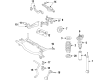
- Q: How to remove and install front coil springs and a front shock absorber on Volkswagen Passat?A:In order to take off the wheel trim or the hub cap (where applicable), one needs to chip half a turn in the wheel bolts as the vehicle rests on the wheels. First thing is to chock the back wheels, turn on the parking brake, lift the front of the car, then place it on jack stands in a secure position, and then remove the wheel. In cars having automatic leveling headlamps, unplug the connection between the vehicle level sensor and the lower Control Arm at the front. Installation To install a shock absorber upper mounting nut you will need to have two holes on the cowl area of the rear part of the engine compartment, remove the rubber covers and unscrew the mounting nut with a socket and long extension. Detach the harness of the ABS wheel speed sensor using the clips and place the sensor off the shock absorber. The next thing is to have the securing nut unscrewed in the wheel well and the clamp bolt removed at the top of the Steering Knuckle and the front and rear upper control arm balljoints detached at the top of the knuckle without damaging the balljoint rubber boots. Take out the nut to detach the rear lower control arm off the steering knuckle so that the shock absorber lower mounting bolt can be pulled out of the front lower control arm. Unscrew the nut and take out the shock absorber lower mounting bolt of the control arm and then pull out the shock absorber mounting studs of the mounting bracket and pull out the unit of the wheel well. To install, ensure that the shock absorber/coil spring unit is positioned and the upper mounting studs inserted into the mounting bracket making sure that the alignment hole in the coil spring lower seat is facing inwards towards the vehicle. Install the shock absorber at the lower control arm fitting a new securing nut but leave that tightening to be done later. Zip the rear lower control arm back to the steering knuckle using a new self-locking nut on the balljoint stud and tightening it to the required torque. Connect the upper control arms again to the steering knuckle making sure the steering knuckle has the clamp bolt and new self-locking nut installed and tighten the nut by pushing down on both control arms so as to make sure the balljoints are seated. Connect new nuts onto the upper mounting studs and tighten it to the required torque and replace the rubber covers. Install the harness of the ABS wheel speed sensor back to the retaining clips and, with vehicles that have automatic leveling headlamps, attach the clip to reconnect the vehicle level sensor connecting rod to the front lower control arm. Swing the suspension, with a floor jack beneath the outer ends of the lower control arms, to simulate normal ride height and tighten the shock absorber lower mounting nut, and torque it to the correct value. Lastly, put in the wheel and the wheel bolts, clamp the bolts firmly, without the wheel on the ground and then drop the vehicle and tighten the wheel bolts to recommended torque.

Related Volkswagen Passat Parts
 Volkswagen Passat Windshield
 Volkswagen Passat Automatic Transmission Oil Cooler
 Volkswagen Passat Axle Shaft
 Volkswagen Passat Fuel Door Switch
 Volkswagen Passat Harmonic Balancer
 Volkswagen Passat Idler Pulley Bolt
 Volkswagen Passat Intake Manifold Gasket
 Volkswagen Passat Relay Boxes
 Volkswagen Passat Valve Spring Retainer Keeper
 Volkswagen Passat Vapor Canister
Browse by Year
2022 Shock Absorber 2021 Shock Absorber 2020 Shock Absorber 2019 Shock Absorber 2018 Shock Absorber 2017 Shock Absorber 2016 Shock Absorber 2015 Shock Absorber 2014 Shock Absorber 2013 Shock Absorber 2012 Shock Absorber 2010 Shock Absorber 2009 Shock Absorber 2008 Shock Absorber 2007 Shock Absorber 2006 Shock Absorber 2005 Shock Absorber 2004 Shock Absorber 2003 Shock Absorber 2002 Shock Absorber 2001 Shock Absorber 2000 Shock Absorber 1999 Shock Absorber 1998 Shock Absorber 1997 Shock Absorber 1996 Shock Absorber 1995 Shock Absorber 1994 Shock Absorber 1993 Shock Absorber 1992 Shock Absorber 1991 Shock Absorber 1990 Shock Absorber