×
- Hello
- Login or Register
- Quick Links
- Live Chat
- Track Order
- Parts Availability
- RMA
- Help Center
- Contact Us
- Shop for
- Volkswagen Parts
My Garage
My Account
Cart
Genuine Volkswagen Rabbit Door Lock Cylinder
Door Lock Cylinder Tumbler- Select Vehicle by Model
- Select Vehicle by VIN
Select Vehicle by Model
orMake
Model
Year
Select Vehicle by VIN
For the most accurate results, select vehicle by your VIN (Vehicle Identification Number).
4 Door Lock Cylinders found

Volkswagen Rabbit Housing Part Number: 1K4-839-167
$13.41 MSRP: $21.98You Save: $8.57 (39%)Ships in 1-2 Business Days
Volkswagen Rabbit Lock Cylinder Part Number: 107-837-167-GH
$280.59 MSRP: $383.32You Save: $102.73 (27%)Ships in 1-2 Business Days

Volkswagen Rabbit Cylinder & Keys Part Number: 191-837-061-A
$22.57 MSRP: $37.00You Save: $14.43 (39%)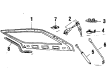
Volkswagen Rabbit Cylinder & Keys Part Number: 171-827-539
$40.36 MSRP: $56.05You Save: $15.69 (28%)
Volkswagen Rabbit Door Lock Cylinder
Choose OEM Door Lock Cylinder for superior quality and long-lasting durability. They match the Volkswagen's factory specifications exactly and pass strict quality control. If you plan to replace Door Lock Cylinder on your Rabbit, put OEM at the top of your list. You'll get the right fit, reliable performance, and peace of mind. We stock an extensive inventory of genuine Volkswagen Rabbit parts. It is easy to find what you need. You will love our competitive prices that help you save. No more hassle with returns or guesswork. Every part includes a warranty straight from the manufacturer. Get trusted quality, strong durability, and real value today.
Volkswagen Rabbit Door Lock Cylinder Parts and Q&A
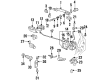
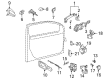
- Q: How to remove and install the door lock and door lock cylinder on Volkswagen Rabbit?A:The lock cylinder is located only on the driver's side door, while the passenger's side door features an end cap, with the removal procedure being identical for both. Begin by opening the driver's door and removing the trim panel from the end of the door. Next, take off the lock cylinder cover cap and turn the Torx bolt counterclockwise until it stops, which will move the locking arm to the rear and release the lock cylinder; for 2011 models, a small screwdriver may be needed to pry the cap from the end of the lock cylinder. Remove the lock cylinder from the outside door handle, and the installation process is the reverse of removal. For the outside handle, follow the same initial steps to remove the lock cylinder, then use a small screwdriver to pry the release cable from the handle, and rotate the end of the handle outwards towards the front of the door for removal, with installation being the reverse. In 2011 models, the door skin is a one-piece shell, so first remove the door trim panel and water shield if equipped, then proceed to remove the lock cylinder and outside handle as previously described. Pry the trim panels from each end of the door, remove the outside handle frame mounting fastener, and carefully work around the door edges to remove the door skin mounting fasteners, noting their locations as they vary in size and style to avoid damage. Protect the paint by applying tape to the edges of the door skin before carefully lifting it from the door frame, with installation being the reverse. For the latch, remove the door trim panel and water shield if equipped, and for 2010 and earlier models, the outer door skin must be removed to access the latch. After removing the lock cylinder, outside handle, and door skin, disconnect the door handle bearing bracket rubber retainer and slide the bearing bracket out, then remove the two fasteners to withdraw the lock unit with its cover from the door. Disconnect the operating cable housing from the lock unit and the electrical connector, and unhook the interior handle operation cable from the lock unit by pulling the cable end straight out of the actuator lever, with installation being the reverse. For 2011 models, pry the cover up from the bottom to remove the access panel from the door, disconnect the electrical harness connector, and remove the lock cylinder or end cap. After removing the two fasteners, withdraw the lock unit with its cover from the door, disconnect the operating cable from the door handle, and unclip the cable from the lock assembly, noting the cable location. Finally, disconnect the operating cable housing from the lock unit and unhook the interior handle operation cable by rotating the cable end 90 degrees and unclipping it, with installation being the reverse of removal.
- Q: How to remove and install the Door Lock Cylinder, Lift Support and Trunk Lid Latch on Volkswagen Rabbit coupe and wagon?A:To install the coupe models, it is advisable to start by lifting the liftgate and take off the trim panel. When the lock is not functioning, tailgate can be opened manually by going inside the vehicle through an emergency cover and then using the lever. Then, remove the wiring of the liftgate lock, lift out the retaining fasteners and the lock of the tailgate, and install it again in the same way that it was removed. Next detach the tailgate wiper motor, dissolve the wiring connections with the handle/release unit and the retaining fasteners that connect the unit to the liftgate and locking brackets and rotate the unit clockwise out of the liftgate. Before reattaching the trim panel, be sure that the lock parts have been properly installed. In wagon models, open the liftgate and take out the trim panel, then unplug the electrical connector on the back side of the lock, remove the fastening screw, and remove the lock, and it is installed the same way. Detach the electrical connector on the rear of the handle button, take out the two retaining fasteners and the threaded pin, and then remove the cover and the handle/release button out of the liftgate, making sure that the operation of the lock parts is checked before restoring the trim panel. Finally, the liftgate support struts to all models are also removed similarly to the hood support struts.


