×
- Hello
- Login or Register
- Quick Links
- Live Chat
- Track Order
- Parts Availability
- RMA
- Help Center
- Contact Us
- Shop for
- Volkswagen Parts
My Garage
My Account
Cart
Genuine Volkswagen Cabrio Coil Springs
Strut Spring- Select Vehicle by Model
- Select Vehicle by VIN
Select Vehicle by Model
orMake
Model
Year
Select Vehicle by VIN
For the most accurate results, select vehicle by your VIN (Vehicle Identification Number).
2 Coil Springs found

Volkswagen Cabrio Spring Part Number: 1H5-511-115-J
$97.58 MSRP: $136.67You Save: $39.09 (29%)Ships in 1-2 Business Days
Volkswagen Cabrio Spring Part Number: 357-411-105-Q
$99.96 MSRP: $140.00You Save: $40.04 (29%)
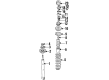
Volkswagen Cabrio Coil Springs
Choose OEM Coil Springs for superior quality and long-lasting durability. They match the Volkswagen's factory specifications exactly and pass strict quality control. If you plan to replace Coil Springs on your Cabrio, put OEM at the top of your list. You'll get the right fit, reliable performance, and peace of mind. We stock an extensive inventory of genuine Volkswagen Cabrio parts. It is easy to find what you need. You will love our competitive prices that help you save. No more hassle with returns or guesswork. Every part includes a warranty straight from the manufacturer. Get trusted quality, strong durability, and real value today.
Volkswagen Cabrio Coil Springs Parts and Q&A
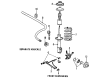
- Q: How do Coil Springs and Shock Absorber affect the removal and reinstallation of the rear wheel on Volkswagen Cabrio?A:In order to take off the rear wheel, one must first loosen the wheel bolts, chock the front wheels, jack the rear of the car, and use axle stands to hold the car. To access the Golf models better, tilt the seat back, unclip and remove the load compartment cover panel and removes the retaining nuts and trim panel in the luggage compartment. In Jetta models, the top of the rear pillar trim panel has a retaining screw on which the left-hand door pillar upper trim panel attaches, which is unscrewed at the bottom of the panel and the top of the pillar and then moved towards the front to disconnect the clips. Repeat on the right hand side and then unclip and take out the parcel shelf trim panel. Installation Take the trim cap off the top of the shock mounting, loosely screw off the upper mounting top nut and dished washer, and unscrew the upper mounting bottom nut to remove the cover plate, upper mounting rubber, and shaped washer and note their proper places of installation. Underneath, unscrew and unbolt shock absorber lower mounting nut and bolt, wrestle out the assembly, and retrieve lower mounting rubber. Wipe the assembly, and clamp it in a vise in an upright position, and position the spring compressor to remove tension on the upper spring seat. Hold onto the piston rod with an open ended wrench, loosen and remove the spring retaining plate nut and remove the spacer, spring retaining plate, rubber spring seat and washer. Take out the coil spring, reclaim the rubber damper stop and protective sleeve and inspect the parts. To reassemble, make sure that the cap is firmly clipped onto the shock absorber body, put the coil spring with close-wound coils on the lower seat, and install the washer and the rubber damper and protective sleeve, slide the rubber spring damper onto the washer, and properly fit the rubber spring seat with spring end. Attach the spring retaining plate and slide in spacer then attach retaining nut and screw it to the correct torque and then carefully remove spring compressors. To install, place the bottom mounting rubber onto the top of the unit, position the assembly, and put the bottom mounting bolt in place by hand, first by hand-tightening the nut on the bolt. Install washer, upper mounting rubber and cover plate inside the vehicle with the tapered serrated face of the rubber facing downwards and convex part of the cover facing upwards. Install dished washer with our convex surface facing down and top mounting nut in that order but be sure that all parts are in place. Under the trailing arm section of the axle beam with a floor jack lift the arm to approximate normal ride height and then tighten the lower mounting bolt to the required value. Lastly, fit the wheel, bring the vehicle down to the ground and screw the wheel bolts to the required torque.

Related Volkswagen Cabrio Parts
 Volkswagen Cabrio Body Control Module
 Volkswagen Cabrio Center Console
 Volkswagen Cabrio Coolant Pipe Seal
 Volkswagen Cabrio Exhaust Heat Shield
 Volkswagen Cabrio Fuse Box
 Volkswagen Cabrio Harmonic Balancer
 Volkswagen Cabrio Stub Axle
 Volkswagen Cabrio Valve Stem Oil Seal
 Volkswagen Cabrio Water Pump Gasket
 Volkswagen Cabrio Wheel Hub