×
- Hello
- Login or Register
- Quick Links
- Live Chat
- Track Order
- Parts Availability
- RMA
- Help Center
- Contact Us
- Shop for
- Volkswagen Parts
My Garage
My Account
Cart
Genuine Volkswagen Cabrio Engine Mount
Engine Motor Mount- Select Vehicle by Model
- Select Vehicle by VIN
Select Vehicle by Model
orMake
Model
Year
Select Vehicle by VIN
For the most accurate results, select vehicle by your VIN (Vehicle Identification Number).
13 Engine Mounts found

Volkswagen Cabrio Bushing Part Number: 1E0-199-233
$3.92 MSRP: $6.42You Save: $2.50 (39%)Ships in 1-2 Business Days
Volkswagen Cabrio Mount Bracket Part Number: 1H0-199-353-D
$78.54 MSRP: $110.00You Save: $31.46 (29%)Ships in 1-2 Business Days
Volkswagen Cabrio Mount Part Number: 191-199-381-A
$90.43 MSRP: $126.65You Save: $36.22 (29%)Ships in 1-2 Business Days
Volkswagen Cabrio Mount Bracket Part Number: 1H0-199-354-J
$92.11 MSRP: $129.00You Save: $36.89 (29%)
Volkswagen Cabrio Front Bracket Part Number: 1H0-199-273-A
$99.96 MSRP: $140.00You Save: $40.04 (29%)Ships in 1-2 Business DaysVolkswagen Cabrio Mount Bracket Part Number: 1H0-199-354-K
$109.48 MSRP: $153.33You Save: $43.85 (29%)Ships in 1-2 Business Days
Volkswagen Cabrio Mount Support Part Number: 1E0-199-185-A
$111.86 MSRP: $156.67You Save: $44.81 (29%)Ships in 1-2 Business DaysVolkswagen Cabrio Front Bracket Part Number: 1H0-199-273-C
$122.57 MSRP: $171.67You Save: $49.10 (29%)Ships in 1-2 Business Days
Volkswagen Cabrio Mount Part Number: 1H0-199-609-G
$124.94 MSRP: $174.98You Save: $50.04 (29%)Ships in 1-2 Business Days
Volkswagen Cabrio Mount Bracket Part Number: 357-199-353-B
$129.95 MSRP: $182.00You Save: $52.05 (29%)Ships in 1-2 Business Days
Volkswagen Cabrio Mount Part Number: 1H0-199-262-A
$147.44 MSRP: $206.50You Save: $59.06 (29%)Ships in 1-2 Business DaysVolkswagen Cabrio Mount Part Number: 1H0-199-262-B
$153.96 MSRP: $215.64You Save: $61.68 (29%)Ships in 1-2 Business Days
Volkswagen Cabrio Support Part Number: 191-199-358-B
$57.60 MSRP: $80.00You Save: $22.40 (28%)Ships in 1-2 Business Days
Volkswagen Cabrio Engine Mount
Choose OEM Engine Mount for superior quality and long-lasting durability. They match the Volkswagen's factory specifications exactly and pass strict quality control. If you plan to replace Engine Mount on your Cabrio, put OEM at the top of your list. You'll get the right fit, reliable performance, and peace of mind. We stock an extensive inventory of genuine Volkswagen Cabrio parts. It is easy to find what you need. You will love our competitive prices that help you save. No more hassle with returns or guesswork. Every part includes a warranty straight from the manufacturer. Get trusted quality, strong durability, and real value today.
Volkswagen Cabrio Engine Mount Parts and Q&A
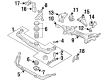
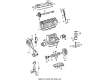
- Q: How to inspect and replace engine mountings for Diesel engine on Volkswagen Cabrio?A:In order to check the mountings of the engine, it is necessary to firstly lift the front of the vehicle and fix it on the axle stands in case it is necessary to access the area better. Examine mounting rubbers and look at the mounting rubbers, to see whether there is cracks, hardening or separation of the mounting rubbers on the metal and all these should be replaced in case any of the above is noticed. Make sure that all the fasteners are tightened to the best of their ability, and, preferably, with a torque wrench. To test free play, a large screwdriver or crowbar can be used by leveraging against the mounting and checking to see whether the mounting is overly worn, otherwise an assistant may move the engine/transaxle and watch the mounting to see whether it is overly worn. In case too much free movement is observed, ensure the fasteners are firmly fixed, and then change any deteriorated parts. To remove the front engine mounting, loosen the battery negative terminal and place the cable away. Place the engine on the floor jack and then loosen and remove the engine mounting through-bolt, starter motor and unbolt the engine mounting-to-transaxle bellhousing bolts and extract the bracket. Unscrew the engine mounting block that is in place in the crossmember cup and raise the block. Installation is the opposite of removal, which is the assurance that the orientation lug fits to the recess of the mounting bracket and that all the bolts are fitted to the required torque. To install the rear right-hand engine, first disconnect the battery negative and then use an engine lifting beam or hoist to suspend the engine. Unbolt engine mounting bracket of cylinder block, loosen and remove engine mounting through-bolt, remove mounting block of engine bay. Removal is carried out in reverse to installation and all the bolts are tightened at the required torque. In the case of the rear left-hand mount, unscrew the battery negative connection, put the engine on a floor jack, and perform the same procedure as the mounting removal and installation, making sure that the orientation lug fits correctly and all the bolts are clamped to the prescribed torque.


