×
- Hello
- Login or Register
- Quick Links
- Live Chat
- Track Order
- Parts Availability
- RMA
- Help Center
- Contact Us
- Shop for
- Volkswagen Parts
My Garage
My Account
Cart
Genuine Volkswagen Cabrio Lift Support
Lift Support Shocks- Select Vehicle by Model
- Select Vehicle by VIN
Select Vehicle by Model
orMake
Model
Year
Select Vehicle by VIN
For the most accurate results, select vehicle by your VIN (Vehicle Identification Number).
3 Lift Supports found

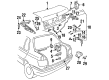
Volkswagen Cabrio Lift Cylinder Part Number: 1C0-827-550-E
$38.89 MSRP: $54.01You Save: $15.12 (28%)Ships in 1-2 Business Days
Volkswagen Cabrio Support Cylinder Part Number: 8L0-823-359
$49.48 MSRP: $68.71You Save: $19.23 (28%)Ships in 1-2 Business Days
Volkswagen Cabrio Hydraulic Cylinder Part Number: 1E0-871-795
$535.58 MSRP: $731.67You Save: $196.09 (27%)Ships in 1-2 Business Days
Volkswagen Cabrio Lift Support
Choose OEM Lift Support for superior quality and long-lasting durability. They match the Volkswagen's factory specifications exactly and pass strict quality control. If you plan to replace Lift Support on your Cabrio, put OEM at the top of your list. You'll get the right fit, reliable performance, and peace of mind. We stock an extensive inventory of genuine Volkswagen Cabrio parts. It is easy to find what you need. You will love our competitive prices that help you save. No more hassle with returns or guesswork. Every part includes a warranty straight from the manufacturer. Get trusted quality, strong durability, and real value today.
Volkswagen Cabrio Lift Support Parts and Q&A
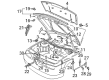
- Q: How to effectively remove and reinstall liftgates with lift support on Volkswagen Cabrio?A:Removing the liftgate To take it off, open the liftgate first, and disconnect the negative battery terminal, having the anti-theft activation code if such exists. Then, loosen and screw a trim panel keeping one end of it in place and unscrew the clips on the trim panel with a flat-bladed screwdriver and then remove the panel very carefully, making sure you do not leave any clips. Unscrew the wiring connectors behind the trim panel, unscrew the washer hose out of the liftgate wiper motor, and also unscrew the wiring of the heated rear window terminals loosening the wiring grommets of the liftgate. connect the tie string on each end of the wiring, be sure you are routing the wiring correctly and release the harness rubber grommets then pull the wiring back; leave the tie string in position to install. Place a mark on the edge of every hinge on the liftgate, and with another body, like an assistant, holding the liftgate, you raise the spring clips and remove the support struts off their mountings on the balljoints. Unscrew the bolts that are holding the hinges to the liftgate and be careful to retrieve the gaskets. Check the condition of hinges and these are worn out or damaged and put in place again rechecking the hinge gasket. In order to get the support struts off, hold the liftgate in the open posture, then lift the spring clip using a small flat-bladed screwdriver and pull the strut out of its balljoint attachments. To install, reverse the removal process and ensure the hinges are in place into the marks you already made and ensure the liftgate is lined up with the rest of the panels and make slight changes as necessary. Lastly, make sure that the support struts are maintained by their clips during installation.

Related Volkswagen Cabrio Parts
 Volkswagen Cabrio Brake Pad Set
 Volkswagen Cabrio Cooling Fan Assembly
 Volkswagen Cabrio Fog Light
 Volkswagen Cabrio Horn
 Volkswagen Cabrio Radiator Cap
 Volkswagen Cabrio Seat Cushion Pad
 Volkswagen Cabrio Thermostat Housing
 Volkswagen Cabrio Turn Signal Lights
 Volkswagen Cabrio Valve Spring Retainer Keeper
 Volkswagen Cabrio Wheel Bearing