×
- Hello
- Login or Register
- Quick Links
- Live Chat
- Track Order
- Parts Availability
- RMA
- Help Center
- Contact Us
- Shop for
- Volkswagen Parts
My Garage
My Account
Cart
Genuine Volkswagen Cabrio Door Lock
Power Door Lock Actuator- Select Vehicle by Model
- Select Vehicle by VIN
Select Vehicle by Model
orMake
Model
Year
Select Vehicle by VIN
For the most accurate results, select vehicle by your VIN (Vehicle Identification Number).
10 Door Locks found

Volkswagen Cabrio Lock Part Number: 6N0-827-505-A
$32.40 MSRP: $54.00You Save: $21.60 (40%)Ships in 1-2 Business DaysVolkswagen Cabrio Lock Part Number: 1E0-827-505-A
$31.93 MSRP: $44.35You Save: $12.42 (28%)Ships in 1-2 Business Days
Volkswagen Cabrio Lock Part Number: 1HM-837-016-J
$74.85 MSRP: $104.83You Save: $29.98 (29%)Volkswagen Cabrio Lock Actuator Part Number: 1HM-837-016-G
$179.48 MSRP: $251.37You Save: $71.89 (29%)Volkswagen Cabrio Lock Part Number: 1HM-837-016-R
$179.48 MSRP: $251.37You Save: $71.89 (29%)
Volkswagen Cabrio Lock Part Number: 1H6-827-505-B
$56.40 MSRP: $78.33You Save: $21.93 (28%)Ships in 1-2 Business Days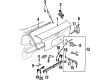
Volkswagen Cabrio Trunk Lock Part Number: 1HM-827-061-E
$98.53 MSRP: $138.00You Save: $39.47 (29%)Volkswagen Cabrio Lock Part Number: 1HM-827-505-A
$33.88 MSRP: $47.04You Save: $13.16 (28%)Volkswagen Cabrio Lock Part Number: 1H1-837-015-P
Volkswagen Cabrio Latch Assembly Part Number: 1HM-837-015-H
Volkswagen Cabrio Door Lock
Choose OEM Door Lock for superior quality and long-lasting durability. They match the Volkswagen's factory specifications exactly and pass strict quality control. If you plan to replace Door Lock on your Cabrio, put OEM at the top of your list. You'll get the right fit, reliable performance, and peace of mind. We stock an extensive inventory of genuine Volkswagen Cabrio parts. It is easy to find what you need. You will love our competitive prices that help you save. No more hassle with returns or guesswork. Every part includes a warranty straight from the manufacturer. Get trusted quality, strong durability, and real value today.
Volkswagen Cabrio Door Lock Parts and Q&A
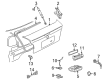
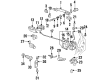
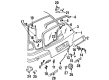
- Q: How to remove and install a door lock and interior door handle on Volkswagen Cabrio?A:The interior door handle can be removed by initially removing the door inner trim panel and then using an appropriate screwdriver to loosen the lower holding clip of the handle, sliding it out of the door and out of the connector rod. In the case of the exterior door handle, this may be accomplished with the inside trim panel still attached; in the case of the front door, with the handle of the lock inserted, loosen the handle retaining bolt at the back of the edge and pivot the whole handle assembly out of position even as the key is rotated 90 degrees to unlock it in the lock operating lever. Get back the handle seals and lock retaining clip, checking it not to be damaged, replacing it accordingly, but do not drop the clip in the door. Then take out the exterior door handle, unhook the connecting rod on the back of the lock cylinder and get the spring back, then disengage the coupling and spring on the back of the cylinder and the lock cylinder out of the handle, as well as replace and repair a damaged sealing ring. With the front door lock, the window should be completely closed, then the interior door handle should be removed, the door trim panel which is holding the clips should be levered out and the insulating panel should be peeled to have access to the lock assembly. Deassemble the exterior door handle, the vacuum line and wiring connector(s) in case of central locking, loosen and remove the lock retaining bolts, disengaging the lock to the link rod. In the case of the rear door lock, the central locking element wiring connector is disconnected; the retaining pin of the interior lock button pivot link rod is pressed out; the link rods guide clips are unclipped and the lock retaining bolts are loosened and removed to maneuver the lock and the link rod out of the door, being careful not to exchange the link rods. To install it, you will need to insert the interior handle into the link rod and you will need to snap the handle back in place making sure that it works properly, before putting the panel of the trim back into place. In the exterior handle, then put the lock retaining clip in place and insert the seals, connect the lock front pivot, clip the handle rear and ensure its functionality before securing and tightening the retaining bolt. Apply lubrication to the lock cylinder and locking plates, place the sealing ring, then fit the cylinder, then fit the coupling and spring, making sure they are properly positioned then check that it is working. In the case of front door lock, loosen the lock adjusting screw, put the lock into place, attach and screw the retaining bolts, reconnect the vacuum lines and wiring connector when needed and put the exterior handle. Use the access of rubber plug to adjust the lock, make sure the lock and handle properly adjusted, and verify the work of the lock and handle, installing the insulating panel and trim panel again. When fitting the rear door lock, install the link rods in the right way, loosen the lock adjustment screw, position the lock assembly into place, loosen the retaining bolts, reconnect the vacuum lines and wiring connector where needed, attach the link rod to the pivot and fix it with the retaining pin, and the installation is complete.

Related Volkswagen Cabrio Parts
 Volkswagen Cabrio Air Injection Pump
 Volkswagen Cabrio Exhaust Heat Shield
 Volkswagen Cabrio Fuel Sending Unit
 Volkswagen Cabrio Hood Release Cable
 Volkswagen Cabrio Oil Dipstick
 Volkswagen Cabrio Piston
 Volkswagen Cabrio Power Steering Hose
 Volkswagen Cabrio Radiator
 Volkswagen Cabrio Seat Cushion Pad
 Volkswagen Cabrio Valve Cover Gasket
 Volkswagen Cabrio Wheel Bearing Dust Cap