×
- Hello
- Login or Register
- Quick Links
- Live Chat
- Track Order
- Parts Availability
- RMA
- Help Center
- Contact Us
- Shop for
- Volkswagen Parts
My Garage
My Account
Cart
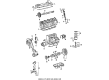
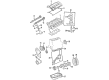
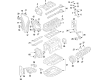
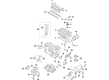
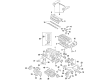
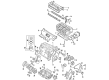
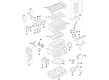
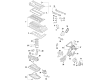
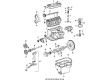
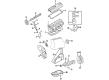
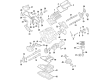
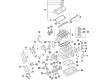
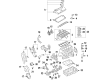
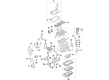
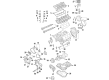
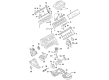
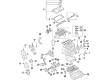
Genuine Volkswagen Intake Valve
Engine Intake Valve- Select Vehicle by Model
- Select Vehicle by VIN
Select Vehicle by Model
orMake
Model
Year
Select Vehicle by VIN
For the most accurate results, select vehicle by your VIN (Vehicle Identification Number).
31 Intake Valves found

Volkswagen Intake Valve Part Number: 037-109-601
$24.60 MSRP: $41.00You Save: $16.40 (40%)Product Specifications- Other Name: Valve
Volkswagen Exhaust Valve Part Number: 068-109-601-N
$34.20 MSRP: $57.00You Save: $22.80 (40%)Product Specifications- Other Name: Valve; Intake Valve
Volkswagen Intake Valve Part Number: 06K-109-601-B
$34.31 MSRP: $57.18You Save: $22.87 (40%)Ships in 1-2 Business DaysProduct Specifications- Other Name: Valve
Volkswagen Intake Valve Part Number: 022-109-601-AL
$34.43 MSRP: $57.38You Save: $22.95 (40%)Ships in 1-2 Business DaysProduct Specifications- Other Name: Valve
- Replaces: 022-109-601-AK
Volkswagen Intake Valve Part Number: 022-109-601-H
$17.52 MSRP: $28.73You Save: $11.21 (40%)Ships in 1-2 Business DaysProduct Specifications- Other Name: Valve
Volkswagen Intake Valve Part Number: 022-109-601-E
$26.39 MSRP: $43.97You Save: $17.58 (40%)Ships in 1-2 Business DaysProduct Specifications- Other Name: Valve
Volkswagen Intake Valve Part Number: 05E-109-601-B
$4.95 MSRP: $8.09You Save: $3.14 (39%)Ships in 1-2 Business DaysProduct Specifications- Other Name: Valve
Volkswagen Intake Valve Part Number: 06E-109-601-Q
$20.73 MSRP: $33.98You Save: $13.25 (39%)Ships in 1-2 Business DaysProduct Specifications- Other Name: Valve
- Replaces: 06E-109-601
Volkswagen Intake Valve Part Number: 068-109-601-C
$24.24 MSRP: $33.67You Save: $9.43 (29%)Product Specifications- Other Name: Valve

Volkswagen Intake Valve Part Number: 7B0-109-601-B
$26.10 MSRP: $36.25You Save: $10.15 (28%)Ships in 1-2 Business DaysProduct Specifications- Other Name: Valve
Volkswagen Intake Valve Part Number: 068-109-601-D
$30.50 MSRP: $42.37You Save: $11.87 (29%)Product Specifications- Other Name: Valve
Volkswagen Intake Valve Part Number: 028-109-601-H
$37.70 MSRP: $52.37You Save: $14.67 (29%)Ships in 1-2 Business DaysProduct Specifications- Other Name: Valve
Volkswagen Valves Part Number: 07D-109-601
$40.80 MSRP: $56.67You Save: $15.87 (28%)Ships in 1-2 Business DaysProduct Specifications- Other Name: Valve
Volkswagen Valves Part Number: 07D-109-601-A
$40.80 MSRP: $56.67You Save: $15.87 (28%)Ships in 1-2 Business DaysProduct Specifications- Other Name: Valve
Volkswagen Intake Valve Part Number: 038-109-601-F
$56.03 MSRP: $77.82You Save: $21.79 (28%)Ships in 1-2 Business DaysProduct Specifications- Other Name: Valve
Volkswagen Intake Valve Part Number: 03L-109-601
$58.07 MSRP: $80.65You Save: $22.58 (28%)Ships in 1-2 Business DaysProduct Specifications- Other Name: Valve
Volkswagen Intake Valve Part Number: 04L-109-601-D
$58.79 MSRP: $81.65You Save: $22.86 (28%)Ships in 1-2 Business DaysProduct Specifications- Other Name: Valve
- Replaces: 04L-109-601-R, 04L-109-601-C
Volkswagen Intake Valve Part Number: 06E-109-601-E
$69.02 MSRP: $96.66You Save: $27.64 (29%)Ships in 1-2 Business DaysProduct Specifications- Other Name: Valve
- Replaces: 06E-109-601-F
Volkswagen Intake Valve Part Number: 038-109-601-B
$61.87 MSRP: $86.65You Save: $24.78 (29%)Ships in 1-2 Business DaysProduct Specifications- Other Name: Valve
Volkswagen Intake Valve Part Number: 038-109-601-E
$61.87 MSRP: $86.65You Save: $24.78 (29%)Ships in 1-2 Business DaysProduct Specifications- Other Name: Valve
| Page 1 of 2 |Next >
1-20 of 31 Results
Volkswagen Intake Valve
The Volkswagen Intake Valve opens just at the right time to allow an evenly distributed stream of air and fuel to enter each cylinder, putting engines throughout the brand in crisp throttle response, steady torque, and cleaner emissions. This Intake Valve relies on a tough steel stem, polished seat, and tightly wound spring so that it seals instantly after the intake stroke, holding compression to save power and economy on every drive. Its durability minimizes carbon accumulation, thereby reducing the need for frequent service and contributing to long engine life, not to mention that the shared design easily slots into the entire family of gasoline and hybrid powertrains, simplifying parts supply for VW owners worldwide. Born in 1937 with the original people's car dream, VW today is a way of getting heritage mixed with modern tech, seeing iconic models such as the Beetle and Type 2 legacy mated with turbine-smooth TSI turbo engines, digital cockpits, and park assist features. The scalable MQB platform reduces weight and costs, allowing engineers to add innovations such as touchscreen MIB infotainment and head-up displays without having to reinvent the chassis each time. VW is also pushing ahead with ID electric vehicles carrying the same clear styling and solid build that made earlier legends so trusted. Whether driving in a compact hatch or a spacious SUV, drivers experience the consistent blend of practicality, reliability, and understated flair that defines the brand.
Buying OEM parts is a smart move to keep your long-term repair costs low. These components are built to last because VW uses such strict factory standards. At VWPartsGiant.com, it is easy to find genuine Volkswagen Intake Valve at prices that actually beat the competition. You get a real manufacturer's warranty with every single part, so you know your purchase is safe. Plus, forget about return headaches since our policy is easy and worry-free. We ship your order fast, too. If you have questions, our team of parts experts is ready to help. Why wait? Start shopping now!
Volkswagen Intake Valve Parts and Q&A
- Q: What role does a professional play in servicing intake valves, specifically valve seats and guides, known as a valve job on Volkswagen Passat?A:A valve job (servicing the valve seats and guides) is complicated and needs special tools, which is why the work should be left to a professional since the valves cannot be serviced. A home mechanic would be able to take the head out to dismantle and perform preliminary cleaning and inspections after which he or she would send it to an automotive machine shop where the actual work is carried out. Using this inspection, it is possible to check the state of the head and the valve train parts, and understand which work and new parts are required in case of cooperation with the shop. It is worth mentioning that the most popular cylinder heads of the Volkswagen have the maximum dimension of the valve seat refacing, which shows the maximum amount of material that can be machined off the valve seats before it is required to replace it, and the shop will measure this index. The shop will also take out the valves and springs, recondition the seats and guides, exam and substitute valves, valve springs, spring retainers and keepers when necessary, recondition valve seals, assemble the parts and check the valve stem height. In case of a cylinder head with warped surface the surface gasket of the cylinder head will be resurfaced provided that this head is at least of the required minimum height. The head will be in like-new condition after the professional job on the valve, and it is necessary to clean it with more cleaning again before reattached to the engine, blowing it out with compressed air where it can be used, to remove all oil holes and passages.
- Q: How should the Cylinder Head, Intake Valve and Valve Spring be refitted and what precautions should be taken during the process on Volkswagen Transporter?A:Unless new valves are being installed then the ones removed should be refitted back into their original locations. Where feasible, apply molybdenum disulphide, or some other anti-scuffing paste, to the valve stem to limit the early wear in the guide. Install the valve in the guide, install the oil ring along the valve stem and then install the spring and spring collar with the close coils of the spring against the head. Then place the compressor of the valve spring with or without the spacer tube and with great care squeeze the spring, taking care not to have the spring flying out, as it will tip in squeezing up, and this will make it difficult to fit the split collets. Squeeze the spring to the extent that it will reveal the grooves of the split collets. In the event of tube method, insert the split collets through the tube slot with a screwdriver, greased, to collect the collet and then place it with the narrow end facing down. The second half can be challenging because the spring is not centrally spaced about the valve stem, which can be mitigated through numerous measures by paying careful attention to tipping the spring with the compressor or pre-exerting a little more compressive force. After the split collets have been correctly aligned on the grooves of the valve stems, carefully disengage the compressor tool, without pushing either of the collets out of place. The two halves of the split collet should be in contact, when disengaged, and otherwise one of them might not be seated properly in the grooves. Do the same with each valve individually.
Related Volkswagen Parts
 Volkswagen Fuel Pump
 Volkswagen PCV Valve
 Volkswagen Flywheel
 Volkswagen EGR Cooler
 Volkswagen Sway Bar
 Volkswagen A/C Clutch
 Volkswagen Axle Shaft
 Volkswagen Exhaust Gas Temperature Sensor
 Volkswagen Exhaust Nut
 Volkswagen Ground Cables
 Volkswagen Mirror Switch
 Volkswagen Pressure Plate
Browse by Model
Atlas Cross Sport Intake Valve Atlas Intake Valve Beetle Intake Valve Cabrio Intake Valve Cabriolet Intake Valve Corrado Intake Valve Eos Intake Valve EuroVan Intake Valve Fox Intake Valve Golf Alltrack Intake Valve Golf Intake Valve Golf SportWagen Intake Valve GTI Intake Valve Jetta Intake Valve Passat Intake Valve Phaeton Intake Valve Quantum Intake Valve R32 Intake Valve Rabbit Intake Valve Routan Intake Valve Scirocco Intake Valve Taos Intake Valve Tiguan Intake Valve Touareg Intake Valve Transporter Intake Valve Vanagon Intake Valve