×
- Hello
- Login or Register
- Quick Links
- Live Chat
- Track Order
- Parts Availability
- RMA
- Help Center
- Contact Us
- Shop for
- Volkswagen Parts
My Garage
My Account
Cart
Genuine Volkswagen Passat Fuel Injector
Gas Injector- Select Vehicle by Model
- Select Vehicle by VIN
Select Vehicle by Model
orMake
Model
Year
Select Vehicle by VIN
For the most accurate results, select vehicle by your VIN (Vehicle Identification Number).
15 Fuel Injectors found

Volkswagen Passat Injector Part Number: 04L-131-113-Q
$287.18 MSRP: $392.29You Save: $105.11 (27%)Ships in 1-2 Business Days
Volkswagen Passat Injector Part Number: 3C0-131-113-C
$265.34 MSRP: $362.48You Save: $97.14 (27%)Ships in 1-2 Business Days
Volkswagen Passat Injector Part Number: 06G-906-036-J
$141.60 MSRP: $198.32You Save: $56.72 (29%)Ships in 1-2 Business DaysVolkswagen Passat Injector Part Number: 06G-906-036-AH
$141.60 MSRP: $198.32You Save: $56.72 (29%)Ships in 1-2 Business Days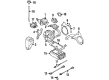
Volkswagen Passat Injector Part Number: 021-906-031-A
$119.00 MSRP: $166.67You Save: $47.67 (29%)Ships in 1-2 Business DaysVolkswagen Passat Injector Part Number: 037-906-031-J
$130.90 MSRP: $183.33You Save: $52.43 (29%)Ships in 1-2 Business DaysVolkswagen Passat Injector Part Number: 058-133-551
$135.66 MSRP: $190.00You Save: $54.34 (29%)Ships in 1-2 Business DaysVolkswagen Passat Injector Part Number: 03H-906-036-R
$170.16 MSRP: $238.32You Save: $68.16 (29%)Ships in 1-2 Business Days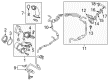
Volkswagen Passat Injector Part Number: 03L-130-277-R
$262.29 MSRP: $358.32You Save: $96.03 (27%)Ships in 1-2 Business Days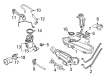
Volkswagen Passat Injector Part Number: 07K-906-031-C
$224.90 MSRP: $314.98You Save: $90.08 (29%)Ships in 1-2 Business Days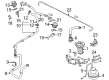
Volkswagen Passat Injector Part Number: 07D-906-031-C
$209.49 MSRP: $293.41You Save: $83.92 (29%)Ships in 1-2 Business Days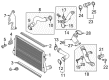
Volkswagen Passat Injector Part Number: 06A-906-036-P
$311.09 MSRP: $424.98You Save: $113.89 (27%)Ships in 1-2 Business Days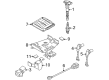
Volkswagen Passat Injector Part Number: 06F-906-036-A
$329.39 MSRP: $449.98You Save: $120.59 (27%)Ships in 1-2 Business Days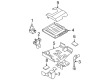
Volkswagen Passat Injector Part Number: 03L-130-277-A
$220.65 MSRP: $309.03You Save: $88.38 (29%)Ships in 1-2 Business Days
Volkswagen Passat Injector Part Number: 038-130-079-PX
$572.54 MSRP: $780.00You Save: $207.46 (27%)Ships in 1-2 Business Days
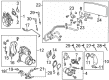
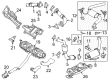
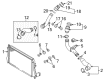
Volkswagen Passat Fuel Injector
Choose OEM Fuel Injector for superior quality and long-lasting durability. They match the Volkswagen's factory specifications exactly and pass strict quality control. If you plan to replace Fuel Injector on your Passat, put OEM at the top of your list. You'll get the right fit, reliable performance, and peace of mind. We stock an extensive inventory of genuine Volkswagen Passat parts. It is easy to find what you need. You will love our competitive prices that help you save. No more hassle with returns or guesswork. Every part includes a warranty straight from the manufacturer. Get trusted quality, strong durability, and real value today.
Volkswagen Passat Fuel Injector Parts and Q&A
- Q: How to remove and install the fuel injector and fuel rail on Volkswagen Passat?A:Relieve the fuel pressure to take out the fuel rail and the injectors. Once more, take off the engine cover (unless it is already removed) and label and disconnect all the vacuum hoses or any electrical wiring that are likely to prevent the removal of the fuel rail. Disconnect the vacuum hose to the fuel pressure regulator and then the fuel inlet line and the fuel return line to the fuel rail. Unscrew the electrical connector of fuel injectors, remove the wiring harness retainers that are on the fuel rail, and position the harness out of the way applying a numbered tag to each connector with the corresponding cylinder number. Take off all the debris surrounding the injectors and then loosen the fuel rail mounting bolts. Vigorously shake the fuel rail and injectors to loosen them and then detach the fuel rail and injectors together. Take out the retaining clip and the injection(s) inside the fuel rail group, making certain to take off the O-rings and dispose them. During the installation, grease the new O-rings with clean engine oil and insert the injectors into their respective bores in the fuel rail ensuring that the injectors are clamped in place. Install the injectors and fuel rail assembly onto the intake manifold making sure the injectors are fully seated before tightening the fuel rail mounting nuts to the required torque. Install the fuel lines connecting them with the electrical connectors to every injector with the help of the numbered tags. The rest of the installation is the opposite of the removal process. Once the injector and fuel rail assembly is installed, turn the ignition switch to the On position without turning on the starter to pump the fuel a few seconds creating fuel pressure in the lines and through the rail. Repeat this procedure two or three times, and examine whether there is any leakage of the fuel around the lines, rail and injectors.
Related Volkswagen Passat Parts
 Volkswagen Passat Instrument Cluster
 Volkswagen Passat Air Filter Box
 Volkswagen Passat Crankshaft Timing Gear
 Volkswagen Passat Exhaust Clamp
 Volkswagen Passat Exhaust Manifold Gasket
 Volkswagen Passat Pressure Plate
 Volkswagen Passat Transmission Filter
 Volkswagen Passat Valve Spring
 Volkswagen Passat Vapor Canister
 Volkswagen Passat Vapor Canister Purge Solenoid
 Volkswagen Passat Voltage Regulators
 Volkswagen Passat Wheel Seal
Browse by Year
2022 Fuel Injector 2021 Fuel Injector 2020 Fuel Injector 2019 Fuel Injector 2018 Fuel Injector 2017 Fuel Injector 2016 Fuel Injector 2015 Fuel Injector 2014 Fuel Injector 2013 Fuel Injector 2012 Fuel Injector 2008 Fuel Injector 2007 Fuel Injector 2006 Fuel Injector 2005 Fuel Injector 2004 Fuel Injector 2003 Fuel Injector 2002 Fuel Injector 1999 Fuel Injector 1998 Fuel Injector 1997 Fuel Injector 1996 Fuel Injector 1995 Fuel Injector 1994 Fuel Injector 1993 Fuel Injector