×
- Hello
- Login or Register
- Quick Links
- Live Chat
- Track Order
- Parts Availability
- RMA
- Help Center
- Contact Us
- Shop for
- Volkswagen Parts
My Garage
My Account
Cart
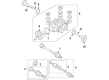
Genuine Volkswagen Rabbit CV Joint Boot
Constant-Velocity Joint Boot- Select Vehicle by Model
- Select Vehicle by VIN
Select Vehicle by Model
orMake
Model
Year
Select Vehicle by VIN
For the most accurate results, select vehicle by your VIN (Vehicle Identification Number).
6 CV Joint Boots found

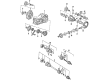
Volkswagen Rabbit Boots Part Number: 191-498-201-D
$33.00 MSRP: $55.00You Save: $22.00 (40%)Ships in 1-2 Business Days
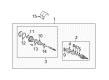
Volkswagen Rabbit Inner Boot Part Number: 1K0-498-201
$35.88 MSRP: $59.80You Save: $23.92 (40%)Ships in 1-2 Business Days
Volkswagen Rabbit Outer Boot Part Number: 1K0-498-203
$7.82 MSRP: $12.82You Save: $5.00 (39%)Ships in 1-2 Business Days
Volkswagen Rabbit Outer Boot Part Number: 1K0-498-203-A
$12.59 MSRP: $20.64You Save: $8.05 (39%)Ships in 1-2 Business Days
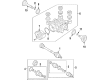
Volkswagen Rabbit Outer Boot Part Number: 1K0-598-203
$21.73 MSRP: $35.62You Save: $13.89 (39%)Ships in 1-2 Business Days
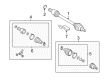
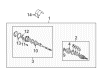
Volkswagen Rabbit Inner Boot Part Number: 1K0-498-201-G
$60.68 MSRP: $84.98You Save: $24.30 (29%)Ships in 1-2 Business Days
Volkswagen Rabbit CV Joint Boot
Choose OEM CV Joint Boot for superior quality and long-lasting durability. They match the Volkswagen's factory specifications exactly and pass strict quality control. If you plan to replace CV Joint Boot on your Rabbit, put OEM at the top of your list. You'll get the right fit, reliable performance, and peace of mind. We stock an extensive inventory of genuine Volkswagen Rabbit parts. It is easy to find what you need. You will love our competitive prices that help you save. No more hassle with returns or guesswork. Every part includes a warranty straight from the manufacturer. Get trusted quality, strong durability, and real value today.
Volkswagen Rabbit CV Joint Boot Parts and Q&A
- Q: What factors should you consider before replacing CV joints and CV joint boots that show signs of wear on Volkswagen Rabbit?A:When the CV joints exhibit signs of wear; usually because of tearing CV joint boots, then weigh all the alternatives first before commencing with the overhaul, because complete rebuilt CV axles can be obtained on an exchange basis and this saves time and effort. The first step involves removing the CV axle out of the vehicle, holding it in a vise, fitting soft jaws, and cutting off the outer CV joint boot which holds the clamps. Slide the CV joint boot down to expose the CV joint, wipe off excess grease, and with a hammer and brass punch, tap the joint off the CV axle and be sure the punch is only hitting the inner race. Unscrew the circlip in the CV axle groove, and squeeze the thrust washer and the dished washer off, recording the relationship. Cast off the CV joint boot and wash the outer CV joint assembly, indicating the positions of the bearing cage, inner race, and housing. The outer CV joint can be fitted in a vise and the bearings taken out of it, and then the cage and the inner race assembly can be removed by tilting the joint vertically. Clean solvent all parts, examine damages and in case some parts cannot be serviced, replace entire CV joint assembly. Should be satisfactory, repair by taking a CV joint boot replacement kit, rubbing all parts with CV joint grease, and starting reassembly with attaching the inner race in the cage, aligning the marks, and putting the balls in. With the grease squeezed into the joint, be sure it is completely stuffed, and wipe the axleshaft with cleaning it and slide on the new clamp and CV joint boot. Fit a new circlip making sure that it fits into the joint and fit the CV joint boot over the joint and tighten the clamps with a crimping tool. In the case of inner CV joints, take away the CV joint boot clamps, draw the CV joint boot back and slide off the joint housing whilst marking the correspondence between the tri-pod and the outer race. Mark the tri-pod and axleshaft with a center punch, and remove the retainer clip and drive the tri-pod joint off the CV axle. Clean up the old grease, check against wear and put together with fresh clamps and grease. In the case of triple-roller type joints, the steps to be followed are the same, i.e. to remove and inspect components and to restore their correct positioning during assembly. In ball-and-cage type joints, take out the CV joint boot clamp, bang out the CV joint boot cap, take out the snap-ring and strip out the inner joint. Wipe everything clean, grease and reassemble, making sure that the snap-ring fits and the joint moves easily before attaching the CV axle again.
- Q: How can one inspect CV Joint Boot and check the steering linkage and suspension components periodically for wear or damage on Volkswagen Rabbit?A:The steering linkage and the suspension parts ought to be periodically inspected because a worn out or damaged component may result in an excessive tire wear, poor ride quality, handling and poor fuel economy. In order to test the shock absorbers, place a car on a flat surface, switch off the engine, and engage the parking brake, and test the tire pressure. On the lower end of the vehicle, press down with one end and release it, and it should stop motion and the shock absorber should be at a level position in one or two bounces, however, when it keeps on moving, or does not go back to a level position, then there is a possibility of a worn shock absorber. Check this at the remaining corners and ensure that the vehicle is raised on jackstands. Check the shock absorbers of leakage of fluid, leaking fluid should be due to the shocks, and replace as a set in case of leaking fluid. In addition, ensure that the shocks are well secured and they are not spoilt or worn out, and replace them in case of any damages or wear. To check the steering and the suspension, inspect visually components, e.g., damage, distortion, and leaks, especially around seals, boots and bushings. Wipe the bottom of the steering knuckle, and have someone push the tire in and out whilst checking for movement at the balljoint, any movement will mean that replacement is necessary. Check all the front tires and look at the steering system play, remember to look at the steering gear mounting and tie-rod ends to check whether they are loose or not. Finally, examine the driveaxle boots by looking at them regarding tears, cracks, and loose clamps since they guard the CV joints against dirt and damage; any sign of cracks or leakage requires replacement.


Related Volkswagen Rabbit Parts
 Volkswagen Rabbit A/C Compressor
 Volkswagen Rabbit Crankshaft Seal
 Volkswagen Rabbit Exhaust Hanger
 Volkswagen Rabbit Hood Hinge
 Volkswagen Rabbit Idler Pulley
 Volkswagen Rabbit Oil Pressure Switch
 Volkswagen Rabbit Parking Brake Cable
 Volkswagen Rabbit Valve Cover
 Volkswagen Rabbit Valve Cover Gasket
 Volkswagen Rabbit Washer Pump