×
- Hello
- Login or Register
- Quick Links
- Live Chat
- Track Order
- Parts Availability
- RMA
- Help Center
- Contact Us
- Shop for
- Volkswagen Parts
My Garage
My Account
Cart
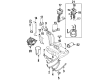
Genuine Volkswagen Cabrio Fuel Tank
Gas Tank- Select Vehicle by Model
- Select Vehicle by VIN
Select Vehicle by Model
orMake
Model
Year
Select Vehicle by VIN
For the most accurate results, select vehicle by your VIN (Vehicle Identification Number).
2 Fuel Tanks found

Volkswagen Cabrio Fuel Tank Part Number: 1E0-201-075-A
$248.05 MSRP: $338.87You Save: $90.82 (27%)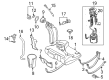
Volkswagen Cabrio Fuel Tank Part Number: 1EM-201-075-D
$1295.64 MSRP: $1517.14You Save: $221.50 (15%)Ships in 1-2 Business Days
Volkswagen Cabrio Fuel Tank
Choose OEM Fuel Tank for superior quality and long-lasting durability. They match the Volkswagen's factory specifications exactly and pass strict quality control. If you plan to replace Fuel Tank on your Cabrio, put OEM at the top of your list. You'll get the right fit, reliable performance, and peace of mind. We stock an extensive inventory of genuine Volkswagen Cabrio parts. It is easy to find what you need. You will love our competitive prices that help you save. No more hassle with returns or guesswork. Every part includes a warranty straight from the manufacturer. Get trusted quality, strong durability, and real value today.
Volkswagen Cabrio Fuel Tank Parts and Q&A
- Q: What steps should be followed to safely remove and reinstall a fuel tank for single-point fuel injection on Volkswagen Cabrio?A:Either drain as much fuel as you can before removing the tank, preferably to the point of it being almost empty, no drain plug is supplied. Take off the negative cable of the battery and do not touch it against the terminal, and have the activation code to the stereo in case it has an anti-theft system. Work out all the fuel in the tank with the aid of a hand pump or siphon. Unscrew the wiring harness of the pump sender unit and the fuel supply and return hoses. Place a floor jack in the middle of tank where a block of wood must lie upon so that the jack does not break. Raise the jack until it has the weight of the tank. Within the rear right wheel arch, unscrew and unscrew the screws that fix the tank filler neck then peel off the rubber covering the sealing flange off the bodywork. Take off the retaining screws of the tank securing straps, and steady the tank slowly, then remove the jack and tank, and break the connection of the charcoal canister vent pipe and the ground strap of the filler neck. In case of sediment or water in the tank, eliminate the Fuel Pump/sender unit and clear the tank with new fuel; otherwise, damaged, replace or repair it by an expert. Installation requires all the removal steps to be reversed, making sure that the mounting rubbers are in place, that the hoses are not caught and that the pipes are firmly held, the ground strap re-attached, and the tank retaining straps bolts are firmly tightened. Lastly, always refuel the tank and ensure that there are no leaks and then drive.

Related Volkswagen Cabrio Parts
 Volkswagen Cabrio Air Bag Sensor
 Volkswagen Cabrio Air Filter Box
 Volkswagen Cabrio CV Joint Boot
 Volkswagen Cabrio Engine Oil Cooler
 Volkswagen Cabrio Heater Core
 Volkswagen Cabrio Oil Dipstick
 Volkswagen Cabrio Oil Pan Gasket
 Volkswagen Cabrio Shift Knob
 Volkswagen Cabrio Wheel Bearing Dust Cap
 Volkswagen Cabrio Windshield Washer Hose
 Volkswagen Cabrio Wiper Linkage