×
- Hello
- Login or Register
- Quick Links
- Live Chat
- Track Order
- Parts Availability
- RMA
- Help Center
- Contact Us
- Shop for
- Volkswagen Parts
My Garage
My Account
Cart
Genuine Volkswagen Jetta Hood Release Cable
Hood Cable- Select Vehicle by Model
- Select Vehicle by VIN
Select Vehicle by Model
orMake
Model
Year
Select Vehicle by VIN
For the most accurate results, select vehicle by your VIN (Vehicle Identification Number).
11 Hood Release Cables found


Volkswagen Jetta Release Cable Part Number: 5K1-823-531
$29.51 MSRP: $49.18You Save: $19.67 (40%)Ships in 1-2 Business Days


Volkswagen Jetta Release Cable Part Number: 5C6-823-535
$44.27 MSRP: $61.49You Save: $17.22 (28%)Ships in 1-2 Business Days

Volkswagen Jetta Release Cable Part Number: 17B-823-531
$65.44 MSRP: $91.65You Save: $26.21 (29%)Ships in 1-2 Business Days

Volkswagen Jetta Cable Part Number: 192-823-531
$35.86 MSRP: $59.76You Save: $23.90 (40%)
Volkswagen Jetta Release Cable Part Number: 1K1-823-531-B
$29.51 MSRP: $49.18You Save: $19.67 (40%)Ships in 1-2 Business Days
Volkswagen Jetta Release Cable Part Number: 5C7-823-531
$33.83 MSRP: $56.38You Save: $22.55 (40%)Ships in 1-2 Business DaysVolkswagen Jetta Release Cable Part Number: 1K1-823-531-C
$23.17 MSRP: $37.98You Save: $14.81 (39%)Ships in 1-2 Business Days
Volkswagen Jetta Cable Part Number: 1J1-823-531-C
$54.71 MSRP: $75.99You Save: $21.28 (28%)Ships in 1-2 Business Days
Volkswagen Jetta Release Cable Part Number: 1K1-823-535-A
$57.11 MSRP: $79.32You Save: $22.21 (28%)Ships in 1-2 Business Days
Volkswagen Jetta Release Cable Part Number: 17A-823-535
$60.68 MSRP: $84.99You Save: $24.31 (29%)Ships in 1-2 Business Days
Volkswagen Jetta Release Cable Part Number: 5K0-823-535
$66.63 MSRP: $93.32You Save: $26.69 (29%)Ships in 1-2 Business Days
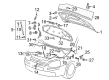
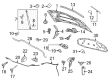
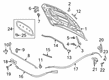
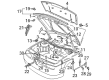
Volkswagen Jetta Hood Release Cable
Choose OEM Hood Release Cable for superior quality and long-lasting durability. They match the Volkswagen's factory specifications exactly and pass strict quality control. If you plan to replace Hood Release Cable on your Jetta, put OEM at the top of your list. You'll get the right fit, reliable performance, and peace of mind. We stock an extensive inventory of genuine Volkswagen Jetta parts. It is easy to find what you need. You will love our competitive prices that help you save. No more hassle with returns or guesswork. Every part includes a warranty straight from the manufacturer. Get trusted quality, strong durability, and real value today.
Volkswagen Jetta Hood Release Cable Parts and Q&A
- Q: How to replace the Hood Release Cable on Volkswagen Jetta?A:The Hood Latch release cable used on this model has two components which include one that is joined with the Hood latch and the other one joins with the release lever located in the vehicle. One should never leave the release cable of the release lever and hood latch locked in place. Firstly, unlock the hood and pull the release cable connector out of the metal support directly over the left-hand side headlamp housing and unpack the plastic cover and loosen the cables. Proceed to use a small screwdriver to lift up the clip on the inside of the vehicle and take out the lever. The second step is to pry up the front part of the sill trim and driver side kick panel, and remove the cable housing in the release lever, and the end of the cable out of the release arm. Disconnect any other retaining points in the engine compartment one of which the release cable is attached to, and connect a wire or string to the end of the old cable. When in the passenger compartment, install the cable by pulling through cowl into passenger compartment, and attaching the new cable to the string or wire and pulling it through cowl into engine compartment. The rest of the installation proceeds in designation with the opposite of the removal process, making sure that all cable holding clips are secured in their respective places. Removing the hood safety lever: This can be done by unbolting it and attaching the bolt positions to the lever on any occasion where it needs to be adjusted, loosening the bolts, and positioning the lever to align perfectly with the latch when the hood is closed and then tightening the bolts back.

Related Volkswagen Jetta Parts
 Volkswagen Jetta Parking Sensors
 Volkswagen Jetta Radiator Hose
 Volkswagen Jetta Body Mount Hole Plug
 Volkswagen Jetta Brake Shoe Set
 Volkswagen Jetta Cooling Fan Assembly
 Volkswagen Jetta Cooling Fan Motor
 Volkswagen Jetta Lift Support
 Volkswagen Jetta Power Seat Switch
 Volkswagen Jetta Seat Heater Switch
 Volkswagen Jetta Turn Signal Lights
 Volkswagen Jetta Vehicle Speed Sensors
 Volkswagen Jetta Window Crank Handles
Browse by Year
2024 Hood Release Cable 2023 Hood Release Cable 2022 Hood Release Cable 2021 Hood Release Cable 2020 Hood Release Cable 2019 Hood Release Cable 2018 Hood Release Cable 2017 Hood Release Cable 2016 Hood Release Cable 2015 Hood Release Cable 2014 Hood Release Cable 2013 Hood Release Cable 2012 Hood Release Cable 2011 Hood Release Cable 2010 Hood Release Cable 2009 Hood Release Cable 2008 Hood Release Cable 2007 Hood Release Cable 2006 Hood Release Cable 2005 Hood Release Cable 2004 Hood Release Cable 2003 Hood Release Cable 2002 Hood Release Cable 2001 Hood Release Cable 2000 Hood Release Cable 1999 Hood Release Cable 1998 Hood Release Cable 1997 Hood Release Cable 1996 Hood Release Cable 1995 Hood Release Cable 1994 Hood Release Cable 1993 Hood Release Cable 1992 Hood Release Cable 1991 Hood Release Cable 1990 Hood Release Cable 1989 Hood Release Cable 1988 Hood Release Cable 1987 Hood Release Cable 1986 Hood Release Cable 1985 Hood Release Cable 1984 Hood Release Cable