×
- Hello
- Login or Register
- Quick Links
- Live Chat
- Track Order
- Parts Availability
- RMA
- Help Center
- Contact Us
- Shop for
- Volkswagen Parts
My Garage
My Account
Cart
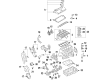
Genuine Volkswagen Passat Piston
Engine Pistons- Select Vehicle by Model
- Select Vehicle by VIN
Select Vehicle by Model
orMake
Model
Year
Select Vehicle by VIN
For the most accurate results, select vehicle by your VIN (Vehicle Identification Number).
15 Pistons found

Volkswagen Passat Piston Part Number: 03L-107-065-N-001
$168.55 MSRP: $236.07You Save: $67.52 (29%)Ships in 1-2 Business Days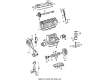
Volkswagen Passat Pistons Part Number: 037-107-065-M
$128.52 MSRP: $180.00You Save: $51.48 (29%)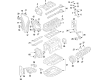
Volkswagen Passat Piston Part Number: 06L-107-065-AN
$133.27 MSRP: $186.66You Save: $53.39 (29%)Ships in 1-2 Business Days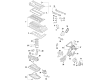
Volkswagen Passat Piston Part Number: 07K-107-065-F
$167.78 MSRP: $234.98You Save: $67.20 (29%)Ships in 1-2 Business Days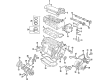
Volkswagen Passat Piston Part Number: 071-107-065-C
$208.25 MSRP: $291.67You Save: $83.42 (29%)Ships in 1-2 Business Days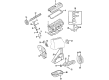
Volkswagen Passat Pistons Part Number: 053-107-065-F
$255.86 MSRP: $349.53You Save: $93.67 (27%)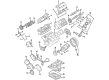
Volkswagen Passat Piston Part Number: 078-107-065-AF
$335.50 MSRP: $458.33You Save: $122.83 (27%)Ships in 1-2 Business Days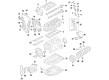
Volkswagen Passat Piston Part Number: 06L-107-065-AS
$405.64 MSRP: $554.15You Save: $148.51 (27%)Ships in 1-2 Business Days
Volkswagen Passat Piston Part Number: 038-107-065-AA-003
$408.69 MSRP: $558.32You Save: $149.63 (27%)Ships in 1-2 Business DaysVolkswagen Passat Piston Part Number: 038-107-065-AB-003
$408.69 MSRP: $558.32You Save: $149.63 (27%)Ships in 1-2 Business Days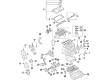
Volkswagen Passat Piston Part Number: 038-107-065-HE-001
$408.69 MSRP: $558.32You Save: $149.63 (27%)Ships in 1-2 Business DaysVolkswagen Passat Piston Part Number: 038-107-065-HF-001
$408.69 MSRP: $558.32You Save: $149.63 (27%)Ships in 1-2 Business Days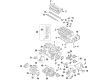
Volkswagen Passat Piston Part Number: 03H-107-065-AR
$273.93 MSRP: $374.22You Save: $100.29 (27%)Ships in 1-2 Business Days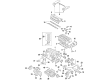
Volkswagen Passat Piston Part Number: 03H-107-066-N
$103.68 MSRP: $145.21You Save: $41.53 (29%)Ships in 1-2 Business DaysVolkswagen Passat Piston Part Number: 03H-107-066-AR
$291.76 MSRP: $398.58You Save: $106.82 (27%)Ships in 1-2 Business Days
Volkswagen Passat Piston
Choose OEM Piston for superior quality and long-lasting durability. They match the Volkswagen's factory specifications exactly and pass strict quality control. If you plan to replace Piston on your Passat, put OEM at the top of your list. You'll get the right fit, reliable performance, and peace of mind. We stock an extensive inventory of genuine Volkswagen Passat parts. It is easy to find what you need. You will love our competitive prices that help you save. No more hassle with returns or guesswork. Every part includes a warranty straight from the manufacturer. Get trusted quality, strong durability, and real value today.
Volkswagen Passat Piston Parts and Q&A
- Q: What steps should be taken before carrying out the inspection process on piston/connecting rod assemblies on Volkswagen Passat?A:The piston/connecting rod assemblies have to be cleaned and also the original Piston Rings have to be taken off the pistons before the inspection process can be performed and new piston rings should be always used whenever the job is to be re-assembled. Take a piston ring installation tool and take the rings off the pistons, without gouging or nicking them. Either by hand with a hand-held wire brush or fine emery cloth, wipe all of the carbon off the top of the piston but not to a point that the soft piston material is eroded against by the wire brush on the end of a drill motor. Carbon deposits in the ring grooves may be removed with a piston ring groove-cleaning tool or a fragment cut off the old ring can adequately do the same, without disturbing the metal or damaging the grooves. Once the deposits have been removed, clean up the piston/rod assemblies using solvent and dry them using compressed air where possible. When the pistons and the walls of the cylinder are not damaged, and the engine block is not rebored, new pistons may not be needed, but in any case of re-building the engine, new piston rings are to be used. The cracks, scoring, scuffing, holes and burned areas on each piston must also be examined to detect any signs of over heating or inappropriate combustion and hence a close examination of the cooling and lubrication system is required. Pitting corrosion is an indication of leaking coolant in the combustion chamber or crankcase which should be eliminated to avoid the recurrence of the problem. Determine the piston ring side clearance at various locations around each groove with the appropriate ring fitting each groove or the clearance will be excessive and new pistons will be needed. The clearance between the piston and bore can be measured by the bore and piston diameter at a given point and the difference between the bore and piston diameter should be calculated; when this is too large then the block will have to be rebored, new pistons and rings should be installed. The clearances between the piston pin and the rod and piston should be checked by turning the piston and rod opposite to each other and the clearance detected by any movement, which in itself indicates that the wear and tear are excessive and will need redressing, which may involve resizing and replacement of pins at a machine shop. In case pistons should be removed out of the connecting rods, they should also be subjected in a machine shop where they can be checked on the bend and twist. Lastly, check the connecting rods as a crack and damage-check, by loosening the rod caps and old bearing inserts, wiping off the surfaces and inspecting them before replacing the bearings and tightening the caps, in case of a connecting rod knock, it is advisable to use new or remanufactured connecting rods.
- Q: What steps must be taken before removing the piston and connecting rod assemblies on Volkswagen Passat?A:The baffle, oil pump, oil pump drive chain (when fitted) and the oil pump as well as the Cylinder Head are to be disassembled before the removal of the piston and connecting rod assemblies. The upper oil pan should as well be removed before moving forward on V6 engines. To begin with, put your fingernail up on the top of each cylinder and look at the top of the ridge you will see. There is a ridge formed at the upper limit of ring travel, about 1/4-inch below the top. Provided there are ridges formed by carbon deposits or wear of the cylinders, the ridges have to be completely cleared by a ridge reamer before one tries to extract the piston and connecting rod subassembly to prevent piston breakage. When the ridges have been cleared, turn the engine on its back, Crankshaft up. Prior to the removal of the connecting rods, verify the endplay using feeler gauges and confirm that the side clearance is not excessive of the service limits; when it is more than the limit, new connecting rod might be required. With the installation of new rods or a new crankshaft the endplay can be less than the minimum stated, necessitating machining of the rods. Take out the oil spray jet(s) in the engine block where necessary. Trace the matching rods and caps with marks and mark them with a small center-punch to designate their position. Loosen the connecting rod cap nuts or bolts, either by attaching and detaching a screwdriver or other tool until they can be removed by hand, then loosen the first connecting rod cap and bearing insert, but do not drop the bearing insert. In the case of 1.8L engine, cover the crankshaft journal and the cylinder wall with a short piece of plastic or rubber hose over each connecting rod cap bolt first before removing the pistons and rods. Take away the bearing insert and push up through the top of the engine the connecting rod/piston assembly, pushing down on the upper surface of the bearing with the help of a wooden or plastic hammer handle. In case of resistance, make sure that all of the material is removed on the ridge. This should be repeated with the other cylinders. Once removed, wear the connecting rod caps and bearing inserts into their respective respective rods, installing the cap nuts or bolts finger tight to eliminate any damage to bearer surfaces and do not remove the pistons off the connecting rods.
Related Volkswagen Passat Parts
 Volkswagen Passat Thermostat
 Volkswagen Passat Air Temperature Sensor
 Volkswagen Passat CV Joint Boot
 Volkswagen Passat Door Lock
 Volkswagen Passat EGR Cooler
 Volkswagen Passat Exhaust Clamp
 Volkswagen Passat Exhaust Hanger
 Volkswagen Passat HVAC Heater Blend Door Actuator
 Volkswagen Passat Oil Pressure Switch
 Volkswagen Passat Rack & Pinion Bushing
 Volkswagen Passat Starter Brush
Browse by Year
2022 Piston 2021 Piston 2020 Piston 2019 Piston 2018 Piston 2017 Piston 2016 Piston 2015 Piston 2014 Piston 2013 Piston 2012 Piston 2008 Piston 2007 Piston 2006 Piston 2005 Piston 2004 Piston 2003 Piston 2002 Piston 2001 Piston 2000 Piston 1999 Piston 1998 Piston 1997 Piston 1996 Piston 1995 Piston 1994 Piston 1993 Piston 1992 Piston 1991 Piston