×
- Hello
- Login or Register
- Quick Links
- Live Chat
- Track Order
- Parts Availability
- RMA
- Help Center
- Contact Us
- Shop for
- Volkswagen Parts
My Garage
My Account
Cart
Genuine Volkswagen Rabbit Timing Cover
Engine Timing Cover- Select Vehicle by Model
- Select Vehicle by VIN
Select Vehicle by Model
orMake
Model
Year
Select Vehicle by VIN
For the most accurate results, select vehicle by your VIN (Vehicle Identification Number).
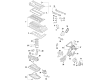
9 Timing Covers found

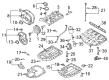
Volkswagen Rabbit Cover Part Number: 06H-103-269-H
$213.00 MSRP: $298.32You Save: $85.32 (29%)Ships in 1-2 Business Days
Volkswagen Rabbit Front Cover Part Number: 06H-109-210-AG
$308.04 MSRP: $420.82You Save: $112.78 (27%)Ships in 1-2 Business Days
Volkswagen Rabbit Cover Part Number: 07K-109-283-E
$340.44 MSRP: $465.08You Save: $124.64 (27%)Ships in 1-2 Business Days
Volkswagen Rabbit Timing Cover Part Number: 07K-109-210-G
$753.34 MSRP: $949.98You Save: $196.64 (21%)Ships in 1-2 Business Days
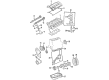
Volkswagen Rabbit Timing Cover Part Number: 068-109-127-A
$31.14 MSRP: $51.90You Save: $20.76 (40%)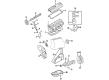
Volkswagen Rabbit Timing Cover Part Number: 049-109-175
$35.34 MSRP: $58.90You Save: $23.56 (40%)Volkswagen Rabbit Timing Cover Part Number: 068-109-121-A
$62.23 MSRP: $87.15You Save: $24.92 (29%)Volkswagen Rabbit Timing Cover Part Number: 055-109-107-B
$108.11 MSRP: $151.42You Save: $43.31 (29%)Volkswagen Rabbit Timing Cover Part Number: 068-109-121-C
$141.93 MSRP: $198.78You Save: $56.85 (29%)
Volkswagen Rabbit Timing Cover
Choose OEM Timing Cover for superior quality and long-lasting durability. They match the Volkswagen's factory specifications exactly and pass strict quality control. If you plan to replace Timing Cover on your Rabbit, put OEM at the top of your list. You'll get the right fit, reliable performance, and peace of mind. We stock an extensive inventory of genuine Volkswagen Rabbit parts. It is easy to find what you need. You will love our competitive prices that help you save. No more hassle with returns or guesswork. Every part includes a warranty straight from the manufacturer. Get trusted quality, strong durability, and real value today.
Volkswagen Rabbit Timing Cover Parts and Q&A
- Q: What precautions should be taken when removing the Timing Chain, Timing Chain Tensioner and Timing Cover for Four-cylinder engines on Volkswagen Rabbit?A:Special care should be taken to ensure that the crankshaft or Camshafts are not turned individually as the timing chain is disconnected since it will cause damage to the valves. In case the battery is switched off, a number of systems will have to be re-learned to be used properly. This is a process peculiar to the CCTA and CBFA engines. To remove the upper timing chain cover, the engine cover and oil dipstick tube should be first removed making sure that the O-ring at the bottom of the dipstick tube is changed. The charge air pipe is supposed to be moved aside with the disconnecting of the required components provided it is equipped with a noise generator. Coolant hoses should be forced back, electrical connector to the camshaft adjustment valve should also be disconnected and then the valve and seal should be removed and replaced. Removal of the upper timing chain cover is then done in a star fashion and the gasket has to be discarded and replaced. To install, one should first clean the cover and the Cylinder Head faces, then to install a new gasket then tighten the cover in that order. Lower cover removal This includes disconnection of battery, lifting up of the vehicle and removal of several parts such as the splash shield, engine cover and inner fender liner and emptying of the engine oil as well as the air charge pipe. Crankshaft pulley should be handled carefully to avoid its damage and engine should be placed in support to have additional disassembling. Oil dipstick tube and turbocharger components should be disconnected and then the lower cover can be removed. Installation involves cleaning of surfaces, putting on RTV seals and alignment of timing marks. The timing chain and tensioners should be maintained with care so as not to cause dire engine harm and the entire parts are to be reassembled in the same sequence of their removal making sure that the crankshaft is turned by hand to ensure that it does not meet any resistance and only then the engine is started. The balance shaft timing chain and tensioner are also to be installed taking care; the tensioner is to be thread locked with sealer and installed.

Related Volkswagen Rabbit Parts
 Volkswagen Rabbit Alternator Bracket
 Volkswagen Rabbit Brake Hose
 Volkswagen Rabbit Flywheel
 Volkswagen Rabbit Fuel Rail
 Volkswagen Rabbit Hazard Warning Switches
 Volkswagen Rabbit Oxygen Sensor
 Volkswagen Rabbit Power Seat Switch
 Volkswagen Rabbit Timing Cover Gasket
 Volkswagen Rabbit Water Pump Pulley