×
- Hello
- Login or Register
- Quick Links
- Live Chat
- Track Order
- Parts Availability
- RMA
- Help Center
- Contact Us
- Shop for
- Volkswagen Parts
My Garage
My Account
Cart
Genuine Volkswagen Cabrio Axle Shaft
Car Axle Shaft- Select Vehicle by Model
- Select Vehicle by VIN
Select Vehicle by Model
orMake
Model
Year
Select Vehicle by VIN
For the most accurate results, select vehicle by your VIN (Vehicle Identification Number).
5 Axle Shafts found

Volkswagen Cabrio Shaft Part Number: JZW-498-340-BX
$157.75 MSRP: $218.00You Save: $60.25 (28%)Ships in 1-2 Business Days
Volkswagen Cabrio Axle Shaft Assembly Part Number: JZW-407-450-TX
$164.31 MSRP: $224.25You Save: $59.94 (27%)Ships in 1-2 Business DaysVolkswagen Cabrio Axle Shaft Assembly Part Number: JZW-407-451-FX
$167.53 MSRP: $228.75You Save: $61.22 (27%)Ships in 1-2 Business DaysVolkswagen Cabrio Axle Shaft Assembly Part Number: 1HM-407-273
$311.89 MSRP: $365.21You Save: $53.32 (15%)Volkswagen Cabrio Axle Shaft Assembly Part Number: 1HM-407-274-B
$340.75 MSRP: $399.00You Save: $58.25 (15%)
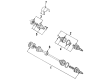
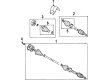
Volkswagen Cabrio Axle Shaft
Choose OEM Axle Shaft for superior quality and long-lasting durability. They match the Volkswagen's factory specifications exactly and pass strict quality control. If you plan to replace Axle Shaft on your Cabrio, put OEM at the top of your list. You'll get the right fit, reliable performance, and peace of mind. We stock an extensive inventory of genuine Volkswagen Cabrio parts. It is easy to find what you need. You will love our competitive prices that help you save. No more hassle with returns or guesswork. Every part includes a warranty straight from the manufacturer. Get trusted quality, strong durability, and real value today.
Volkswagen Cabrio Axle Shaft Parts and Q&A
- Q: What steps are involved in removing and installing an axle shaft retaining nut on Volkswagen Cabrio?A:A new driveaxle retaining nut will be required on installation. For removal, on automatic transaxle models, it may be necessary to unbolt the front and rear engine/transaxle mounts and lift the engine slightly to gain the necessary clearance to withdraw the left-hand driveaxle. Begin by removing the wheel trim or hub cap, loosening the driveaxle retaining nut while the vehicle is resting on its wheels, and also loosening the wheel bolts. Block the rear wheels, apply the parking brake, raise the front of the vehicle, and support it securely on jackstands before removing the front wheel. Unscrew the bolts securing the inner driveaxle joint to the transaxle flange and, if applicable, remove the retaining plates from underneath the bolts. Support the driveaxle with wire or string to prevent damage. Use a marking pen to draw around the end of the suspension control arm to mark the correct installed position of the balljoint, then unscrew the balljoint retaining bolts and remove the retaining plate from the top of the control arm. Unscrew the driveaxle retaining nut and, if necessary, remove its washer. Carefully pull the hub assembly outwards and withdraw the driveaxle outer constant velocity joint from the hub assembly, using a soft-faced mallet if the splines are stuck. Maneuver the driveaxle out from underneath the vehicle and recover the gasket from the end of the inner constant velocity joint, discarding it as a new one should be used on installation. Avoid allowing the vehicle to rest on its wheels with one or both driveaxles removed to prevent damage to the wheel bearings; if moving the vehicle is unavoidable, temporarily insert the outer end of the driveaxles in the hubs and tighten the retaining nuts while supporting the inner ends. For installation, ensure that the transaxle flange and inner joint mating surfaces are clean and dry, then install a new gasket. Clean and dry the outer joint and hub splines and threads, applying a 1/8-inch bead of sealant to the outer joint splines on models with Plus suspension. Maneuver the driveaxle into position, engage the outer joint with the hub, and install the washer and nut to draw the joint fully into position. Install the suspension control arm balljoint retaining bolts, tightening them to the specified torque while ensuring correct positioning. Align the driveaxle inner joint with the transaxle flange, install the retaining bolts and plates, and tighten them to the torque. Ensure the outer joint is fully drawn into position, then install the wheel and lower the vehicle. On models with Plus suspension, tighten the driveaxle nut to stage 1 torque and then rotate through the specified stage 2 angle; for models with base suspension, tighten the driveaxle nut to the torque. Finally, tighten the wheel bolts to the torque and install the wheel trim or hub cap.

Related Volkswagen Cabrio Parts
 Volkswagen Cabrio Air Intake Hose
 Volkswagen Cabrio Axle Support Bushings
 Volkswagen Cabrio Brake Hose
 Volkswagen Cabrio Fuel Pressure Regulator
 Volkswagen Cabrio Parking Brake Cable
 Volkswagen Cabrio Throttle Position Sensor
 Volkswagen Cabrio Transmission Filter
 Volkswagen Cabrio Washer Pump
 Volkswagen Cabrio Wheel Bearing
 Volkswagen Cabrio Wheel Cylinder