×
- Hello
- Login or Register
- Quick Links
- Live Chat
- Track Order
- Parts Availability
- RMA
- Help Center
- Contact Us
- Shop for
- Volkswagen Parts
My Garage
My Account
Cart
Genuine Volkswagen Cabrio Dash Panels
Dashboard- Select Vehicle by Model
- Select Vehicle by VIN
Select Vehicle by Model
orMake
Model
Year
Select Vehicle by VIN
For the most accurate results, select vehicle by your VIN (Vehicle Identification Number).
1 Dash Panels found

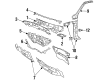
Volkswagen Cabrio Dash Panel Part Number: 1H1-863-911-C
$149.94 MSRP: $210.00You Save: $60.06 (29%)
Volkswagen Cabrio Dash Panels
Choose OEM Dash Panels for superior quality and long-lasting durability. They match the Volkswagen's factory specifications exactly and pass strict quality control. If you plan to replace Dash Panels on your Cabrio, put OEM at the top of your list. You'll get the right fit, reliable performance, and peace of mind. We stock an extensive inventory of genuine Volkswagen Cabrio parts. It is easy to find what you need. You will love our competitive prices that help you save. No more hassle with returns or guesswork. Every part includes a warranty straight from the manufacturer. Get trusted quality, strong durability, and real value today.
Volkswagen Cabrio Dash Panels Parts and Q&A
- Q: How should Dash Panels be labeled during disconnection for proper installation on Volkswagen Cabrio?A:Label all wiring connector as it is not connected with its respective component since the labels will be needed during installation in order to route and feed the wiring along the dash apertures. Start by removing the battery negative terminal, this is done with the right activation code to the stereo in case it has an anti-theft system. Take out the Center Console, steering column, instrument panel assembly, cigarette lighter, radio/cassette unit and the front treble loudspeakers on the dash. In cars with a passenger airbag, disassemble the airbag, and in car without an airbag, the glovebox. In diesel models, do not have cold start accelerator cable. To access the fusebox, unclip the fusebox cover on the underside of the lower dash panel on the driver side and then pry the trim panel on the top of the driver side lower dash panel, loosening and removing all the retaining screws and then removing it out of the vehicle. Unscrew and take out the retaining screws that hold the dash on the mounting frame, the driver, driver, and passenger side screws. Take out the windshield wipers arms, unscrew the windshield wiper motor trim cover which has fastener screws, and remove the fasteners. Unscrew the two halves of the trim cover of the windshield by peeling the rubber seal on top of the firewall and removing it. Unscrew and detach the two dash retaining nuts that are found underneath the center of the windshield and unscrew the wiper motor, should there be a necessity to access a deeper area. Internally, unhurriedly peel away the dash assembly off the firewall, dislodge the wiring harness out of its retaining clips and be careful of the proper routing of the wiring, and then carefully remove the dash assembly out of the vehicle, recover sealing grommets attached to the mounting studs to the dash and replace them if burned or damaged. To install, reverse the procedure in removal, though it is important to ensure that the sealing grommets are installed to the dash studs and position the dash into its place, carefully guiding the wiring and firmly holding the labels attached to it (used in removal) in place. Reconnect all the wiring connectors by connecting them through the relevant apertures and fitting all the dash fasteners and firmly tightening them. Lastly, re-connect the battery and ensure that all the electrical parts and switches are working as expected.

Related Volkswagen Cabrio Parts
 Volkswagen Cabrio Body Mount Hole Plug
 Volkswagen Cabrio Brake Booster
 Volkswagen Cabrio Brake Master Cylinder
 Volkswagen Cabrio Brake Master Cylinder Reservoir
 Volkswagen Cabrio Cabin Air Filter
 Volkswagen Cabrio Exhaust Heat Shield
 Volkswagen Cabrio Thermostat
 Volkswagen Cabrio Washer Reservoir
 Volkswagen Cabrio Windshield