×
- Hello
- Login or Register
- Quick Links
- Live Chat
- Track Order
- Parts Availability
- RMA
- Help Center
- Contact Us
- Shop for
- Volkswagen Parts
My Garage
My Account
Cart
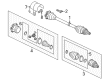
Genuine Volkswagen Passat Axle Shaft
Car Axle Shaft- Select Vehicle by Model
- Select Vehicle by VIN
Select Vehicle by Model
orMake
Model
Year
Select Vehicle by VIN
For the most accurate results, select vehicle by your VIN (Vehicle Identification Number).
52 Axle Shafts found

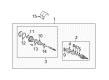
Volkswagen Passat Shaft Part Number: 321-498-099-EX
$155.61 MSRP: $215.00You Save: $59.39 (28%)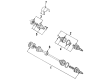
Volkswagen Passat Shaft Part Number: JZW-498-340-BX
$157.75 MSRP: $218.00You Save: $60.25 (28%)Ships in 1-2 Business Days
Volkswagen Passat Axle Assembly Part Number: JZW-407-449-DX
$163.47 MSRP: $224.25You Save: $60.78 (28%)
Volkswagen Passat Flange Part Number: 01Z-525-356
$356.84 MSRP: $487.49You Save: $130.65 (27%)Ships in 1-2 Business Days
Volkswagen Passat Output Shaft Part Number: 01R-525-356
$426.99 MSRP: $583.32You Save: $156.33 (27%)Ships in 1-2 Business Days
Volkswagen Passat Shaft Part Number: 357-498-099-EX
$143.14 MSRP: $197.53You Save: $54.39 (28%)Ships in 1-2 Business Days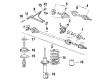
Volkswagen Passat Axle Part Number: 191-407-272-AQ
$549.00 MSRP: $750.00You Save: $201.00 (27%)Volkswagen Passat Axle Shaft Assembly Part Number: 171-407-272-NX
$254.76 MSRP: $342.30You Save: $87.54 (26%)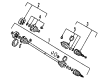
Volkswagen Passat Axle Assembly Part Number: 357-407-272-M
$259.22 MSRP: $349.53You Save: $90.31 (26%)Ships in 1-2 Business DaysVolkswagen Passat Axle Assembly Part Number: 357-407-272-MX
$259.22 MSRP: $349.53You Save: $90.31 (26%)Ships in 1-2 Business Days
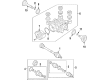
Volkswagen Passat Axle Assembly Part Number: 1K0-501-204-FX
$288.70 MSRP: $338.06You Save: $49.36 (15%)Ships in 1-2 Business Days
Volkswagen Passat Axle Assembly Part Number: 561-407-271-AD
$349.05 MSRP: $408.73You Save: $59.68 (15%)Ships in 1-2 Business Days
Volkswagen Passat Axle Assembly Part Number: 5C0-407-271-AA
$371.48 MSRP: $434.98You Save: $63.50 (15%)Ships in 1-2 Business DaysVolkswagen Passat Axle Assembly Part Number: 1J0-407-451-MX
$374.91 MSRP: $438.73You Save: $63.82 (15%)Ships in 1-2 Business Days

Volkswagen Passat Axle Assembly Part Number: 5C0-407-271-BA
$413.10 MSRP: $483.74You Save: $70.64 (15%)Ships in 1-2 Business Days
Volkswagen Passat Axle Assembly Part Number: 561-407-272-AA
$438.72 MSRP: $513.73You Save: $75.01 (15%)Ships in 1-2 Business Days
Volkswagen Passat Axle Assembly Part Number: 561-407-272-Q
$438.72 MSRP: $513.73You Save: $75.01 (15%)Ships in 1-2 Business Days
Volkswagen Passat Axle Assembly Part Number: 561-407-272-S
$438.72 MSRP: $513.73You Save: $75.01 (15%)Ships in 1-2 Business DaysVolkswagen Passat Axle Assembly Part Number: 561-407-271-AA
$454.74 MSRP: $532.49You Save: $77.75 (15%)Ships in 1-2 Business Days
Volkswagen Passat Axle Assembly Part Number: 3B0-501-203-X
| Page 1 of 3 |Next >
1-20 of 52 Results
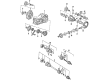
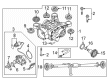
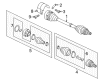
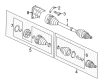
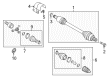
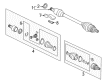
Volkswagen Passat Axle Shaft
Choose OEM Axle Shaft for superior quality and long-lasting durability. They match the Volkswagen's factory specifications exactly and pass strict quality control. If you plan to replace Axle Shaft on your Passat, put OEM at the top of your list. You'll get the right fit, reliable performance, and peace of mind. We stock an extensive inventory of genuine Volkswagen Passat parts. It is easy to find what you need. You will love our competitive prices that help you save. No more hassle with returns or guesswork. Every part includes a warranty straight from the manufacturer. Get trusted quality, strong durability, and real value today.
Volkswagen Passat Axle Shaft Parts and Q&A
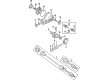
- Q: How to remove and install the front axle shaft for the front and rear drive axle on Volkswagen Passat?A:In removing the front driveaxle, the steps involved include removing the wheel trim or hub cap with the vehicle on the wheels, loosening the driveaxle/hub bolt and then loosening the wheel bolts. Lift the front part of the vehicle and place it on jackstands to block a rear wheel roll and remove the wheel. Removal of the retaining plates, which have bolts attaching the inner CV joint to the transaxle drive flange, should be supported by the driveaxle to avoid being damaged. To ensure that the ABS wheel speed sensor is not destroyed when removing the driveaxle, partially remove the sensor by its mounting hole. Screw off the driveaxle/hub bolt and loosen the upper control arms off the steering knuckle. One can carefully position the steering knuckle out of the hub and pull the outer constant velocity joint out of the hub, with a brass drift as needed to loosen the stuck splines. Move the driveaxle out of underneath the car, and dispose of old gasket. It should not be put on the wheels with the driveaxle out, as this may cause damage to the wheel bearings; where it is essential to move it should temporarily place the outer end of the driveaxle into the hub and hold the inner end. To install, the transaxle drive flange and inner joint mating surfaces should be clean and dry and a new gasket installed. Lubricate and clean the outer joint and hub splines, position the driveaxle and fit the outer joint to the hub, fitting a new bolt that is not tightened fully at this point. Attach the control arms to the steering knuckle and attach the nut to the pinch bolt. Install the inner joint and align with the trans axle flange and install the retaining bolts and plates and screw them. After the outer joint is completely installed, the next step is to fit the wheel and the next step is to lower the vehicle. The process is followed by the installation of the driveaxle/hub, wheel lug bolts, by tightening them to the recommended torque. In the case of the rear driveaxle in all-wheel drive versions, the procedure is the same as with wheel trim removal, and loosening of the bolts, except that after this, the rear of the car is raised and fastened in place. Where possible, dismantle the rear part of the exhaust system to gain access, partially dismantle the ABS wheel speed sensor and remove the bolts of the cover plate where needed. Unscrew the bolts that anchor the inner CV joint on the differential drive flange, prop the driveaxle, and remove the driveaxle/hub bolt. To service individual model models, remove the stabilizer bar connection and the upper control arm and swing the rear knuckle outwards to pull the outer joint out of the hub with the aid of a brass drift or puller, when necessary. Position the driveaxle off, jettisoning the old gasket and do not put the vehicle on its wheels with the driveaxle out. Installation To install a differing drive flange requires that the mating surfaces of the joint and the inside are clean and dry, install a new gasket, clean and lubricate the outer joint and hub splines and engage the outer joint with the hub, installing a new bolt without tightening it completely. Install the upper control arm and stabilizer bar connector (where applicable) by positioning the inner joint with the differential flange and screwing the fixing bolts. Install the exhaust system when taken off, position the outer joint all the way in, followed by the wheel and then lower the vehicle, and finally by attaching the driveaxle/hub bolt and wheel lug bolts to the recommended torque.
- Q: What role does the Axle Shaft play in transmitting power from the transaxle to the front wheels and what are the components involved in this process on Volkswagen Passat?A:The transaxle also sends power to the front wheels via two driveaxles and on all-wheel drive models also to the rear wheels via two further driveaxles. A drive flange of the Differential is clamped to the inner end of the corresponding driveaxle, and the outer end has a stub shaft, splined to the hub and bearing assembly to fit in a large bolt. The driveaxle inner ends have sliding constant velocity (CV) joints, which can angularly and axially move, being either a triple rotor-type bearing or a ball-and-cage type bearing, in a housing that will slide with the wheel. The outer extremes have ball and cage type CV joints that have an angular movement range but none in an axial direction, with ball bearings in between a ball and cage. Examination of the boots due to rupture and leakage of lubricants is required regularly because damaged CV joint boots should be replaced immediately or the joint may be damaged, in this case the driveaxle needs to be removed and replaced. When the boot gets damaged, the CV joint could be taken to pieces, cleaned, however, any components which are discovered to be damaged might require replacement of the full driveaxle assembly, and local auto parts shops can advise. Typical symptoms of worn or damaged CV joints are the leaking of lubricant, clicking during rotary motion, clunking with acceleration following coasting, and vibration in the highway speed. Each axle is to be held and switched in each direction whilst holding the CV joint housings to feel any play that is a sign of worn splines or loose CV joints and look at the driveaxle shafts to outlook cracks, dents, and distortion.


Related Volkswagen Passat Parts
 Volkswagen Passat Throttle Position Sensor
 Volkswagen Passat Wheel Bearing
 Volkswagen Passat Air Intake Hose
 Volkswagen Passat Axle Support Bushings
 Volkswagen Passat Belt Tensioner Bolt
 Volkswagen Passat Brake Hose
 Volkswagen Passat EGR Cooler
 Volkswagen Passat Fuel Pressure Regulator
 Volkswagen Passat Parking Brake Cable
 Volkswagen Passat Transmission Filter
 Volkswagen Passat Washer Pump
 Volkswagen Passat Wheel Cylinder
Browse by Year
2022 Axle Shaft 2021 Axle Shaft 2020 Axle Shaft 2019 Axle Shaft 2018 Axle Shaft 2017 Axle Shaft 2016 Axle Shaft 2015 Axle Shaft 2014 Axle Shaft 2013 Axle Shaft 2012 Axle Shaft 2010 Axle Shaft 2009 Axle Shaft 2008 Axle Shaft 2007 Axle Shaft 2006 Axle Shaft 2005 Axle Shaft 2004 Axle Shaft 2003 Axle Shaft 2002 Axle Shaft 2001 Axle Shaft 2000 Axle Shaft 1999 Axle Shaft 1998 Axle Shaft 1997 Axle Shaft 1996 Axle Shaft 1995 Axle Shaft 1994 Axle Shaft 1993 Axle Shaft 1992 Axle Shaft 1991 Axle Shaft 1990 Axle Shaft