×
- Hello
- Login or Register
- Quick Links
- Live Chat
- Track Order
- Parts Availability
- RMA
- Help Center
- Contact Us
- Shop for
- Volkswagen Parts
My Garage
My Account
Cart
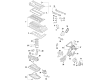
Genuine Volkswagen Rabbit Piston
Engine Pistons- Select Vehicle by Model
- Select Vehicle by VIN
Select Vehicle by Model
orMake
Model
Year
Select Vehicle by VIN
For the most accurate results, select vehicle by your VIN (Vehicle Identification Number).
3 Pistons found

Volkswagen Rabbit Piston Part Number: 07K-107-065-F
$167.78 MSRP: $234.98You Save: $67.20 (29%)Ships in 1-2 Business Days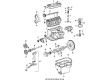
Volkswagen Rabbit Pistons Part Number: 049-107-065-AD
$179.21 MSRP: $251.00You Save: $71.79 (29%)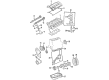
Volkswagen Rabbit Piston Part Number: 068-107-065-BA-001
$260.59 MSRP: $356.00You Save: $95.41 (27%)
Volkswagen Rabbit Piston
Choose OEM Piston for superior quality and long-lasting durability. They match the Volkswagen's factory specifications exactly and pass strict quality control. If you plan to replace Piston on your Rabbit, put OEM at the top of your list. You'll get the right fit, reliable performance, and peace of mind. We stock an extensive inventory of genuine Volkswagen Rabbit parts. It is easy to find what you need. You will love our competitive prices that help you save. No more hassle with returns or guesswork. Every part includes a warranty straight from the manufacturer. Get trusted quality, strong durability, and real value today.
Volkswagen Rabbit Piston Parts and Q&A
- Q: What steps should be followed before removing the piston and connecting rod assemblies on Volkswagen Rabbit?A:The oil pans and cylinder head should be removed before the removal of the piston and the connecting rod assemblies. First, examine whether there are any ridges at the upper limit of the range of travel of the rings in each cylinder, and remove them with a ridge reamer, to avoid the breaking of pistons. Once the ridges have been removed position the engine such that the Crankshaft is facing upward and remove the balance shaft assembly. Check the connecting rod endplay next, using feeler gauges, to make sure that it is within the given limits; otherwise, new connecting rods might be needed. Locate the connecting rods and caps, making sure that the marks face the end of the drivebelt on the engine and slowly loosen the connect rod cap bolts. Lift the first cap attaching the connecting rod and bearing insert without dropping the insert and then thrust the connecting rod/piston assembly out of the top of the engine making sure all the ridge material has been cleared. Proceed in the same manner with the other cylinders and install the connecting rod caps and bearing inserts in their respective rods leaving the old inserts until reassembly. The connecting rods and the pistons are now prepared by being inspected and overhauled. Check the ring end visitation and register the correctness of the piston ring side clearance before the installation of new piston rings. Prepare the assemblies of piston/connecting rods, and new sets of rings to match them during installation. Install the top ring into the first cylinder, align it with the walls of the cylinder and make measurements of the end gap using feeler gauges and adjusting when necessary. Ring: Installing of the oil control ring should be followed by the middle and top ring in proper orientation. Preparations Before fitting, the cylinder walls must be clean and the edges chamfered and the crankshaft fitted. Wipe the surfaces of the bearings and fit the new upper bearing insert, avoiding lubrication. Install the piston ring with the gaps at a 90-degree interval so that it can be lubricated and installed using a piston ring compressor. Put the piston/connecting rod assembly into the cylinder making sure that the connecting rod fits in the crankshaft journal. Check the connecting rod bearing oil clearance with Plastigage and in case the clearance is other than as required, check the bearing inserts and journal diameter. Clean and grease the bearing faces, replace the connecting rod and install the new rod cap bolts and tighten them to the required torque. Repeat with the rest of the assemblies cleaning and facing upward. Lastly, turn the crankshaft to ensure no binding and measure endplay of connecting rod and adjust where needed when new parts were fitted.
Related Volkswagen Rabbit Parts
 Volkswagen Rabbit Air Temperature Sensor
 Volkswagen Rabbit CV Joint Boot
 Volkswagen Rabbit Door Lock
 Volkswagen Rabbit Exhaust Clamp
 Volkswagen Rabbit Exhaust Hanger
 Volkswagen Rabbit HVAC Heater Blend Door Actuator
 Volkswagen Rabbit Oil Pressure Switch
 Volkswagen Rabbit Rack & Pinion Bushing
 Volkswagen Rabbit Thermostat