×
- Hello
- Login or Register
- Quick Links
- Live Chat
- Track Order
- Parts Availability
- RMA
- Help Center
- Contact Us
- Shop for
- Volkswagen Parts
My Garage
My Account
Cart
Genuine Volkswagen Cabrio Rack and Pinions
Steering Rack- Select Vehicle by Model
- Select Vehicle by VIN
Select Vehicle by Model
orMake
Model
Year
Select Vehicle by VIN
For the most accurate results, select vehicle by your VIN (Vehicle Identification Number).
3 Rack and Pinions found

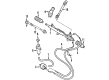
Volkswagen Cabrio Steering Gear Part Number: 6K1-422-061-CX
$610.71 MSRP: $830.00You Save: $219.29 (27%)Ships in 1-2 Business Days
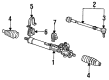
Volkswagen Cabrio Rack & Pinion Part Number: 1HM-422-055-D
$351.36 MSRP: $480.00You Save: $128.64 (27%)Ships in 1-2 Business Days
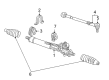
Volkswagen Cabrio Gear Assembly Part Number: 1HM-422-055-F
Volkswagen Cabrio Rack and Pinions
Choose OEM Rack and Pinions for superior quality and long-lasting durability. They match the Volkswagen's factory specifications exactly and pass strict quality control. If you plan to replace Rack and Pinions on your Cabrio, put OEM at the top of your list. You'll get the right fit, reliable performance, and peace of mind. We stock an extensive inventory of genuine Volkswagen Cabrio parts. It is easy to find what you need. You will love our competitive prices that help you save. No more hassle with returns or guesswork. Every part includes a warranty straight from the manufacturer. Get trusted quality, strong durability, and real value today.
Volkswagen Cabrio Rack and Pinions Parts and Q&A
- Q: What are the steps required for the installation of new subframe mounting bolts and steering gear components on Rack and Pinions on Volkswagen Cabrio?A:The installation will need to have new subframe mounting bolts, tie-rod end nuts, rack and pinions retaining nuts, and intermediate shaft connecting piece retaining plate nuts. You should start with loosening the wheel bolts, chocking the rear wheels, turning on the parking brake, jacking the front part of the vehicle and holding it on the axle stands after which you are expected to remove the two front wheels. The second step is to loosen and remove the nuts holding the rack and pinions tie-rod ends onto the Steering Knuckles and then release the balljoint tapered shanks using a universal balljoint separator. Draw the rubber boot out of the firewall, cut the cable-tie, and pull the boot out of the rack and pinions sliding it downwards as far as it reaches the intermediate shaft. In an attempt to do so, one can also gain access through the inside of the vehicle, by prying out the retaining clip then eliminating the trim cover at the bottom of the steering column. Unscrew and remove the nuts, and then proceed to remove the connecting piece holding the plate on the intermediate shaft sliding the connecting piece upwards to release the halves of the shaft and then take back the connecting piece prior to removing the rubber boot. A jack and a block of wood should be used to support the weight of the engine or lifting eyes should be attached, and a hoist or a support bar installed. In models with manual transmission it may be necessary to loosen and remove bolts that hold the gearchange linkage pivot to the top of the rack and pinions. Unscrew and dismantle all front subframe fixing bolts and make sure the engine/transmission is well supported. In the case of manual rack and pinions, the rack and pinions retaining nuts and the mounting clamps should be loosened and removed and the rack and pinions brought out towards the back of the subframe, checking the mounting rubbers to ensure they are not damaged and replacing them where necessary. When the rack and pinions are going to be out of commission temporarily, then take the engine back into place and fit the subframe mount bolts. When using power-assisted rack and pinions, clamp the supply and the return hose near the reservoir of the power steering fluid in order to minimize wastage of fluid, label the fittings to be properly re-assembled, unscrew the feed and the return line fitting nuts of the rack and pinions and place a container under the hose to collect any fluid leakage, and reconnect the two lines and replace the sealing rings of the line ends and rack and pinions orifices to avoid leakage and entry of dirt. Take off the rack and pinions and inspect the assembly for both wear and damage; the rack should move freely without being rough or overly free play; the housing components are a complete assembly and, therefore, have to be replaced, but the boots, tie-rod ends, and tie-rods of the rack and pinions only. To install the manual rack and pinions, fit the mounting rubbers onto the rack and pinions, position the assembly onto the subframe, fit the mounting clamps and the new retaining nuts then screw them to the recommended torque. Gently position the subframe and install the new mounting bolts and tighten them to the required torque values. Hold the intermediate shaft connecting piece and slide it upon the upper half of the shaft aligning the two shaft halves and attaching them to the connecting piece by inserting the retaining plate and fitting the new nuts tightening them to the desired torque level. Place the rubber boot in the correct location within the firewall and place the rubber boot on the rack and pinions and fasten it using a new cable-tie. Re-fit the tie-rod ends to the steering knuckles, fit new retaining nuts, and tighten them to the desired torque value. Install the front wheels, lower the car on the ground, and measure the front wheel alignment. In case of power assist rack and pinions, fit the rack and pinions, wipe the feed and return line fittings and fit them to the rack and pinions and attach the fitting nuts in the correct positions making sure that the lines are properly laid and clamped with all the required retaining clips before performing the operations.

Related Volkswagen Cabrio Parts
 Volkswagen Cabrio Blower Motor Resistor
 Volkswagen Cabrio Center Console
 Volkswagen Cabrio Distributor
 Volkswagen Cabrio Fuel Tank
 Volkswagen Cabrio Ignition Switch
 Volkswagen Cabrio Intake Manifold Gasket
 Volkswagen Cabrio Parking Brake Cable
 Volkswagen Cabrio Sway Bar
 Volkswagen Cabrio Windshield Wiper Motors