×
- Hello
- Login or Register
- Quick Links
- Live Chat
- Track Order
- Parts Availability
- RMA
- Help Center
- Contact Us
- Shop for
- Volkswagen Parts
My Garage
My Account
Cart
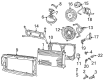
Genuine Volkswagen Coolant Reservoir
Coolant Tank Reservoir- Select Vehicle by Model
- Select Vehicle by VIN
Select Vehicle by Model
orMake
Model
Year
Select Vehicle by VIN
For the most accurate results, select vehicle by your VIN (Vehicle Identification Number).
27 Coolant Reservoirs found


Volkswagen Reservoir Part Number: 701-121-407-E
$55.20 MSRP: $76.67You Save: $21.47 (28%)Ships in 1-2 Business DaysProduct Specifications- Other Name: Tank


Volkswagen Reservoir Part Number: 7B0-121-407-A
$87.91 MSRP: $123.53You Save: $35.62 (29%)Ships in 1-2 Business DaysProduct Specifications- Other Name: Tank; Expansion Tank
- Replaces: 7B0-121-407


Volkswagen Reservoir Part Number: 701-121-407-C
$99.95 MSRP: $139.98You Save: $40.03 (29%)Ships in 1-2 Business DaysProduct Specifications- Other Name: Tank


Volkswagen Reservoir Part Number: 1EA-121-407-F
$46.79 MSRP: $64.98You Save: $18.19 (28%)Product Specifications- Other Name: Tank
- Replaced by: 1EA-121-407-H


Volkswagen Reservoir Part Number: 5QM-121-407-C
$31.07 MSRP: $51.78You Save: $20.71 (40%)Ships in 1-2 Business DaysProduct Specifications- Other Name: Tank; Expansion Tank
- Replaces: 5Q0-121-407-D, 5Q0-121-407-S, 5Q0-121-407-F, 5QM-121-407-B

Volkswagen Reservoir Part Number: 8Z0-121-407-A
$25.31 MSRP: $42.18You Save: $16.87 (40%)Ships in 1-2 Business DaysProduct Specifications- Other Name: Tank; Reservoir Tank

Volkswagen Reservoir Part Number: 5QM-121-407-E
$32.51 MSRP: $54.18You Save: $21.67 (40%)Ships in 1-2 Business DaysProduct Specifications- Other Name: Tank; Expansion Tank

Volkswagen Reservoir Part Number: 5WA-121-407-F
$15.73 MSRP: $25.78You Save: $10.05 (39%)Ships in 1-2 Business DaysProduct Specifications- Other Name: Tank; Expansion Tank

Volkswagen Reservoir Part Number: 3QF-121-407-A
$4.05 MSRP: $6.64You Save: $2.59 (40%)Ships in 1-2 Business DaysProduct Specifications- Other Name: Tank; Expansion Tank
- Replaces: 5WA-121-407-H

Volkswagen Reservoir Part Number: 1J0-121-407-F
$55.55 MSRP: $77.15You Save: $21.60 (28%)Ships in 1-2 Business DaysProduct Specifications- Other Name: Tank
- Replaces: 1C0-121-403-C, 1C0-121-403-A, 1C0-121-407-F, 1C0-121-403, 1C0-121-407-C, 1J0-121-403, 1J0-121-407-E, 1J0-121-403-B, 1C0-121-407-E

Volkswagen Reservoir Part Number: 1K0-121-407-F
$58.43 MSRP: $81.16You Save: $22.73 (29%)Ships in 1-2 Business DaysProduct Specifications- Other Name: Tank; Expansion Tank
- Replaces: 1K0-121-407-A

Volkswagen Reservoir Part Number: 5Q0-121-407-M
$59.51 MSRP: $82.65You Save: $23.14 (28%)Ships in 1-2 Business DaysProduct Specifications- Other Name: Tank
- Replaced by: 5Q0-121-407-AA

Volkswagen Reservoir Part Number: 1H0-121-407-C
$65.26 MSRP: $91.40You Save: $26.14 (29%)Product Specifications- Other Name: Tank
Volkswagen Reservoir Part Number: 1H0-121-407-A
$112.44 MSRP: $157.48You Save: $45.04 (29%)Ships in 1-2 Business DaysProduct Specifications- Other Name: Tank; Reservoir Tank
- Replaces: 5X0-121-407-A

Volkswagen Reservoir Part Number: 3D0-121-407-H
$163.02 MSRP: $228.31You Save: $65.29 (29%)Ships in 1-2 Business DaysProduct Specifications- Other Name: Tank
- Replaces: 3D0-121-403, 3D0-121-407-E

Volkswagen Reservoir Part Number: 7P0-121-407-B
$185.63 MSRP: $259.98You Save: $74.35 (29%)Ships in 1-2 Business DaysProduct Specifications- Other Name: Tank; Expansion Tank
- Replaces: 7P0-121-407

Volkswagen Reservoir Part Number: 7L0-121-407-F
$211.81 MSRP: $296.65You Save: $84.84 (29%)Ships in 1-2 Business DaysProduct Specifications- Other Name: Tank
- Replaces: 7L0-121-407-E, 7L0-121-407-C

Volkswagen Reservoir Part Number: 3Q0-121-407-F
$91.63 MSRP: $128.33You Save: $36.70 (29%)Ships in 1-2 Business DaysProduct Specifications- Other Name: Tank; Expansion Tank
- Replaces: 3Q0-121-407-C
Volkswagen Reservoir Part Number: 1EA-121-407-H
$46.79 MSRP: $64.98You Save: $18.19 (28%)Ships in 1-2 Business DaysProduct Specifications- Other Name: Tank; Expansion Tank
- Replaces: 1EA-121-407-F, 1EA-121-407-E


Volkswagen Reservoir Part Number: 3B0-121-407-B
Product Specifications- Other Name: Tank
| Page 1 of 2 |Next >
1-20 of 27 Results
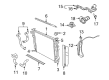
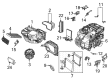
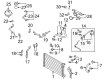
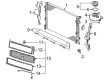
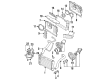
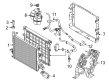
Volkswagen Coolant Reservoir
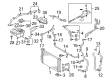
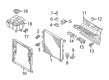
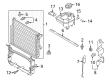
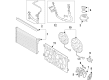
The Volkswagen Coolant Reservoir maintains engine temperatures by allowing expanding antifreeze a safe location to expand in order to keep pressure balanced and never get a chance to overheat. This handy plastic tank is high in the cooling loop where sensors and legible level markings allow any driver to know the status of the fluid at a glance, and its reinforced walls maintain pressure so air can't sneak into the system. A sturdy cap vents only when necessary, preventing messy spills and lessening the pollution of ground soil. By letting coolant flow back into the radiator as the motor cools, the unit prevents rust, scale, and harmful air pockets to promote long engine life. Because all modern Volkswagens have common engineering principles, a second Coolant Reservoir provides the same reliable performance in hatchbacks, sedans, vans, and future electric models. Founded in Wolfsburg in 1937, VW won worldwide admiration with the Beetle and the versatile Type 2 van, proving that friendly design can run side by side with durability. Today the brand hones that legacy with TSI turbo power, direct fuel injection, and the flexible MQB platform that reduces weight and enhances safety. Drivers love digital cockpits, park assist, and responsive MIB touchscreens that make long trips easy. VW also leads the charge ahead with the ID.3 and ID.4 electric lineup, demonstrating a commitment to clean transport while retaining that eternal sense of reliability, practicality, and fun.
Buying OEM parts is a smart move to keep your long-term repair costs low. These components are built to last because VW uses such strict factory standards. At VWPartsGiant.com, it is easy to find genuine Volkswagen Coolant Reservoir at prices that actually beat the competition. You get a real manufacturer's warranty with every single part, so you know your purchase is safe. Plus, forget about return headaches since our policy is easy and worry-free. We ship your order fast, too. If you have questions, our team of parts experts is ready to help. Why wait? Start shopping now!
Volkswagen Coolant Reservoir Parts and Q&A
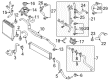
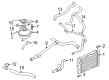
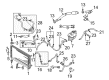
- Q: What precautions should be taken when disconnecting the battery and replacing the radiator and coolant reservoir on Volkswagen Jetta?A:If the battery is disconnected, several systems must be re-learned before they will work properly. For the replacement of the radiator shutter assembly (if equipped), follow the appropriate procedures. Begin by raising the front of the vehicle and securely supporting it on jackstands, then disconnect the cable from the negative terminal of the battery. Remove the under-vehicle splash shield and drain the cooling system, followed by removing the engine cover and cooling fan shroud. Disconnect the hoses from the radiator, being prepared for some coolant to spill, and then remove the front bumper cover. Next, remove the air guide fasteners and the air guides from each side of the condenser, followed by the condenser to radiator bolts. Remove the radiator mount bolts and push the radiator towards the rear until the upper mounts can be removed from the sides, then lift the radiator up and out of the lower mounts. Installation is the reverse of removal, and after refilling and bleeding the system, run the engine and check carefully for leaks. For specific engine types, remove the clips securing the hose connectors, disconnect the coolant temperature sensor electrical connector, and lift the clips securing the hose connectors to the charge air system circuit cooler. Remove the radiator mounting bolts, slide the radiator towards the engine until the upper mounts are free, and lift it out. Prior to installation, replace any damaged components. For the expansion tank, drain the cooling system until empty, detach the upper coolant hoses, disconnect the coolant level sensor connector, and remove the mounting screws to lift the expansion tank and disconnect the lower hose. Ensure the reservoir is clean before installation, which is the reverse of removal.
- Q: How to replace the coolant reservoir and radiator on Volkswagen Passat?A:The steps involved in substituting the radiator include first lifting the front of the car and ensuring that it rests on jackstands and then emptying the cooling system. Place the radiator support panel in an accessible location and unscrew the upper and lower hoses of the coolant through prying the clip out of shape and removing the hoses off the radiator and the fan thermo switch electrical connector. In the cases of an automatic transaxle, un-hook transmission oil cooler lines at the lower section of the radiator. In cars that have air conditioning, remove the air conditioning line retaining clamps, loosen the condenser mounting bolts and unbreech the condenser and the radiator without breaking the lines and attach it to the body using wire so that it is not held loose. The second step is to remove the radiator mounting clips and the radiator out of the support panel. Prior to fitting the new radiator, any broken hose clips and fittings should be replaced and radiator checked and cleaned in case of leaks or other cooling problems. Installation is done in reverse sequence of removal and once we have installed, fill the system with correct antifreeze mixture and remove all the air in the cooling system. To perform the expansion tank, drain the system until it is dry, disconnect the coolant recovery hoses, disconnect the reservoir mounting bolts, lift the expansion tank off the firewall, and disconnect the coolant level sensor connector, and then leave the expansion tank out of engine compartment. The reservoir must be clean and free of debris before installation, and it is done in the same order as it is removed, too.


Related Volkswagen Parts
 Volkswagen Ignition Switch
 Volkswagen PCV Valve
 Volkswagen Timing Belt
 Volkswagen Radiator Cap
 Volkswagen Axle Beam Mount
 Volkswagen Brake Drum
 Volkswagen Brake Pad Set
 Volkswagen Coil Spring Insulator
 Volkswagen Exhaust Nut
 Volkswagen Intercooler Hose
 Volkswagen Spark Plug Wire
 Volkswagen Vapor Canister
Browse by Model
Arteon Coolant Reservoir Atlas Coolant Reservoir Atlas Cross Sport Coolant Reservoir Beetle Coolant Reservoir Cabrio Coolant Reservoir Cabriolet Coolant Reservoir CC Coolant Reservoir Corrado Coolant Reservoir e-Golf Coolant Reservoir Eos Coolant Reservoir EuroVan Coolant Reservoir Fox Coolant Reservoir Golf Alltrack Coolant Reservoir Golf Coolant Reservoir Golf R Coolant Reservoir Golf SportWagen Coolant Reservoir GTI Coolant Reservoir ID.4 Coolant Reservoir Jetta Coolant Reservoir Passat Coolant Reservoir Phaeton Coolant Reservoir Quantum Coolant Reservoir R32 Coolant Reservoir Rabbit Coolant Reservoir Routan Coolant Reservoir Scirocco Coolant Reservoir Taos Coolant Reservoir Tiguan Coolant Reservoir Tiguan Limited Coolant Reservoir Touareg Coolant Reservoir Vanagon Coolant Reservoir