×
- Hello
- Login or Register
- Quick Links
- Live Chat
- Track Order
- Parts Availability
- RMA
- Help Center
- Contact Us
- Shop for
- Volkswagen Parts
My Garage
My Account
Cart
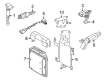
Genuine Volkswagen Knock Sensor
Engine Knock Sensor- Select Vehicle by Model
- Select Vehicle by VIN
Select Vehicle by Model
orMake
Model
Year
Select Vehicle by VIN
For the most accurate results, select vehicle by your VIN (Vehicle Identification Number).
28 Knock Sensors found

Volkswagen Knock Sensor Part Number: 07D-905-376-C
$35.70 MSRP: $59.50You Save: $23.80 (40%)Ships in 1-2 Business DaysProduct Specifications- Other Name: Sensor
Volkswagen Knock Sensor Part Number: 07D-905-376-D
$35.70 MSRP: $59.50You Save: $23.80 (40%)Ships in 1-2 Business DaysProduct Specifications- Other Name: Sensor
Volkswagen Knock Sensor Part Number: 07D-905-376-E
$35.70 MSRP: $59.50You Save: $23.80 (40%)Ships in 1-2 Business DaysProduct Specifications- Other Name: Sensor
Volkswagen Knock Sensor Part Number: 07D-905-376-F
$35.70 MSRP: $59.50You Save: $23.80 (40%)Ships in 1-2 Business DaysProduct Specifications- Other Name: Sensor

Volkswagen Knock Sensor Part Number: 037-905-377-B
$46.80 MSRP: $65.00You Save: $18.20 (28%)Product Specifications- Other Name: Sensor

Volkswagen Knock Sensor Part Number: 7B0-905-377-C
$66.84 MSRP: $93.61You Save: $26.77 (29%)Ships in 1-2 Business DaysProduct Specifications- Other Name: Sensor

Volkswagen Knock Sensor Part Number: 030-905-377-F
$4.22 MSRP: $6.92You Save: $2.70 (40%)Ships in 1-2 Business DaysProduct Specifications- Other Name: Sensor

Volkswagen Knock Sensor Part Number: 078-905-377
$89.96 MSRP: $126.00You Save: $36.04 (29%)Ships in 1-2 Business DaysProduct Specifications- Other Name: Sensor

Volkswagen Knock Sensor Part Number: 07K-905-377-D
$96.38 MSRP: $134.98You Save: $38.60 (29%)Ships in 1-2 Business DaysProduct Specifications- Other Name: Sensor
- Replaces: 07K-905-377-B, 07K-905-377
Volkswagen Knock Sensor Part Number: 07K-905-377-E
$98.76 MSRP: $138.32You Save: $39.56 (29%)Ships in 1-2 Business DaysProduct Specifications- Other Name: Sensor
- Replaces: 07K-905-377-A, 07K-905-377-C
Volkswagen Knock Sensor Part Number: 06C-905-377
$98.76 MSRP: $138.32You Save: $39.56 (29%)Ships in 1-2 Business DaysProduct Specifications- Other Name: Sensor

Volkswagen Knock Sensor Part Number: 06F-905-377
$99.95 MSRP: $139.98You Save: $40.03 (29%)Ships in 1-2 Business DaysProduct Specifications- Other Name: Sensor

Volkswagen Knock Sensor Part Number: 06K-905-377-E
$101.14 MSRP: $141.65You Save: $40.51 (29%)Ships in 1-2 Business DaysProduct Specifications- Other Name: Sensor
- Replaces: 06K-905-377, 06K-905-376

Volkswagen Sensor Part Number: 054-905-377-G
$102.33 MSRP: $143.32You Save: $40.99 (29%)Ships in 1-2 Business DaysProduct Specifications- Other Name: Knock Sensor
- Replaces: 054-905-377

Volkswagen Knock Sensor Part Number: 06E-905-377-J
$102.33 MSRP: $143.32You Save: $40.99 (29%)Ships in 1-2 Business DaysProduct Specifications- Other Name: Sensor
- Position: Driver Side
- Replaces: 06E-905-377-A, 06E-905-376-A

Volkswagen Knock Sensor Part Number: 06E-905-377-K
$102.33 MSRP: $143.32You Save: $40.99 (29%)Ships in 1-2 Business DaysProduct Specifications- Other Name: Sensor
- Position: Passenger Side
- Replaces: 06E-905-377-B, 06E-905-376-B, 06E-905-377-C

Volkswagen Knock Sensor Part Number: 079-905-377-E
$102.33 MSRP: $143.32You Save: $40.99 (29%)Ships in 1-2 Business DaysProduct Specifications- Other Name: Sensor
- Replaces: 079-905-376-C, 079-905-377-A

Volkswagen Knock Sensor Part Number: 07D-905-377
$102.33 MSRP: $143.32You Save: $40.99 (29%)Ships in 1-2 Business DaysProduct Specifications- Other Name: Sensor


Volkswagen Knock Sensor Part Number: 7B0-905-377-E
$158.96 MSRP: $223.38You Save: $64.42 (29%)Ships in 1-2 Business DaysProduct Specifications- Other Name: Sensor
- Replaces: 7B0-905-377

Volkswagen Knock Sensor Part Number: 7B0-905-377-D
$115.58 MSRP: $161.88You Save: $46.30 (29%)Ships in 1-2 Business DaysProduct Specifications- Other Name: Sensor
- Replaces: 7B0-905-377-A
| Page 1 of 2 |Next >
1-20 of 28 Results
Volkswagen Knock Sensor
The Volkswagen Knock Sensor protects all VW engines by detecting harmful vibrations from combustion and triggering immediate changes to the ignition process to ensure the power remains strong and the parts remain unharmed. Founded in 1937 with the dream of a people's car, the brand won the hearts of people worldwide with classics such as the Beetle and the Type 2. The brand still champions smart simplicity and rock-solid build quality with lively driving manners. Modern VW cars feature responsive TSI turbo engines, streamlined MQB architecture, and digital cockpits that put information clearly in the driver's line of sight while advanced park assist and intuitive MIB touchscreens provide added convenience for daily use. The brand is also forging ahead with the ID family of electric vehicles that is proving that it is committed to clean mobility without compromising that familiar mix of reliability and fun. Part of this forward-thinking line-up, the Knock Sensor is a silent bodyguard that listens thousands of times each second for the metallic ping of detonation that can result from low octane fuel, high heat, or heavy loads. When those sharp vibrations occur, it sends a signal to the control unit to back off timing just enough to prevent the knock, then allows the engine to edge forward again for maximum efficiency, which means drivers will enjoy smooth acceleration, better fuel economy, and longer-lasting engines across the entire VW family.
Buying OEM parts is a smart move to keep your long-term repair costs low. These components are built to last because VW uses such strict factory standards. At VWPartsGiant.com, it is easy to find genuine Volkswagen Knock Sensor at prices that actually beat the competition. You get a real manufacturer's warranty with every single part, so you know your purchase is safe. Plus, forget about return headaches since our policy is easy and worry-free. We ship your order fast, too. If you have questions, our team of parts experts is ready to help. Why wait? Start shopping now!
Volkswagen Knock Sensor Parts and Q&A
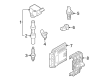
- Q: How can incorrectly tightening a knock sensor fastener affect its performance on Volkswagen Jetta?A:Poorly fitting a knock sensor fasteners may interfere with the functionality of the knock sensor. In case the battery is disconnected, it will be necessary to re-learn several systems until they will start to work properly. To do so, with 1.4L and 2.0L non-turbocharged engines, lift the front of the automobile and place it firmly on jackstands, and then remove the under-vehicle splash cover and the drivebelt. In 1.4L engines, get the air conditioning compressor bolts out and fix the compressor to the side. Find and unscrew the knock sensor electrical connector, pull the bolt off and unscrew the knock sensor off the block. Installation is the opposite of removing, and the knock sensor bolt should be tightened up to the torque. In 1.8L and 2.0L turbocharged engines, initial steps are the same, namely, disconnection of negative battery terminal and emptying of the cooling system. Disassemble the intake manifold and water pump, disconnect hoses and electrical connector to the Engine Temperature Control Actuator and disassemble the actuator. Disassembling The old O-rings should be discarded and the new ones installed and then the knock sensor harness connector should be disconnected, the knock sensor bolt removed and the knock sensor removed. Installation is in reverse of uninstalling and the knock sensor bolt is tightened to specifications. In the case of engines with 2.5L, the two knock sensors can be found beneath the exhaust manifold, and their electrical wires must be disconnected, the fasteners of the heat shield removed, and the screw fixing the knock sensor must be removed. Installation When fitting a knock sensor, the sensor mounting screw should be firmly screwed to its torque, and otherwise the installation process is the opposite of the removal process.
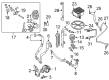
- Q: What are the functions and locations of knock sensors on Volkswagen Passat?A:The two knock sensors are fitted on all models. The knock sensors are on the left side of the engine block, directly below the intake manifold, with one knock sensor being on each side of the engine block (V6 models have a knock sensor on each side of the engine block, under the intake manifold). The knock sensor detects excessive vibration, including spark knock or ping, and the knock control system is designed to decrease spark knock during heavy detonation, and the engine is able to use maximum spark advance to give it better driveability. Knock sensors generate an AC response voltage based on the strength of the knock and the signal is diverted to the ECM which delays the timing in order to avoid detonation. In order to reach the knock sensor, take out the required parts, unplug the electrical connector, unscrew the bolt, and pull out the sensor of the engine block. Installation means the undoing of the process to remove it and tightening the knock sensor bolt to 15 ft-lbs (20Nm).


Related Volkswagen Parts
 Volkswagen MAP Sensor
 Volkswagen Starter
 Volkswagen Thermostat
 Volkswagen Distributor
 Volkswagen Coolant Pipe
 Volkswagen Axle Beam Mount
 Volkswagen Axle Shaft
 Volkswagen Canister Purge Valves
 Volkswagen Cooling Fan Shroud
 Volkswagen Crankshaft Seal
 Volkswagen Idler Pulley
 Volkswagen Intake Manifold Gasket
Browse by Model
Arteon Knock Sensor Beetle Knock Sensor Cabrio Knock Sensor CC Knock Sensor Corrado Knock Sensor Eos Knock Sensor EuroVan Knock Sensor Golf Knock Sensor Golf R Knock Sensor GTI Knock Sensor Jetta Knock Sensor Passat Knock Sensor Phaeton Knock Sensor Rabbit Knock Sensor Routan Knock Sensor Tiguan Knock Sensor Tiguan Limited Knock Sensor Touareg Knock Sensor