×
- Hello
- Login or Register
- Quick Links
- Live Chat
- Track Order
- Parts Availability
- RMA
- Help Center
- Contact Us
- Shop for
- Volkswagen Parts
My Garage
My Account
Cart
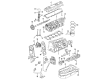
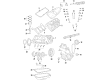
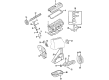
Genuine Volkswagen Piston
Engine Pistons- Select Vehicle by Model
- Select Vehicle by VIN
Select Vehicle by Model
orMake
Model
Year
Select Vehicle by VIN
For the most accurate results, select vehicle by your VIN (Vehicle Identification Number).
59 Pistons found

Volkswagen Piston Part Number: 025-107-111-AF-001
$86.08 MSRP: $120.57You Save: $34.49 (29%)Volkswagen Piston Part Number: 025-107-111-D-001
$86.08 MSRP: $120.57You Save: $34.49 (29%)
Volkswagen Piston Part Number: 05E-107-065-BC
$97.57 MSRP: $136.65You Save: $39.08 (29%)Ships in 1-2 Business Days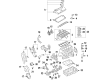
Volkswagen Piston Part Number: 03L-107-065-N-001
$168.55 MSRP: $236.07You Save: $67.52 (29%)Ships in 1-2 Business DaysVolkswagen Piston Part Number: 025-107-111-AF-003
$125.44 MSRP: $175.68You Save: $50.24 (29%)
Volkswagen Pistons Part Number: 037-107-065-M
$128.52 MSRP: $180.00You Save: $51.48 (29%)Product Specifications- Other Name: Piston
Volkswagen Piston Part Number: 06L-107-065-AN
$133.27 MSRP: $186.66You Save: $53.39 (29%)Ships in 1-2 Business Days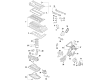
Volkswagen Piston Part Number: 07K-107-065-F
$167.78 MSRP: $234.98You Save: $67.20 (29%)Ships in 1-2 Business DaysProduct Specifications- Replaces: 07K-107-065-B
Volkswagen Pistons Part Number: 049-107-065-AD
$179.21 MSRP: $251.00You Save: $71.79 (29%)Product Specifications- Other Name: Piston
Volkswagen Pistons Part Number: 026-107-065-Q
$202.78 MSRP: $284.00You Save: $81.22 (29%)Product Specifications- Other Name: Piston
Volkswagen Piston Part Number: 06K-107-065-BS
$263.26 MSRP: $359.65You Save: $96.39 (27%)Ships in 1-2 Business Days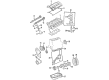
Volkswagen Piston Part Number: 068-107-071-AP
$206.99 MSRP: $289.90You Save: $82.91 (29%)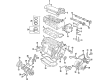
Volkswagen Piston Part Number: 071-107-065-C
$208.25 MSRP: $291.67You Save: $83.42 (29%)Ships in 1-2 Business DaysProduct Specifications- Replaces: 071-107-065-B
Volkswagen Pistons Part Number: 026-107-065-R
$214.20 MSRP: $300.00You Save: $85.80 (29%)Product Specifications- Other Name: Piston
Volkswagen Piston Part Number: 044-107-065-H
$214.20 MSRP: $300.00You Save: $85.80 (29%)Ships in 1-2 Business Days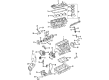
Volkswagen Pistons Part Number: 06A-107-065-F
$226.10 MSRP: $316.67You Save: $90.57 (29%)Ships in 1-2 Business DaysProduct Specifications- Other Name: Piston
Volkswagen Pistons Part Number: 06A-107-065-AE
$246.44 MSRP: $336.67You Save: $90.23 (27%)Ships in 1-2 Business DaysProduct Specifications- Other Name: Piston
Volkswagen Piston Part Number: 7B0-105-399
$251.17 MSRP: $343.14You Save: $91.97 (27%)Ships in 1-2 Business DaysProduct Specifications- Other Name: Connect Rod

Volkswagen Pistons Part Number: 027-107-065
$255.86 MSRP: $349.53You Save: $93.67 (27%)Product Specifications- Other Name: Piston
Volkswagen Pistons Part Number: 053-107-065-F
$255.86 MSRP: $349.53You Save: $93.67 (27%)Product Specifications- Other Name: Piston
| Page 1 of 3 |Next >
1-20 of 59 Results
Volkswagen Piston
The Volkswagen Piston is a weapon of the brand's well-earned reputation for lively and reliable performance as the Piston turns the fiery pressure of combustion into the smooth rotational power of every drive. From its 1937 inception in the brand's home of Wolfsburg, VW has concentrated on the development of workable cars for all, in the form of first the Beetle and then the adaptable Type 2 van. Modern VW vehicles add punchy TSI turbo engines, digital cockpits, park assist, and sleek MIB infotainment screens which make daily travel easy and fun. The scalable MQB platform reduces weight and cost, and electric ID models demonstrate how VW is pushing into a cleaner future without forgoing the solid feel and timeless styling fans trust. Every model is a combination of crisp handling and thoughtful technology so families, commuters, and adventurers all feel at home behind the wheel. Inside the engine block, the Piston moves along polished cylinders with its lightweight aluminum alloy body sealed by precision rings that contain the expanding gases for maximum thrust and channel them through the connecting rod to turn the crankshaft. Forged construction, internal cooling passages, and balanced skirts allow this component to withstand high turbo pressures, high revs, and long highway cruises alike, enhancing efficiency and durability throughout the entire lineup. Thanks to this hardy component, the engines provide smooth acceleration, steady torque, and the long life owners expect.
Buying OEM parts is a smart move to keep your long-term repair costs low. These components are built to last because VW uses such strict factory standards. At VWPartsGiant.com, it is easy to find genuine Volkswagen Piston at prices that actually beat the competition. You get a real manufacturer's warranty with every single part, so you know your purchase is safe. Plus, forget about return headaches since our policy is easy and worry-free. We ship your order fast, too. If you have questions, our team of parts experts is ready to help. Why wait? Start shopping now!
Volkswagen Piston Parts and Q&A
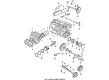
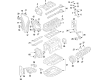
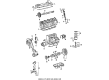
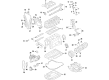
- Q: What steps should be taken before installing the piston and connecting rod assemblies on Volkswagen Passat?A:Prior to the installation of the piston and connecting rod assemblies, the walls of the cylinder should be clean, the top of each cylinder should be chamfered and the crankshaft installed. Take the cap off the number one connecting rod, being careful to record the marks made when doing so, and wipe the bearing surfaces with a lint-free cloth. Wipe the reverse of the new upper bearing insert, and insert it in the connecting rod, taking care to fit the tab in the recess without beating it in. Then do the upper bearing insert in the rod cap and the bottom bearing insert in the bottom tab. Four cylinder engines stagger the gaps between the piston rings and apply a hose over each connecting rod cap bolt. Wet the piston and rings using clean engine oil, put on a piston ring compressor, and using the skirt sticking out piston, place the piston in the cylinder. Turn the crankshaft to bring the number one connecting rod journal to the bottom dead center and wipe engine oil to the walls of the cylinder. Install piston/connecting rod assembly into the cylinder bore positioning the mark on the piston to the front of the engine and softly tapping the piston as the connecting rod is inserted into position. Once installed, verify the connecting rod bearing oil clearance with Plastigage, cleaning the bearing faces and placing a coating of grease on them uniformly before (re)connecting the rod cap and tightening the nuts or bolts to the final torque in steps. Proceed with the same procedure on the other assemblies, remembering to keep the bearsings and connection-rods clean, to use the right piston/rod-assembly, and to occasionally lubricate the boiler-walls and bearing-faces. Install all assemblies, then rotate the crankshaft to verify binding is clear and lastly verify the connecting rod endplay and compare it to the correct but in case of installation of new rods or a crankshaft, adjustments may be needed.
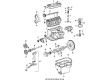
- Q: How should new piston rings be fitted to existing pistons on Volkswagen Transporter?A:Occasionally, new rings are put on the old pistons and in such cases, the pistons should be thoroughly inspected and the new ring gaps known in the cylinder bores. The new rings need to be installed on top of the piston crown with the bottom being the first ring. In the event that an appropriate ring expander tool is not available, clamp the ring ends apart to stretch it over the piston pushing it down over the grooves progressively with the help of a feeler gauge or shim steel. It is better not to bend the ring a lot, because it can easily break. These two rings vary, with the bottom one cut-away, and the top chamfered, each being labeled with the direction in which it should be used, the bottom ring being installed initially. New pistons being supplied to rebored cylinders have the rings pre-fitted, and these should have the right gaps, though the top ring in the bore should be checked. Once the little end bushes have been properly sized to fit the gudgeon pins, remove a single circlip on each piston and force out the gudgeon pin until the piston boss is clear to install the connecting rod. When the pins are tight, heat the pistons, but do not excessive heat them. Any connecting rod can have new pistons installed so that the one that has the flywheel written on it, or where there is an arrow, she points at the flywheel end. Replacement of gudgeon pin and circlip will be required and only the supplied circlips can be used. Once a piston has been fitted, be careful when turning the crankshaft the skirt of the piston will foul the bottom dead centre of the crankcase and see that the piston rings do not get trapped in anything to the point of breaking them.
Related Volkswagen Parts
 Volkswagen Thermostat
 Volkswagen Exhaust Clamp
 Volkswagen Door Lock
 Volkswagen EGR Cooler
 Volkswagen Exhaust Hanger
 Volkswagen Oil Pressure Switch
 Volkswagen Air Temperature Sensor
 Volkswagen Automatic Transmission Seal
 Volkswagen CV Joint Boot
 Volkswagen HVAC Heater Blend Door Actuator
 Volkswagen Rack & Pinion Bushing
 Volkswagen Starter Brush
Browse by Model
Arteon Piston Atlas Cross Sport Piston Atlas Piston Beetle Piston Cabrio Piston Cabriolet Piston CC Piston Corrado Piston EuroVan Piston Fox Piston Golf Alltrack Piston Golf Piston Golf R Piston Golf SportWagen Piston GTI Piston Jetta Piston Passat Piston Quantum Piston R32 Piston Rabbit Convertible Piston Rabbit Piston Routan Piston Scirocco Piston Taos Piston Tiguan Piston Touareg Piston Transporter Piston Vanagon Piston