×
- Hello
- Login or Register
- Quick Links
- Live Chat
- Track Order
- Parts Availability
- RMA
- Help Center
- Contact Us
- Shop for
- Volkswagen Parts
My Garage
My Account
Cart
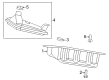
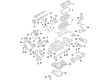
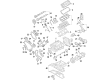
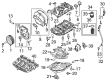
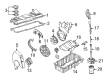
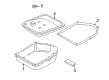
Genuine Volkswagen Oil Pan
Oil Drain Pan- Select Vehicle by Model
- Select Vehicle by VIN
Select Vehicle by Model
orMake
Model
Year
Select Vehicle by VIN
For the most accurate results, select vehicle by your VIN (Vehicle Identification Number).
90 Oil Pans found

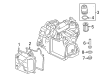
Volkswagen Transmission Pan Part Number: 7B0-321-359
$141.60 MSRP: $198.32You Save: $56.72 (29%)Ships in 1-2 Business DaysProduct Specifications- Other Name: Oil Sump

Volkswagen Oil Pan Part Number: 06K-103-603-CT
$93.91 MSRP: $131.53You Save: $37.62 (29%)Ships in 1-2 Business DaysProduct Specifications- Other Name: Oil Sump; Upper Oil Pan, Upper Pan

Volkswagen Transmission Pan Part Number: 02E-325-201-D
$109.47 MSRP: $153.31You Save: $43.84 (29%)Ships in 1-2 Business DaysProduct Specifications- Other Name: Cover; Side Cover


Volkswagen Oil Pan Part Number: 7B0-103-604-A
$170.16 MSRP: $238.32You Save: $68.16 (29%)Ships in 1-2 Business DaysProduct Specifications- Other Name: Oil Sump; Lower Oil Pan
- Replaces: 7B0-103-604


Volkswagen Oil Pan Part Number: 06B-103-601-CH
$114.24 MSRP: $160.00You Save: $45.76 (29%)Ships in 1-2 Business DaysProduct Specifications- Replaces: 06B-103-601-AR

Volkswagen Oil Pan Part Number: 035-103-601-D
$117.81 MSRP: $165.00You Save: $47.19 (29%)Product Specifications- Other Name: Oil Sump

Volkswagen Oil Pan Part Number: 07K-103-600-A
$130.70 MSRP: $183.05You Save: $52.35 (29%)Ships in 1-2 Business DaysProduct Specifications- Other Name: Oil Sump; Lower Oil Pan

Volkswagen Oil Pan Part Number: 021-103-598
$122.09 MSRP: $171.00You Save: $48.91 (29%)Product Specifications- Replaces: 021-103-601-D

Volkswagen Oil Pan Part Number: 078-103-604-AC
$149.94 MSRP: $210.00You Save: $60.06 (29%)Ships in 1-2 Business DaysProduct Specifications- Other Name: Oil Sump
- Replaces: 078-103-604-T


Volkswagen Transmission Pan Part Number: 01M-321-359
$150.18 MSRP: $210.34You Save: $60.16 (29%)Ships in 1-2 Business DaysProduct Specifications- Other Name: Oil Sump

Volkswagen Oil Pan Part Number: 058-103-598-E
$153.51 MSRP: $215.00You Save: $61.49 (29%)Ships in 1-2 Business DaysProduct Specifications- Replaces: 058-103-603-E

Volkswagen Oil Pan Part Number: 021-103-601-B
$155.89 MSRP: $218.33You Save: $62.44 (29%)Ships in 1-2 Business DaysProduct Specifications- Other Name: Oil Sump

Volkswagen Oil Pan Part Number: 059-103-602-AB
$174.49 MSRP: $244.37You Save: $69.88 (29%)Ships in 1-2 Business DaysProduct Specifications- Other Name: Oil Sump; Lower Oil Pan

Volkswagen Oil Pan Part Number: 059-103-602-F
$174.49 MSRP: $244.37You Save: $69.88 (29%)Ships in 1-2 Business DaysProduct Specifications- Other Name: Oil Sump; Lower Oil Pan

Volkswagen Oil Pan Part Number: 06J-103-600-AM
$177.11 MSRP: $248.05You Save: $70.94 (29%)Ships in 1-2 Business DaysProduct Specifications- Other Name: Oil Sump; Lower Oil Pan
- Replaces: 06K-103-603-DD, 06K-103-601

Volkswagen Oil Pan Part Number: 06A-103-601-M
$160.65 MSRP: $225.00You Save: $64.35 (29%)Ships in 1-2 Business DaysProduct Specifications- Replaces: 06A-103-603-HA

Volkswagen Oil Pan Part Number: 038-103-601-NA
$161.23 MSRP: $225.82You Save: $64.59 (29%)Ships in 1-2 Business Days
Volkswagen Oil Pan Part Number: 03G-103-601-M
$167.79 MSRP: $235.00You Save: $67.21 (29%)Ships in 1-2 Business DaysProduct Specifications- Other Name: Oil Sump

Volkswagen Transmission Pan Part Number: 01P-321-359
Product Specifications- Other Name: Oil Sump
Volkswagen Oil Pan Part Number: 022-103-601
| Page 1 of 5 |Next >
1-20 of 90 Results
Volkswagen Oil Pan
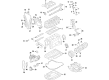
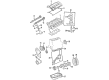
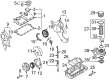
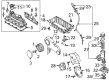
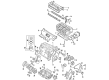
The Volkswagen Oil Pan functions as the reservoir for the engine and contains essential lubricants so that all the moving parts are protected constantly and the power transmission in the entire lineup gets smoothened. Since 1937, the brand has chased the ideal of a reliable people's car, and today, from the compact hatch to the updated models of the ID series, the models share clean styling, rock solid engineering, and smart technology like that of the digital cockpit, touchscreen MIB infotainment, and park assist that makes everyday driving simple and enjoyable. TSI turbo engines provide plenty of punch while remaining fuel efficient, and the flexible MQB platform keeps production lean so that customers enjoy consistent quality at fair prices. VW also pushes into electric mobility with ID.3 and ID.4 as proof of the brand's evolution without losing the friendly character first shown by the Beetle and the versatile Type 2 van. Just like the engines and electronics, the humble Oil Pan continues to play a critical role. Its tough metal case located low in the crankcase catches oil after it's been sucked through the bearings, pistons, and cams and then leads the oil pump to send that oil back up for another go-round. A tight gasket helps the pump avoid leaks that would starve it, and well-designed baffling helps limit slosh when handling sharp turns to keep VW vehicles maintaining oil pressure whether cruising highways or weaving city streets. Simple, durable, and easy to service, this component speaks to its commitment to dependable engineering.
Buying OEM parts is a smart move to keep your long-term repair costs low. These components are built to last because VW uses such strict factory standards. At VWPartsGiant.com, it is easy to find genuine Volkswagen Oil Pan at prices that actually beat the competition. You get a real manufacturer's warranty with every single part, so you know your purchase is safe. Plus, forget about return headaches since our policy is easy and worry-free. We ship your order fast, too. If you have questions, our team of parts experts is ready to help. Why wait? Start shopping now!
Volkswagen Oil Pan Parts and Q&A
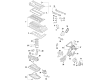
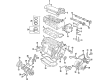
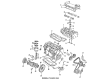
- Q: How to remove and install the lower and upper oil pans for Four-cylinder engines on Volkswagen Jetta?A:In order to pull out the lower oil pan, the parking brake must be engaged, the rear wheels blocked, and then the front of the vehicle raised and the weight firmly kept on jackstands. Beneath the vehicle, take away the splash cover beneath the engine and empty the engine oil. In the case of 1.4L models, unscrew electrical connector of the oil level thermal sensor, loosen the mounting nuts and take away the sensor, making sure replacing the seal with a new one. Un-bolt the oil pan in the reverse order of tighten-up order, and then loosen the lower oil pan with a special instrument or similar to dislodge the bond of the liquid gasket, and tap it with a mallet, should it be very tenacious. In the case of 2.0L engines, the oil pan can be taken apart, grabbing, all in one piece; loosen the oil pan bolts, disassemble the lower oil pan, and clean the sealing surfaces of any dried liquid sealant. With timing chain engines, unplug the electrical connector to the oil level thermal sensor, loosen the oil pan bolts in the reverse order of the tightening sequence and scrape the lower oil pan off the upper pan with a gasket scraper, tapping it with a screwdriver as necessary. Unfit the bolts of the oil baffle mounting and the oil baffle, and install a fresh one once the lower oil pan is taken out. In installing, make sure that the edge of the oil pan is on the flywheel side is at the same level with the cylinder block before the bolts are tightened. Set up a scraper, and use it to remove old sealant on the block and oil pan, clean mating surfaces and apply RTV sealant onto the oil pan-to-cylinder block mating surface. Inspect the threaded holes of the block to ensure that they are clean and examine the oil pan flange to determine whether it is distorted or not. Fit an oil baffle on timing chain models, put a bead of RTV sealant on the oil pan flange, in place the lower oil pan, and fit the mounting fasteners which are tightened in that order. The other steps of installation are the opposite of the removal. To drain the upper oil pan, dismount the engine oil and the oil filter and then dismount the lower splash shield and the lower oil pan. In 1.4L engines, omit the air conditioning compressor, and still leave the refrigerant lines attached, dismount the oil pump and transaxle-oil pan mounting bolts. In the reverse order of tightening, loosen the upper oil pan mounting bolts by working around the tightening order, then the upper oil pan and block should be separated carefully and the oil baffle should be cleaned where necessary. In all 2.0L engines, loosen up the transaxle to oil pan mounting bolts, splash wall mounting bolts, and pick-up tube mounting bolts, and then loosen the upper oil pan. In case of 1.8L and 2.0L engines, disconnect electrical connectors and take away different parts and then take out upper oil pan. When installing, make sure that you have the oil pan sitting flat against the cylinder block, eliminate old sealant, clean the surfaces and use RTV sealant. Install the oil pan at the top, ensure the fasteners are installed in order, take care of curing properly and aligning the sealant in place then add oil. Lastly, test the engine and oil pressure and leaks.
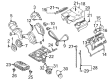
- Q: How to remove and install the lower oil pan while it remains for Five-cylinder engines on Volkswagen Rabbit?A:This engine has a two-part oil pan with the top part being able to be pulled off only when the engine is not in the vehicle thus the following process is aimed at pulling out the lower oil pan and installing it when the engine is still in the vehicle. You should start by parking the car with the parking brake on and the rear wheels blocked then raise up the front of the car and put jackstands under it to support it. Take off the splash shield underneath the vehicle, empty the engine oil and then take off the bottom oil pan that holds the fasteners in a diagonal order. When the oil pan is stuck, attach it with a mallet. To install, a scraper should be used to remove all the previous sealant grease on both the upper and lower oil pans and the mating surfaces should be cleaned with brake system cleaner and RTV sealant should be applied to the mating surface between the oil pans and the cylinder block. Wipe clean the threaded bolt holes in the block and check the flange of the oil pan to ensure it is not distorted, and so any nicks or burrs are removed. Use a 1/8-inch (3 mm) bead of RTV sealant over the oil pan flange, and place the bottom oil pan on the top one, by hand tightening the bolts before tightening them in a crisscross pattern to the recommended torque. Installation should be done in the opposite order of the removal, following the recommendations of the manufacturer of the sealant on the time that the sealant requires to cure before adding the oil. Lastly, start the engine and look after its oil pressure and leakages.


Related Volkswagen Parts
 Volkswagen Alternator
 Volkswagen Fuel Pressure Regulator
 Volkswagen Ball Joint
 Volkswagen Belt Tensioner
 Volkswagen Radiator Cap
 Volkswagen ABS Relay
 Volkswagen Alternator Bracket
 Volkswagen Belt Tensioner Bolt
 Volkswagen Differential Seal
 Volkswagen Exhaust Manifold Gasket
 Volkswagen Exhaust Nut
 Volkswagen Pressure Plate
Browse by Model
Arteon Oil Pan Atlas Cross Sport Oil Pan Atlas Oil Pan Beetle Oil Pan Cabrio Oil Pan Cabriolet Oil Pan CC Oil Pan Corrado Oil Pan Eos Oil Pan EuroVan Oil Pan Fox Oil Pan Golf Alltrack Oil Pan Golf Oil Pan Golf R Oil Pan Golf SportWagen Oil Pan GTI Oil Pan Jetta Oil Pan Passat Oil Pan Phaeton Oil Pan Quantum Oil Pan R32 Oil Pan Rabbit Oil Pan Routan Oil Pan Scirocco Oil Pan Taos Oil Pan Tiguan Limited Oil Pan Tiguan Oil Pan Touareg Oil Pan Vanagon Oil Pan